Please Note: This article is written for users of the following Microsoft Word versions: 2007, 2010, 2013, 2016, 2019, 2021, and Word in Microsoft 365. If you are using an earlier version (Word 2003 or earlier), this tip may not work for you. For a version of this tip written specifically for earlier versions of Word, click here: Vertical Alignment of an Inline Graphic.
Robert notes that when he places an inline graphic in his document that is taller than a single line of text, the text defaults to being aligned with the bottom of the graphic. He wonders if it is possible to change that so the text is either center- or top-aligned with the graphic.
The effect that Robert is noticing is the default behavior for inline graphics, although the cause he cites is backwards—it is actually the graphic that defaults to bottom alignment with the text, not the text with the graphic. So the solution involves adjusting the vertical positioning of the graphic.
Word treats inline graphics as a single character. You can change the vertical alignment of an inline graphic by treating it as you would any other single character with a vertical position you'd want to adjust. Follow these steps:
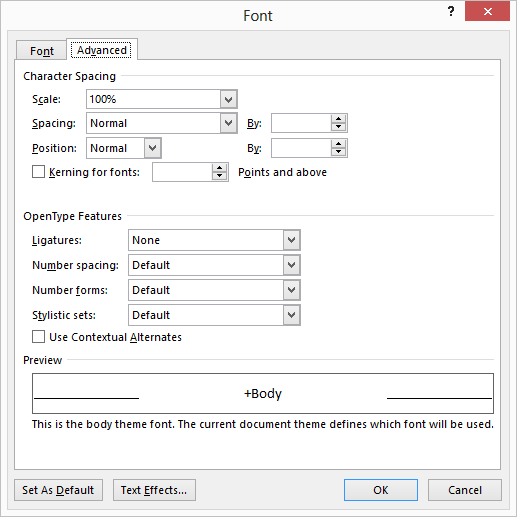
Figure 1. The Character Spacing tab of the Font dialog box.
You may need to play with the value entered in the By box (step 5) to get just the look you want. The value you use will depend on the size of the graphic whose position you are adjusting and the characteristics of the font used in the paragraph.
If Word won't display the Font dialog box (step 2), then there are two possible reasons. First, your graphic may not really be inline. In order to follow the rest of the steps, you'll need to convert it to an inline graphic, as described in other WordTips. The other possible cause is that some graphics cannot, for whatever reason, be positioned as described here. If that is the case, you'll need to change to one of the non-inline graphics options, set the wrapping, and adjust the vertical position manually. If you need to do this, you may find it easier to insert the graphic into a text box before doing your positioning.
WordTips is your source for cost-effective Microsoft Word training. (Microsoft Word is the most popular word processing software in the world.) This tip (9827) applies to Microsoft Word 2007, 2010, 2013, 2016, 2019, 2021, and Word in Microsoft 365. You can find a version of this tip for the older menu interface of Word here: Vertical Alignment of an Inline Graphic.

Do More in Less Time! An easy-to-understand guide to the more advanced features available in the Microsoft 365 version of Word. Enhance the quality of your documents and boost productivity in any field with this in-depth resource. Complete your Word-related tasks more efficiently as you unlock lesser-known tools and learn to quickly access the features you need. Check out Microsoft 365 Word For Professionals For Dummies today!
When you print a graphic that includes a gradient, you may not get exactly the output you expect. This tip examines two ...
Discover MoreDo you struggle with getting your graphics and surrounding text to appear just the way you want it? Here are some ...
Discover MoreWhen you insert an object into your document, it is anchored to a paragraph. If you want to change the paragraph to which ...
Discover MoreFREE SERVICE: Get tips like this every week in WordTips, a free productivity newsletter. Enter your address and click "Subscribe."
2024-05-24 09:48:28
Paul Stregevsky
If you rely on this feature often, make it a character style, such as "character_-3pt" for "move this character 3 points down." That way, you can apply it quickly. And if someone mucks with your paragraph style, your vertical offsets will be preserved.
2024-05-23 20:14:17
Sarah
THANK YOU!!!! Been needing this for YEARS!
Got a version of Word that uses the ribbon interface (Word 2007 or later)? This site is for you! If you use an earlier version of Word, visit our WordTips site focusing on the menu interface.
Visit the WordTips channel on YouTube

FREE SERVICE: Get tips like this every week in WordTips, a free productivity newsletter. Enter your address and click "Subscribe."
Copyright © 2026 Sharon Parq Associates, Inc.
 Please Note:
This article is written for users of the following Microsoft Word versions: 2007, 2010, 2013, 2016, 2019, 2021, and Word in Microsoft 365. If you are using an earlier version (Word 2003 or earlier), this tip may not work for you. For a version of this tip written specifically for earlier versions of Word, click here:
Please Note:
This article is written for users of the following Microsoft Word versions: 2007, 2010, 2013, 2016, 2019, 2021, and Word in Microsoft 365. If you are using an earlier version (Word 2003 or earlier), this tip may not work for you. For a version of this tip written specifically for earlier versions of Word, click here:
Comments