Please Note: This article is written for users of the following Microsoft Word versions: 2007, 2010, 2013, 2016, 2019, 2021, and Word in Microsoft 365. If you are using an earlier version (Word 2003 or earlier), this tip may not work for you. For a version of this tip written specifically for earlier versions of Word, click here: Default Picture Location.
Written by Allen Wyatt (last updated July 22, 2023)
This tip applies to Word 2007, 2010, 2013, 2016, 2019, 2021, and Word in Microsoft 365
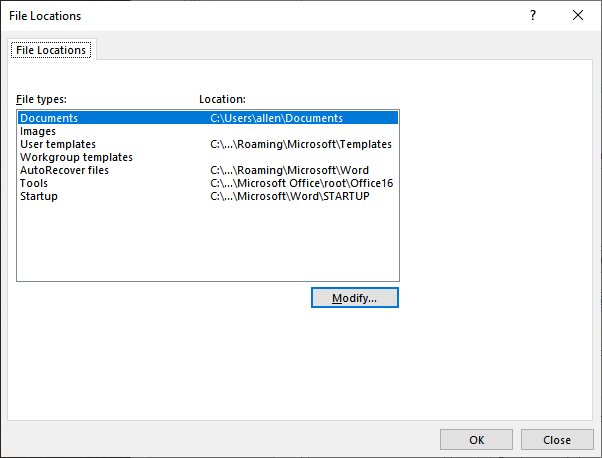
Word allows you to insert graphics (pictures) into your documents. You normally do this by using the Picture tool in the Illustrations group on the Insert tab of the ribbon. On my system, Word always defaults to the Pictures Library folder, although this may be different on your system. If you want Word to start in a different folder, you can specify the folder by following these steps:

Figure 1. The File Locations dialog box.
That's it. Now each time you use the Picture tool, Word displays the folder you selected in step 6.
It is unfortunate that Word doesn't have a "memory" concerning the graphics files directory, as it does for document directories. Word remembers the folder you last used for documents during the current Word session; it won't do that for graphics—it always starts from the folder you specified in step 6.
If you want Word to remember the last place you were each time you use the Picture tool in the current session, then you need to go back to not having a default picture location set. (I know; this seems very odd.) If you follow the steps above, but erase the Folder Name box in step 6, you will set the Clipart Pictures location to nothing—no location. Now, when you use the Picture tool, Word again starts at the Pictures Library (or whatever your system default is) but it remembers where you navigate. This means that during the current session, each time you insert a picture from a file Word will start at the folder from where you last inserted.
WordTips is your source for cost-effective Microsoft Word training. (Microsoft Word is the most popular word processing software in the world.) This tip (10173) applies to Microsoft Word 2007, 2010, 2013, 2016, 2019, 2021, and Word in Microsoft 365. You can find a version of this tip for the older menu interface of Word here: Default Picture Location.

Learning Made Easy! Quickly teach yourself how to format, publish, and share your content using Word 2021 or Microsoft 365. With Step by Step, you set the pace, building and practicing the skills you need, just when you need them! Check out Microsoft Word Step by Step today!
Two of the long-time features in Word are text boxes and WordArt. You might not think these two are related, but they are ...
Discover MoreInsert a graphic into a document and Word allows you to add a shadow behind the graphic. You can also adjust the ...
Discover MoreThe tools on the Review tab of the ribbon allow you to do all sorts of markup and comparisons of documents. When ...
Discover MoreFREE SERVICE: Get tips like this every week in WordTips, a free productivity newsletter. Enter your address and click "Subscribe."
There are currently no comments for this tip. (Be the first to leave your comment—just use the simple form above!)
Got a version of Word that uses the ribbon interface (Word 2007 or later)? This site is for you! If you use an earlier version of Word, visit our WordTips site focusing on the menu interface.
Visit the WordTips channel on YouTube
FREE SERVICE: Get tips like this every week in WordTips, a free productivity newsletter. Enter your address and click "Subscribe."
Copyright © 2026 Sharon Parq Associates, Inc.
Comments