The Word documents Ian works with often have images embedded. Ian wonders if there is a quick way to save these images as individual image files.
There are actually three easy ways to get those embedded images out of your documents, which I'll explain in a moment. First, though, understand that these approaches work ONLY for truly embedded images. If the images are actually shapes or SmartArt (created with the tools on the Insert tab of the ribbon), then these won't work; that is a topic for a different WordTip.
With that in mind, let's look at the three ways you can get those embedded images out of Word and into their own files.
The Manual Approach
This approach is generally useful if you want to extract the occasional image or two from a document. All you need to do is to right-click on the image and Word displays a Context menu with a variety of actions you can take. (See Figure 1.)
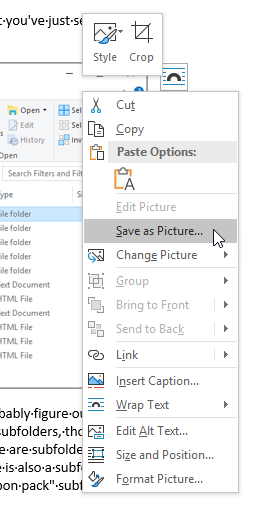
Figure 1. A typical Context menu when right-clicking on an embedded image.
The options available in the Context menu will vary from system to system. What you want to do is to look for an option named "Save as Image" or "Save as Picture." (The exact word seems to differ based on the version of Word you are using and the characteristics of the image.) When you choose the option, Word displays a Save As dialog box. (See Figure 2.)
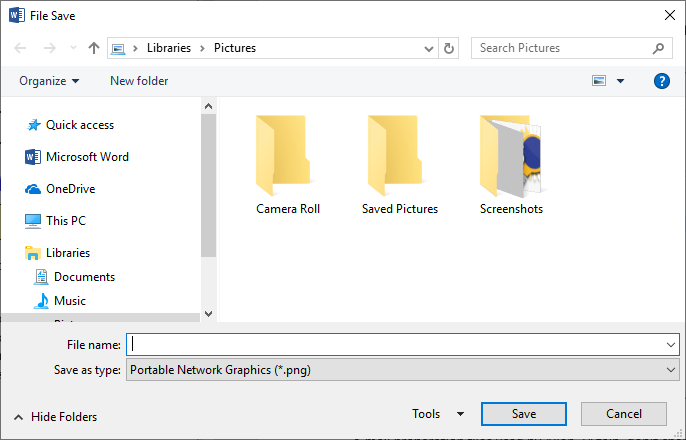
Figure 2. Saving an image.
Just use the controls in the dialog box to specify a name and location for the file you are extracting. You can also, if desired, use the Save As Type drop-down list to specify the format in which the image should be saved.
The HTML Approach
If you want to get all of the embedded images out of a document, a great way to do so is to save the document in HTML format. As part of exporting, Word saves the images in their own folder. Here are the steps to follow:
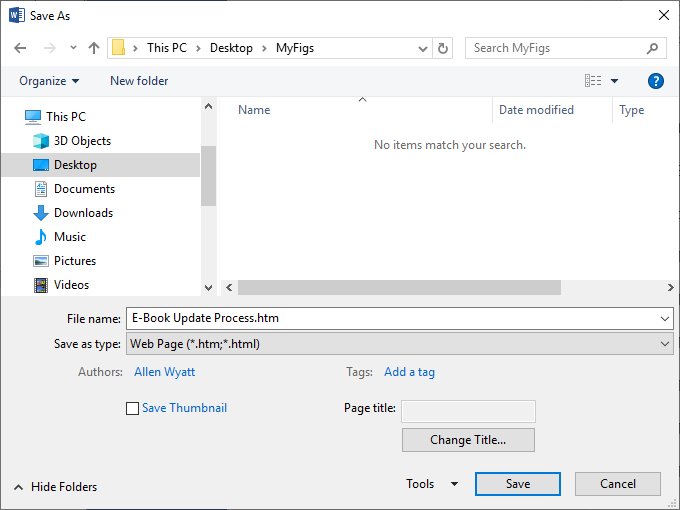
Figure 3. The Save As dialog box, ready to save as a Web page.
Now you can open the folder you created in step 1 and it should contain various subfolders. If your file was named MyDocument, you want to look for the folder named MyDocument_files. Open that, and the images are all there, mixed in with some other files. The odd numbered files (ending in 1, 3, 5, etc.) are the full-size images. The even-numbered files are the corresponding thumbnails. You can move the desired images (or copy them) to wherever you need.
The Direct Approach
This approach is somewhat similar to the previous approach, in that it allows you to get to your actual image files. This approach will work only with DOCX or DOCM files; it won't work with the older DOC files. All the steps are handled outside of Word, however, so get out of the program completely and follow these steps:
At this point you can double-click on the ZIP file and it should open and look just like any other folder on your system. Open the "word" folder (within the ZIP file) and then the "media" folder. You should then see all the image files in the document. (See Figure 4.)
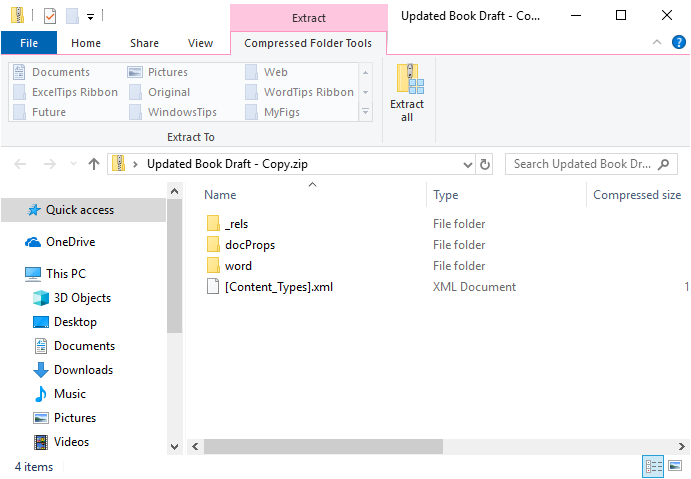
Figure 4. The images in the Media folder.
As with the HTML approach, you can now move or copy the files to wherever you need them. Unlike the HTML approach, however, there are no thumbnail files.
WordTips is your source for cost-effective Microsoft Word training. (Microsoft Word is the most popular word processing software in the world.) This tip (3162) applies to Microsoft Word 2007, 2010, 2013, 2016, 2019, and 2021.

Create Custom Apps with VBA! Discover how to extend the capabilities of Office 365 applications with VBA programming. Written in clear terms and understandable language, the book includes systematic tutorials and contains both intermediate and advanced content for experienced VB developers. Designed to be comprehensive, the book addresses not just one Office application, but the entire Office suite. Check out Mastering VBA for Microsoft Office 365 today!
Word allows you to easily add pictures to your document. When you do, the size of your document can quickly become quite ...
Discover MoreWord cand other Office applications are often provided with special add-ins that expand what you can do with the ...
Discover MorePictures and their titles go together like peanut butter and jelly. (Wow, did I just say that?) Seriously, pictures and ...
Discover MoreFREE SERVICE: Get tips like this every week in WordTips, a free productivity newsletter. Enter your address and click "Subscribe."
2021-04-16 09:52:48
Mike
Hello Allen,
Sorry, on reading your page in more detail I see that my question was answered. ". The odd numbered files (ending in 1, 3, 5, etc.) are the full-size images. The even-numbered files are the corresponding thumbnails."
Thanks,
Mike.
2021-04-15 15:08:50
Mike
Hello Allen, I am using the approach you described in order to get the formulas in a MS Word document saved as individual PNG files. For experimenting I created a document that contains 4 simple maths equations. I saved the original DOCX file as a web page. It works as expected except that 8 files are generated instead of 4. The first equation ends up as image001.png and is repeated as image002.png. Similarly for the other equations. Any ideas as to why this happens?
I've checked and can add some more info. The first image in each pair has a better resolution. When zooming, the 2nd in each pair gives a pixelated appearance sooner than the 1st in the pair. According to the properties of the files, the bit depth of the 1st in each pair is 24 but 8 for the 2nd in each pair. My question is more about why there are copies of the files generated rather than why they are different. Can you help with this?
Regards,
Mike
2020-05-24 05:16:27
Rense
Hi Allen,
Never mind (from my personal needs perspective) the comment post I sent you about half an hour ago.
I just found the Ivan Moala code here: https://www.mrexcel.com/board/threads/list-of-macro-shortcuts-in-worksheet.217431/.
So I'm helped, but maybe you'd like to have your page up to date anyway.
Cheers,
Got a version of Word that uses the ribbon interface (Word 2007 or later)? This site is for you! If you use an earlier version of Word, visit our WordTips site focusing on the menu interface.
Visit the WordTips channel on YouTube

FREE SERVICE: Get tips like this every week in WordTips, a free productivity newsletter. Enter your address and click "Subscribe."
Copyright © 2026 Sharon Parq Associates, Inc.
Comments