Please Note: This article is written for users of the following Microsoft Word versions: 2007, 2010, 2013, 2016, 2019, and 2021. If you are using an earlier version (Word 2003 or earlier), this tip may not work for you. For a version of this tip written specifically for earlier versions of Word, click here: Putting Your Index after Your Endnotes.
Written by Allen Wyatt (last updated November 17, 2022)
This tip applies to Word 2007, 2010, 2013, 2016, 2019, and 2021
When you start adding different elements to your documents, you may wonder how to order those elements. For instance, Word allows you to easily add elements such as tables of contents, other special tables, footnotes, endnotes, and indexes. If your document contains both endnotes and an index, you may wonder how you can place your index after your endnotes.
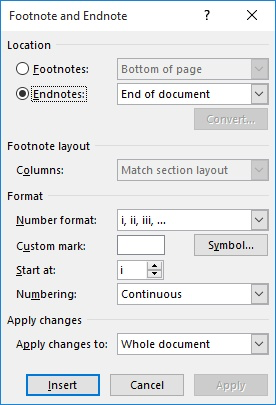
The reason for this confusion typically crops up because Word allows you to specify where your endnotes are placed—at the end of a section or the end of the document. You obviously don't want the endnotes at the end of your document if you want your index to appear after the endnotes. So, the solution is to add a "next page" section break after the end of your document's body and just before the index. Your document should now contain two sections—one for the body of the document and one for the index. So, in the main body of the document format your endnotes so that they appear at the end of the section. You can do that by following these steps:

Figure 1. The Footnote and Endnote dialog box.
Word then automatically places the endnotes before your index, just as you want.
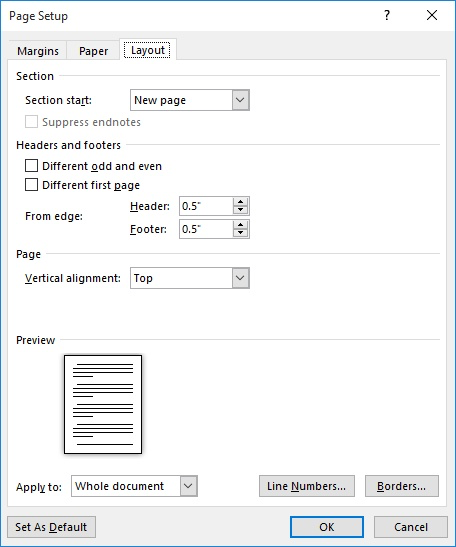
Of course, if you are already using multiple sections in your document, then this simple approach won't work as you expect. You can still place your endnotes where you want, however:

Figure 2. The Layout tab of the Page Setup dialog box.
Now Word suppresses the endnotes for all the sections except the one you specified (in steps 16 and 21), so all your endnotes appear there—just before your index.
WordTips is your source for cost-effective Microsoft Word training. (Microsoft Word is the most popular word processing software in the world.) This tip (7912) applies to Microsoft Word 2007, 2010, 2013, 2016, 2019, and 2021. You can find a version of this tip for the older menu interface of Word here: Putting Your Index after Your Endnotes.

Do More in Less Time! An easy-to-understand guide to the more advanced features available in the Microsoft 365 version of Word. Enhance the quality of your documents and boost productivity in any field with this in-depth resource. Complete your Word-related tasks more efficiently as you unlock lesser-known tools and learn to quickly access the features you need. Check out Microsoft 365 Word For Professionals For Dummies today!
In a document that contains both footnotes and endnotes, you may want to convert your endnotes to footnotes. This tip ...
Discover MoreEndnotes normally appear as superscripted characters followed by a space and the endnote text. In this tip you'll find ...
Discover MoreEndnotes are a beneficial necessity for some documents. If you want to print a copy of the document without endnotes, ...
Discover MoreFREE SERVICE: Get tips like this every week in WordTips, a free productivity newsletter. Enter your address and click "Subscribe."
2025-01-16 18:37:43
Linda
My apologies. I tried again and it worked perfectly.
In case this one difference helps someone else:
On step 14 I clicked ‘this section’ not ‘whole document’.
2025-01-16 18:23:15
Linda
Hello Allen
I thought I’d hit the jackpot when I found your very clear guidelines but unfortunately they do not work for a common situation editors like me face. (I use Word 365 on a Mac and have worked out how to follow your instructions though the pathways may be a bit different.)
I am editing and styling a book with dozens of chapters that are each separate sections. This is because endnotes for each chapter start at number 1 (ie they not continuous within the book, only within the chapter). All endnotes are published at the end in the sequence of chapters, with chapter headings inserted above each set, eg. Chapter A, notes 1, 2, 3, Chapter B, 1, 2, 3, 4, 5; Chapter C, notes 1, 2; etc. This is a common style for the type of publication I work on. I wish to add end matter after all these notes but can’t work out how to.
I would really appreciate any instructions on how to achieve this.
2023-09-20 17:36:16
I"m using multiple sections. The second method does not work for multiple reasons: (1) there is no small icon at the bottom-right of the Footnotes group (step 3); there is no Page Layout tab (Step 10); there is no Page Setup group (Step 11); there is no Suppress Endnotes check box (step 13). I'm using WORD 365 on an Apple computer.
2023-04-14 11:37:04
Alan Wilcox
Allen,
re: a possible unintended side effect of this solution
Thank you for once again solving a difficult problem for this Word user. Your description and instructions, as always, are easy to follow and yielded the results I was after.
However, I may have to go back to the original format of making the endnotes the last section in the document. Otherwise, when I convert the Word doc to Adobe pdf, the click-through links for the endnotes appear to be fouled up if the endnotes are not the last section in the document. The links work, but don't go to the correct endnote/location.
I will do some more experimenting and testing, but it appears that Adobe wants the endnotes to be the last section. With 700 endnotes in the document, it is important to me that click links are available... so I will probably be forced to place the index before the endnotes (not my first choice).
alan
2022-05-29 09:21:35
Tom
Thank you!! This seems to solve a very difficult problem since I have Word endnotes, references in Endnote software and and index. Few other Word help websites are as effective and clear.
++++
I spoke too soon. The index is now after the Word endnotes, but the references generate by Endnote software come before the Word endnotes.
2022-05-29 09:19:24
Tom
Thank you!! This seems to solve a very difficult problem since I have Word endnotes, references in Endnote software and and index. Few other Word help websites are as effective and clear.
Got a version of Word that uses the ribbon interface (Word 2007 or later)? This site is for you! If you use an earlier version of Word, visit our WordTips site focusing on the menu interface.
Visit the WordTips channel on YouTube
FREE SERVICE: Get tips like this every week in WordTips, a free productivity newsletter. Enter your address and click "Subscribe."
Copyright © 2026 Sharon Parq Associates, Inc.
Comments