The ribbon-based interface is made up of different tabs, each of which contains a collection of related tools. The tabs that are visible often depend on what you are doing in Word at the moment.
One tab that is especially necessary for advanced users is the Developer tab. This tab contains a variety of tools that allow you to "develop" and customize Word. Of particular importance is the fact that the Developer tab contains tools that allow you to create and access macros.
The Developer tab is not contextual in nature; it should always be visible on the ribbon. If it is not visible, that means you have not configured Word to display it. To display the tab, follow these steps if you are using Word 2010 or a later version:
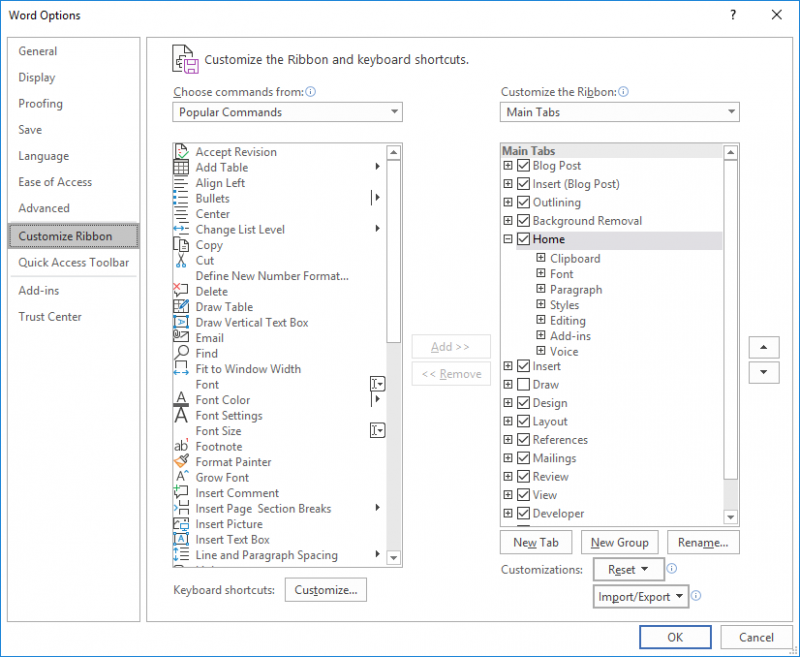
Figure 1. The Customize Ribbon options of the Word Options dialog box.
Follow these steps in Word 2007:
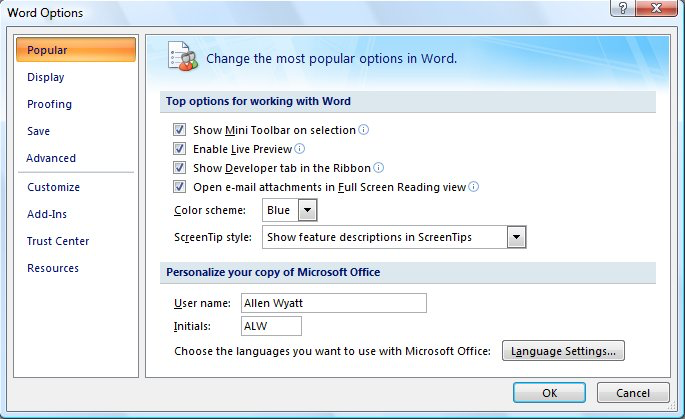
Figure 2. The Popular options of the Word Options dialog box.
The developer tab should now be visible on the ribbon.
Note:
WordTips is your source for cost-effective Microsoft Word training. (Microsoft Word is the most popular word processing software in the world.) This tip (6746) applies to Microsoft Word 2007, 2010, 2013, 2016, 2019, and 2021.

Create Custom Apps with VBA! Discover how to extend the capabilities of Office 365 applications with VBA programming. Written in clear terms and understandable language, the book includes systematic tutorials and contains both intermediate and advanced content for experienced VB developers. Designed to be comprehensive, the book addresses not just one Office application, but the entire Office suite. Check out Mastering VBA for Microsoft Office 365 today!
When looking at your document in Draft view, you may want Word to use a larger font than what it normally does. Here's ...
Discover MoreIf you want to reset everything in your Word installation, it can be done by simply making a few deletions. This tip ...
Discover MoreDo Word's attempts to be helpful drive you nuts? Here's a way that you can turn off at least some of the helpfulness.
Discover MoreFREE SERVICE: Get tips like this every week in WordTips, a free productivity newsletter. Enter your address and click "Subscribe."
2021-12-30 08:48:38
Henk
In Word365:
Options, Quick Access Toolbar (left frame), Choose commands from "Developer tab" (2nd frame), select Code, View Macros and Visual Basic Editor.
2020-05-07 05:48:38
Rod
Thanks! it really helped
2020-04-10 09:34:21
Hadassa M. Sylvestre
Hi! I just want to thank you very much for these tips for Word users, it's the second time I came here this week, and it's always very helpful =)
Got a version of Word that uses the ribbon interface (Word 2007 or later)? This site is for you! If you use an earlier version of Word, visit our WordTips site focusing on the menu interface.
Visit the WordTips channel on YouTube

FREE SERVICE: Get tips like this every week in WordTips, a free productivity newsletter. Enter your address and click "Subscribe."
Copyright © 2026 Sharon Parq Associates, Inc.
Comments