Written by Allen Wyatt (last updated December 14, 2024)
This tip applies to Word 2007, 2010, 2013, 2016, 2019, 2021, and Word in Microsoft 365
Mary has a ten-page document that she needs to print and distribute to co-workers. When she prints the document, however, Word leaves out some words and, in some cases, entire paragraphs. What she ends up with is eight printed pages instead of the expected ten. Mary wonders what could be causing this issue and how she can fix it.
The root of a problem such as this could like either with your printer or with the document itself. The easiest way to figure out if it is your printer is to either print to a different printer or, easier still, to a PDF file. (You can print to a PDF by pressing Ctrl+P and, using the Printer drop-down list, choose Microsoft Print to PDF.)
Once you have the PDF or the printout from the different printer, examine it to see if it has the same problems you were experiencing on your own printer. If you get the full output you expected, then the problem is with your printer or with some setting in your printer. Check to make sure you have the latest printer driver installed (you can get the latest from the printer's manufacturer), and then check all the settings available within that printer driver.
If the output in the PDF file or from the other printer exhibits the same problems you are seeing through your printer, then you can safely assume that the problem is with the document you are using.
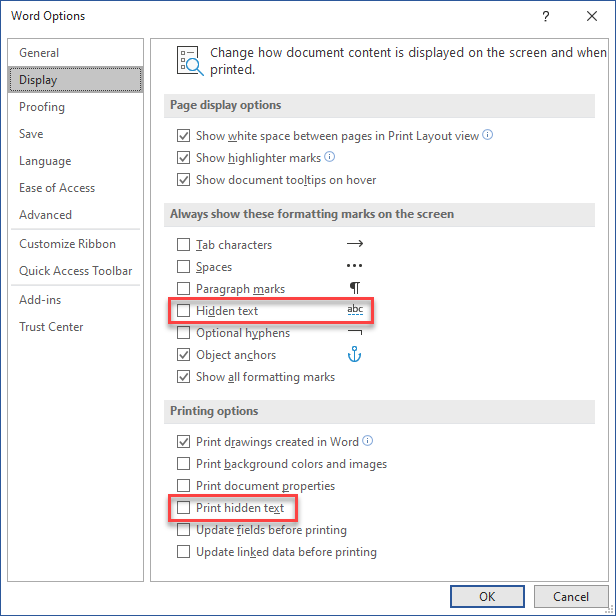
The first thing to determine is if there is any text in your document that is formatted as hidden. Text, in Word, can be formatted as hidden in the same way that you might format it to be bold or italic. To make matters just a bit confusing, you can independently control whether hidden text should be displayed or printed. In Mary's case, this could mean that hidden text is displayed, so she sees the document has ten pages, but not printed, so only eight pages comes out of the printer.
You can use Find and Replace to locate hidden text in your document, just as you would if you were searching for any other font-related attribute. If you want to check the settings related to hidden text, then follow these steps:

Figure 1. The Display options of the Word Options dialog box.
If the Print Hidden Text check box had been cleared (step 4), then Mary should be able to print and will find that the printout matches what she expects.
If your document still isn't printing as you expect, check other document formatting settings, such as paper size or page orientation. If these are not set correctly, of if they are incompatible with the capabilities of your printer, you may have problems getting the right number of pages printed. The likelihood of this being Mary's problem, however, is low, as she indicates that she is seeing not just parts of pages missing, but single words missing here and there.
Another potential issue is that the document has, for some reason, become corrupted. If you suspect that the document is corrupted, then you can try fixing it in this manner:
Understand that copying from the potentially corrupted document to the new document in this manner just copies the text and objects in the document. It doesn't copy things like macros, but that may not be that big of an issue because it could be the macros that are messing with your printout.
At this point, the new document should still be open on your screen. Try to print the document and see if this fixes the issue. If it does not, you may need to reinstall or repair your Word installation. You can do that by following the instructions on this page:
https://support.microsoft.com/en-us/office/repair-an-office-application-7821d4b6-7c1d-4205-aa0e-a6b40c5bb88b
WordTips is your source for cost-effective Microsoft Word training. (Microsoft Word is the most popular word processing software in the world.) This tip (13944) applies to Microsoft Word 2007, 2010, 2013, 2016, 2019, 2021, and Word in Microsoft 365.

Create Custom Apps with VBA! Discover how to extend the capabilities of Office 365 applications with VBA programming. Written in clear terms and understandable language, the book includes systematic tutorials and contains both intermediate and advanced content for experienced VB developers. Designed to be comprehensive, the book addresses not just one Office application, but the entire Office suite. Check out Mastering VBA for Microsoft Office 365 today!
Word allows you to print in every color of the rainbow, but not in white. (Bad comparison; white is not a color of the ...
Discover MoreIt can be frustrating when a single-page document actually prints of two pages, depending on the system that is doing the ...
Discover MoreHow accurate is your printer when it comes to placing information on the printed page? The simple technique described in ...
Discover MoreFREE SERVICE: Get tips like this every week in WordTips, a free productivity newsletter. Enter your address and click "Subscribe."
There are currently no comments for this tip. (Be the first to leave your comment—just use the simple form above!)
Got a version of Word that uses the ribbon interface (Word 2007 or later)? This site is for you! If you use an earlier version of Word, visit our WordTips site focusing on the menu interface.
Visit the WordTips channel on YouTube
FREE SERVICE: Get tips like this every week in WordTips, a free productivity newsletter. Enter your address and click "Subscribe."
Copyright © 2026 Sharon Parq Associates, Inc.
Comments