When typing in a document, Drew can type three dashes and when he presses Enter, Word converts the dashes to a full-width line. He wonders how he can do this within a macro.
The feature in Word that results in converting three dashes into a full-width line is AutoFormatting. It is just one of the things that goes on in the background as you type—Word is continually analyzing the characters you enter and the actions you take, and then "helping you out" by doing the conversion automatically. In this case, you just need to—on a new line—type three dashes and press the Enter key. The conversion to a full-width line is immediately done.
How AutoFormat does this is actually a bit interesting. You might think that you could record a macro to see what AutoFormat does, but you cannot. When you turn on the Macro Recorder, type three dashes, and press Enter, AutoFormat does absolutely nothing—the dashes remain and no line appears.
So, it is helpful to use a different detective method to figure out what is going on. What I did was to open a brand-new document and make sure that non-printing characters were displayed. (This is necessary so you can see where paragraph marks—hard returns—are within the document.) I then typed some numbers so I could reference the paragraphs, but I made sure there was an "empty" paragraph in the middle. (See Figure 1.)
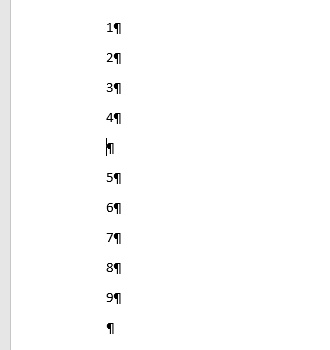
Figure 1. Setting up for the AutoFormat test.
The empty paragraph (between paragraphs 4 and 5) is where I'm going to type the three dashes to test out AutoFormat. When I type them and then press Enter, the result is an underline on paragraph 4. (See Figure 2.)
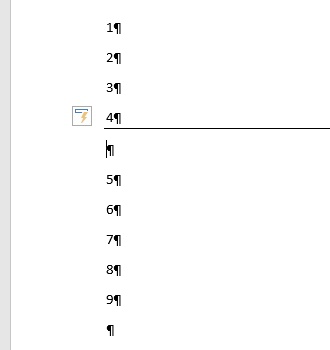
Figure 2. An underline added by AutoFormat.
You can tell that the underline is on paragraph 4 by putting the insertion point on that line and displaying the Borders and Shading dialog box. When you display the dialog box with the insertion point on any other line, there is no border—it is only on paragraph 4.
I then added an empty paragraph between paragraphs 7 and 8 in order to see what AutoFormat does when I type three underscores and press Enter. When I did this, the exact same thing happened as noted earlier. The only difference was that the border added to paragraph 7 was of a heavier weight (it was thicker) then the border added to paragraph 4. (See Figure 3.)
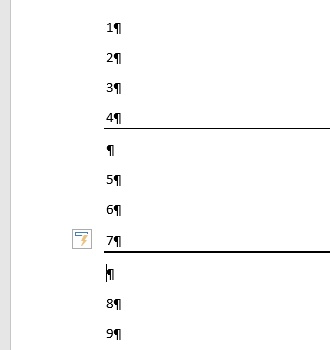
Figure 3. An underline added by typing three underscores.
Thus, typing three dashes and three underscores results in a border added to the previous paragraph (after the paragraph with the dashes or underscores is deleted), with the only difference being the weight of the underscore. Further, if you look closely at the Borders and Shading dialog box in the above instances, you'll notice that when you type three dashes, AutoFormat uses a border width of 0.75 points and if you type three underscores it uses a border width of 1.50 points.
Replicating this behavior in a macro is relatively easy. You don't need to actually add three dashes or underscores and then delete them and their paragraph; that would be superfluous. Instead, the macro can simply move to the previous paragraph and set the bottom border for that paragraph.
Sub BottomBorder()
    Selection.MoveUp Unit:=wdParagraph, Count:=1
    With Selection.Borders(wdBorderBottom)
        .LineStyle = wdLineStyleSingle
        .LineWidth = wdLineWidth075pt
        .Color = wdColorAutomatic
    End With
End Sub
If you want to mimic AutoFormat's behavior when you type three underscores and press Enter, all you need to do is change the wdLineWidth075pt enumeration in the above macro to wdLineWidth150pt.
WordTips is your source for cost-effective Microsoft Word training. (Microsoft Word is the most popular word processing software in the world.) This tip (13537) applies to Microsoft Word 2007, 2010, 2013, 2016, 2019, 2021, 2024, and Word in Microsoft 365.

Learning Made Easy! Quickly teach yourself how to format, publish, and share your content using Word 2021 or Microsoft 365. With Step by Step, you set the pace, building and practicing the skills you need, just when you need them! Check out Microsoft Word Step by Step today!
Want to know the absolute value of a number? It's easy to derive in VBA by using the Abs function.
Discover MoreIf you are applying formatting from within a macro, you may want to change the alignment of various paragraphs. Here's ...
Discover MoreThe entire purpose of macros is to allow you to automate repetitive or tedious tasks with relative ease. How easy the ...
Discover MoreFREE SERVICE: Get tips like this every week in WordTips, a free productivity newsletter. Enter your address and click "Subscribe."
There are currently no comments for this tip. (Be the first to leave your comment—just use the simple form above!)
Got a version of Word that uses the ribbon interface (Word 2007 or later)? This site is for you! If you use an earlier version of Word, visit our WordTips site focusing on the menu interface.
Visit the WordTips channel on YouTube

FREE SERVICE: Get tips like this every week in WordTips, a free productivity newsletter. Enter your address and click "Subscribe."
Copyright © 2026 Sharon Parq Associates, Inc.
Comments