Michael wonders how he can center a picture or graphic in a table cell, both vertically and horizontally, and have it stay centered if the cell changes size. He has tried several methods proposed by various websites and forums, but they have all either not worked or been too cumbersome to use.
Before figuring out how to center your image in a table cell, you must understand that there are two ways that graphics can be inserted in a Word document: floating or inline. The format used by Word depends on what you are inserting. If you insert a graphic, it is inline by default. If you insert a shape, it is floating by default. When putting a graphic in a table cell, you'll never be able to really get it right (and keep it right) if the graphic is floating. You need to make sure it is inline. An inline graphic is pulled off of the graphic "layer" and placed in line with the text that surrounds it. It is, essentially, treated like any other textual character.
So, to put your graphic in the table cell, you need to click within that table cell. I find it very helpful to turn on the display of non-printing characters while doing this. (Click the Show/Hide tool in the Paragraph group on the Home tab of the ribbon.) With non-printing characters displayed, you can easily tell if there are any extraneous characters in the table cell. The only thing you want in the cell is the end-of-cell marker, which looks like a small circle with four little "tails" attached to it. If you have other text in the cell (in addition to graphic you want there), it will throw off your centering efforts.
Make sure the insertion point is just in front of the end-of-cell marker, and then insert the picture. You can make sure the graphic is inline (instead of floating) by right-clicking the just-inserted graphic to display a Context menu. Choose, from the menu, the Wrap Text option and then In Line with Text.
Now do a bit of resizing. Both your graphic and your table cell need to be sized so that the graphic fits fully inside the cell.
Now take care of your alignment by displaying the Layout tab of the ribbon. (This tab is visible when you are working inside of a table.) With the graphic selected or the insertion point otherwise located within the cell that contains the graphic, click the Align Center tool, which is in the Alignment group.
If you hover the mouse pointer over the Align Center tool, you see a ToolTip appear that explains that the tool centers text both horizontally and vertically within the cell. The graphic is centered because you made it inline, which means it is treated as your text is treated. The graphic should now remain centered—both horizontally and vertically—even if you resize the graphic or the cell containing the graphic.
There are a few caveats to this, and they have to do with how Word formats paragraphs. When you click the Align Center tool, Word automatically changes the paragraph alignment for the cell. (You can verify this by looking at the Home tab of the ribbon, where you'll see that the alignment indicated in the Paragraph group is changed to Center.) What it doesn't change, however, are other formatting settings such as indentation and spacing.
To correct this, display the Paragraph dialog box. With the insertion point still in the cell containing the graphic, display the Home tab of the ribbon and click the small icon at the lower-right corner of the Paragraph group. (See Figure 1.)
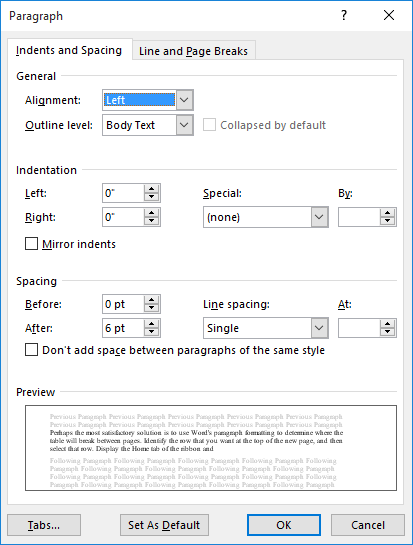
Figure 1. The Paragraph dialog box.
Set the Left, Right, Before, and After controls to 0. Set the Special drop-down list to None and the Line Spacing drop-down list to Single. Click on OK to apply the settings.
In addition, the table settings can affect how a graphic is centered in the cell. Again, display the Layout tab of the ribbon and click the Cell Margins tool (in the Alignment group). Word displays the Table Options dialog box. (See Figure 2.)
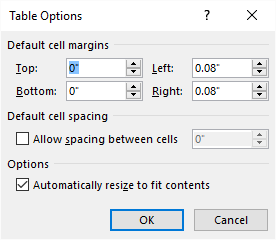
Figure 2. The Table Options dialog box.
Set the Top, Bottom, Left, and Right controls to 0 and feel free to clear the Automatically Resize to Fit Contents check box. Click OK, and these formatting settings are applied. Your graphic should now be exactly centered in the cell.
Finally, you should understand that the nature of your graphic itself can affect how centered it appears in your table cell. Some graphics have a transparency characteristic, which means that you can "see through" a portion of the graphic. If yours does, it may appear off-center when it really isn't. If you click once on your graphic, Word displays a thin-lined box around the graphic. It is this box, which is actually centered, as it represents the boundaries of the graphic as understood by Word.
WordTips is your source for cost-effective Microsoft Word training. (Microsoft Word is the most popular word processing software in the world.) This tip (13114) applies to Microsoft Word 2007, 2010, 2013, 2016, 2019, and 2021.

Create Custom Apps with VBA! Discover how to extend the capabilities of Office 365 applications with VBA programming. Written in clear terms and understandable language, the book includes systematic tutorials and contains both intermediate and advanced content for experienced VB developers. Designed to be comprehensive, the book addresses not just one Office application, but the entire Office suite. Check out Mastering VBA for Microsoft Office 365 today!
Navigating the perplexing world of accessibility requirements can be confusing. This tip provides some guidance on how to ...
Discover MorePut a caption with a picture and you'd probably like the two elements to behave like they belong together. If you are ...
Discover MoreWhat are you to do if you can't see all the pictures you know are in your document? The answer may lie in where those ...
Discover MoreFREE SERVICE: Get tips like this every week in WordTips, a free productivity newsletter. Enter your address and click "Subscribe."
2023-04-23 08:10:27
Tomek
@Kees Booij
Was your tab decimal?
If you have a single decimal tab in a cell Word will try to decimal align whatever you type into a cell. You will not need to enter a tab character to decimal align what you type in the cell, unlike in a regular paragraph.
2023-04-22 09:35:51
Kees Booij
Dear Allen,
Here is something really weird. I had a 3x4 table with 24 bitmaps in Word 2016. Content was aligned right, but I wanted align centered. I followed all instructions above, but it did not work. Clearing all tabs under paragraph properties AND following your instructions did the job (I had one tab stop at 16 cm). No idea why that worked, but it did.
Many thanks for all your advise on many Office features; always very helpful.
All the best,
Kees
Got a version of Word that uses the ribbon interface (Word 2007 or later)? This site is for you! If you use an earlier version of Word, visit our WordTips site focusing on the menu interface.
Visit the WordTips channel on YouTube

FREE SERVICE: Get tips like this every week in WordTips, a free productivity newsletter. Enter your address and click "Subscribe."
Copyright © 2026 Sharon Parq Associates, Inc.
Comments