Please Note: This article is written for users of the following Microsoft Word versions: 2007, 2010, 2013, 2016, 2019, and 2021. If you are using an earlier version (Word 2003 or earlier), this tip may not work for you. For a version of this tip written specifically for earlier versions of Word, click here: Hiding Gridlines.
You may not realize it when you first insert a table, but most versions of Word include non-printing gridlines around the table. You can't normally see the gridlines because they are obscured by the border that Word formats tables with by default. The purpose of gridlines is to mark the boundaries of the table and each cell in the table when you have the table formatted for no border. (See Figure 1.)
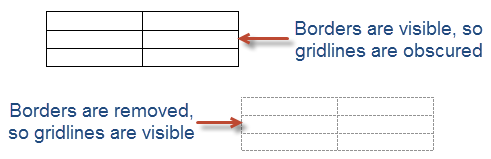
Figure 1. Gridlines are normally obscured by the table borders.
In Word 2007 and Word 2010 gridlines are turned off by default. In Word 2013 and later versions gridlines are turned on by default. You, of course, have complete control over whether gridlines are displayed or not, regardless of your version of Word.
You turn gridlines on or off by placing the insertion point within a table and then displaying the Layout tab of the ribbon. In the Table group click the View Gridlines tool. You can also control their display by displaying the Table Design tab of the ribbon, clicking the down-arrow under the Borders tool (in the Borders group) and then choosing View Gridlines.
The gridlines setting is not set on a per-table basis. In other words, if you turn the gridlines off anywhere in a document, it is turned off throughout the entire document.
WordTips is your source for cost-effective Microsoft Word training. (Microsoft Word is the most popular word processing software in the world.) This tip (13082) applies to Microsoft Word 2007, 2010, 2013, 2016, 2019, and 2021. You can find a version of this tip for the older menu interface of Word here: Hiding Gridlines.

Discover the Power of Microsoft Office This beginner-friendly guide reveals the expert tips and strategies you need to skyrocket your productivity and use Office 365 like a pro. Mastering software like Word, Excel, and PowerPoint is essential to be more efficient and advance your career. Simple lessons guide you through every step, providing the knowledge you need to get started. Check out Microsoft Office 365 For Beginners today!
Tables are often used to organize information into an understandable format. If your company requires that tables in ...
Discover MoreFor those times when you remove the borders from your tables, Word provides a way that you can display non-printing ...
Discover MoreInsert a picture into a table cell, and you may quickly find that the table is no longer the size you expected. Here's ...
Discover MoreFREE SERVICE: Get tips like this every week in WordTips, a free productivity newsletter. Enter your address and click "Subscribe."
There are currently no comments for this tip. (Be the first to leave your comment—just use the simple form above!)
Got a version of Word that uses the ribbon interface (Word 2007 or later)? This site is for you! If you use an earlier version of Word, visit our WordTips site focusing on the menu interface.
Visit the WordTips channel on YouTube

FREE SERVICE: Get tips like this every week in WordTips, a free productivity newsletter. Enter your address and click "Subscribe."
Copyright © 2026 Sharon Parq Associates, Inc.
 Please Note:
This article is written for users of the following Microsoft Word versions: 2007, 2010, 2013, 2016, 2019, and 2021. If you are using an earlier version (Word 2003 or earlier), this tip may not work for you. For a version of this tip written specifically for earlier versions of Word, click here:
Please Note:
This article is written for users of the following Microsoft Word versions: 2007, 2010, 2013, 2016, 2019, and 2021. If you are using an earlier version (Word 2003 or earlier), this tip may not work for you. For a version of this tip written specifically for earlier versions of Word, click here:
Comments