Please Note: This article is written for users of the following Microsoft Word versions: 2007, 2010, 2013, 2016, 2019, and 2021. If you are using an earlier version (Word 2003 or earlier), this tip may not work for you. For a version of this tip written specifically for earlier versions of Word, click here: Table Header Rows after a Manual Page Break.
Ed had his table set up the way he wanted, with a couple of rows repeated at the top of each page. He ran into a problem, however, when he inserted a manual page break in the middle of the table. When he did, the formerly repeating rows no longer repeated at the top of the table.
The reason for this is rather simple—when you insert a page break into a table you are, in reality, splitting the table into two separate tables. The rows that were repeating are no longer in the new table, but in the original table.
To get around this problem, don't insert a manual page break in the table to force a row to a new page. Instead, use this formatting approach:
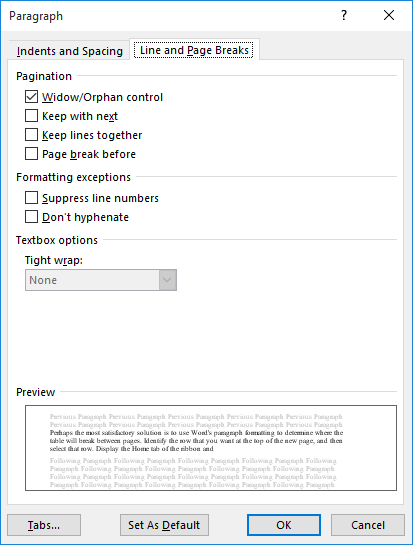
Figure 1. The Line and Page Breaks tab of the Paragraph dialog box.
Now the row will always start at the beginning of a new page, your table is not "broken" into two parts, and your desired rows will still repeat at the top of each page.
WordTips is your source for cost-effective Microsoft Word training. (Microsoft Word is the most popular word processing software in the world.) This tip (13094) applies to Microsoft Word 2007, 2010, 2013, 2016, 2019, and 2021. You can find a version of this tip for the older menu interface of Word here: Table Header Rows after a Manual Page Break.

The First and Last Word on Word! Bestselling For Dummies author Dan Gookin puts his usual fun and friendly candor back to work to show you how to navigate Word 2019. Spend more time working and less time trying to figure it all out! Check out Word 2019 For Dummies today!
Creating a table in Word is a relatively simple task. When you want to format or edit information in the table, often the ...
Discover MoreWhen you get information in your document "just right," you may want to make sure that others cannot change it. Here's a ...
Discover MoreIf you work with data imported from the Web or with documents prepared by others, you may have tables that have leading ...
Discover MoreFREE SERVICE: Get tips like this every week in WordTips, a free productivity newsletter. Enter your address and click "Subscribe."
2022-12-20 01:43:06
Michelle
THANK YOU!! I couldn't figure this out for the life of me, then I googled it and this popped up and saved me. It was EXACTLY what I was looking for!!
Got a version of Word that uses the ribbon interface (Word 2007 or later)? This site is for you! If you use an earlier version of Word, visit our WordTips site focusing on the menu interface.
Visit the WordTips channel on YouTube

FREE SERVICE: Get tips like this every week in WordTips, a free productivity newsletter. Enter your address and click "Subscribe."
Copyright © 2026 Sharon Parq Associates, Inc.
 Please Note:
This article is written for users of the following Microsoft Word versions: 2007, 2010, 2013, 2016, 2019, and 2021. If you are using an earlier version (Word 2003 or earlier), this tip may not work for you. For a version of this tip written specifically for earlier versions of Word, click here:
Please Note:
This article is written for users of the following Microsoft Word versions: 2007, 2010, 2013, 2016, 2019, and 2021. If you are using an earlier version (Word 2003 or earlier), this tip may not work for you. For a version of this tip written specifically for earlier versions of Word, click here:
Comments