Written by Allen Wyatt (last updated March 16, 2023)
This tip applies to Word 2007, 2010, 2013, 2016, 2019, and 2021
When Gina hovers the mouse over a style listed in the Styles task pane, Word shows her a synopsis of the formatting defined in the style. One of the things she often sees listed is "priority." Gina wonders what a style's priority means and how to go about changing it. She doesn't even know why she would want to change it.
Good question, Gina! The priority value assigned to a style has to do with how that style is ordered in styles shown in the Styles task pane and, to a lesser degree, in the Quick Styles Gallery on the Home tab of the ribbon. Let's take a look at how it works.
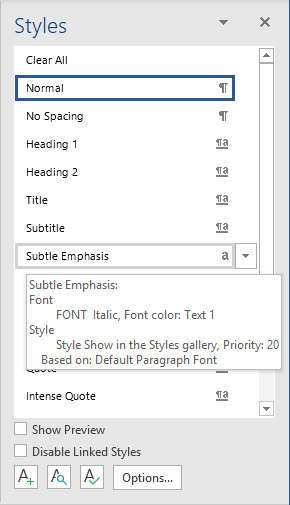
Start by displaying the Home tab of the ribbon and clicking the small icon in the lower-right corner of the Styles group. You should see the Styles task pane appear at the right side of the screen. If you hover the mouse pointer over a style, you should see some summary information about that style including, possibly, its priority. (See Figure 1.)

Figure 1. You may see a priority listed for a style in its summary.
I said "possibly" because not all styles show a priority. For instance, if a style has a priority of 1 (the highest priority), then the priority number is not shown in the summary. You can see this if you hover the mouse pointer over the Normal style; it does not display a priority in its summary.
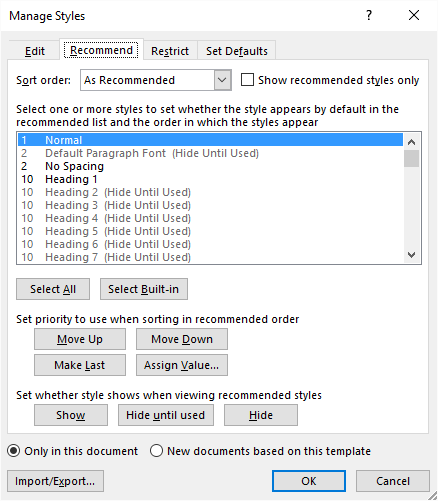
Now, click the Manage Styles icon at the bottom of the Styles task pane. (It is the icon immediately to the left of the Options button.) Word displays the Manage Styles dialog box. You want to make sure that the Recommend tab is displayed. (See Figure 2.)

Figure 2. The Recommend tab of the Manage Styles dialog box.
It is the controls within this tab of the dialog box that allow you to both set priority levels for styles and to control whether they are hidden or not. The list of styles shown in the dialog box is sorted based on priority level. You can use the controls just below the list to adjust the priority you assign to any style selected in the style list. The Move Up and Move Down buttons should be self-explanatory—they move whatever style you selected either up or down in the priority list. You can also choose Move Last, which moves a style to the very end of the list, or click Assign Value, which allows you to specify whatever value you want, from 1 (highest priority) to 100 (lowest priority).
Note, as well, the three hide-related buttons (Show, Hide Until Used, and Hide). These allow you to control whether a particular style is shown in the Styles task pane (or the Quick Styles Gallery) or not. This "hide setting" is independent of the priority you may assign to a style.
The built-in styles provided by Microsoft all have initial priority values assigned to them, but you can modify those values as you see fit. Again, the goal would be to specify the order in which you want styles to appear in the Styles task pane and the Quick Styles Gallery. When you create a custom style, it is automatically given a priority value of 1 by Word, but you can modify that value as you see fit after the style is created.
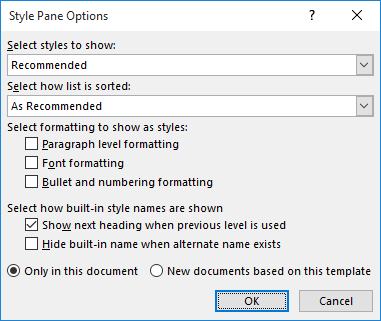
I need to also point out that how styles are displayed in the Styles task pane is also controlled in a different dialog box. Remember that the name of the tab we've been working with is "Recommend." This should give you a clue as to when the "hide settings" and the priority values come into play. Close the Manage Styles dialog box and then click the Options button at the bottom of the Styles task pane. This displays the Style Pane Options dialog box. (See Figure 3.)

Figure 3. The Style Pane Options dialog box.
Note the top two drop-down lists in the dialog box. The Select Styles to Show drop-down list should be set to Recommended. This causes the Styles task pane to only include those styles you marked as "Show" (not "Hide" or "Hide Until Used") on the Recommend tab of the Manage Styles dialog box.
The next drop-down list, Select How List is Sorted, specifies how you want the styles sorted in the Styles task pane. If you choose As Recommended, then the styles are sorted according to the priority assigned to each style.
Many people never bother with hiding styles or adjusting priority values, but if you spend some time doing so, you can make using styles easier than ever. Simply hide those you will never use and then adjust the priority values on the remaining styles. The only other alternative for making styles easier to use (and the one used by, perhaps, most people) is to display styles alphabetically, which makes Word ignore the priority value entirely. If you decide to go this route, simply use the Select How List is Sorted drop-down list in the Style Pane Options dialog box to choose Alphabetical.
WordTips is your source for cost-effective Microsoft Word training. (Microsoft Word is the most popular word processing software in the world.) This tip (13594) applies to Microsoft Word 2007, 2010, 2013, 2016, 2019, and 2021.

Learning Made Easy! Quickly teach yourself how to format, publish, and share your content using Word 2021 or Microsoft 365. With Step by Step, you set the pace, building and practicing the skills you need, just when you need them! Check out Microsoft Word Step by Step today!
When you apply styles to a paragraph, you may periodically see a message asking if you want to reapply the style or ...
Discover MoreStyles are very powerful, but they can be messed up if someone chooses to use direct formatting with document text. If ...
Discover MoreWord allows you to modify the language associated with the text in your document. How you modify the language can affect ...
Discover MoreFREE SERVICE: Get tips like this every week in WordTips, a free productivity newsletter. Enter your address and click "Subscribe."
2024-11-10 10:55:09
Frans
Yes, very helpful. Thank you very much. I had been struggeling with this for some time now. Styles are incredibily helpful when organising the editing and writing process but not exactly Microsofts forte.
2023-02-15 10:55:00
Per Wijk
Responding to my own question - it was possible to set the desired priority with a few lines of VBA:
With ActiveDocument.Styles("Table Grid")
.Priority = 100
End With
The greyed out button remains though.
2023-02-15 10:33:21
Per Wijk
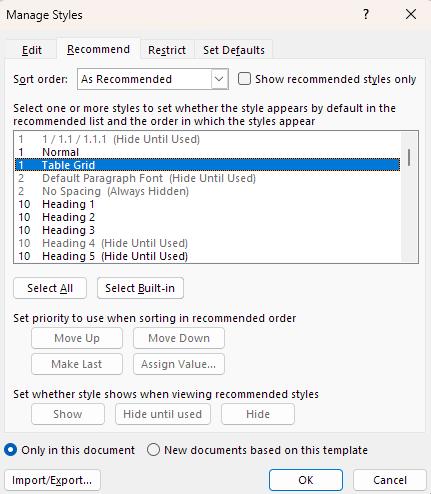
Hello, I was interesting in this topic but run into an unexpected problems. There are a couple of styles for which I cannot change the priority. In the Manage Style dialog, all the buttons below "Set priority to use when sorting in recommended order" are greyed out for 1 / 1.1 / 1.1.1 and Table Grid. Any suggestion on how to resolve this would be highly appreciated. Best regards, Per
(see Figure 1 below)

Figure 1.
2023-02-07 18:12:24
Paula
This does not explain why you are unable to change the level of some styles, such as custom tables.
2019-01-06 20:10:04
Brian L.
Good info! Also, if you want your Priority changes to "stick", you have to click the radio button "New documents based on this template" in the Manage Styles dialog box.
2018-12-12 13:06:25
Linda Branam
SO helpful! I have been wondering why I have to scroll down the style list for styles I'd created. Thanks!
Got a version of Word that uses the ribbon interface (Word 2007 or later)? This site is for you! If you use an earlier version of Word, visit our WordTips site focusing on the menu interface.
Visit the WordTips channel on YouTube
FREE SERVICE: Get tips like this every week in WordTips, a free productivity newsletter. Enter your address and click "Subscribe."
Copyright © 2026 Sharon Parq Associates, Inc.
Comments