Please Note: This article is written for users of the following Microsoft Word versions: 2007, 2010, 2013, 2016, 2019, and 2021. If you are using an earlier version (Word 2003 or earlier), this tip may not work for you. For a version of this tip written specifically for earlier versions of Word, click here: Making Bookmarks Bold.
Written by Allen Wyatt (last updated July 7, 2025)
This tip applies to Word 2007, 2010, 2013, 2016, 2019, and 2021
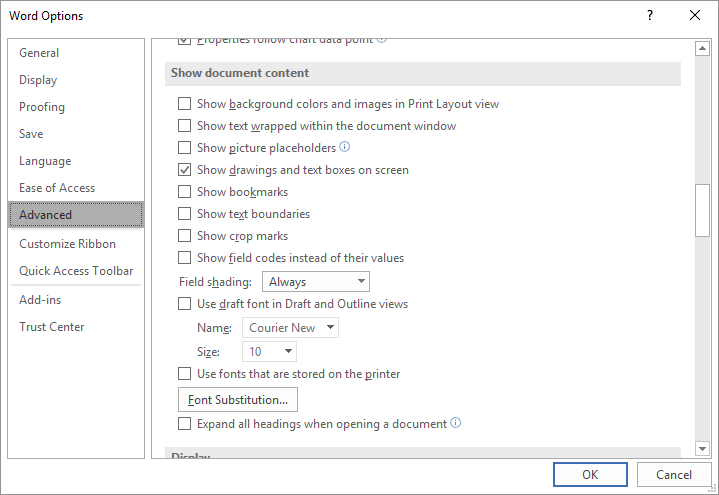
If you have quite a few bookmarks in your documents, you may want to highlight them, perhaps by making them bold, so that you can see them better. Word provides a direct way to highlight bookmarks:

Figure 1. The Advanced options of the Word Options dialog box.
The result is that any bookmarks in the document are surrounded by [brackets]. These don't print, but only appear on-screen and are very helpful in visually locating the bookmarks.
If you actually want to make the bookmarks bold, one approach is to create a special character style to be used for bookmarks. You could set the style to be bold, and then apply it to all your bookmarked text.
You can also use a macro to make your bookmarks bold. The following macro will step through each bookmark in a document and make its text bold:
Sub BookMarks2Bold()
    Dim bm As Bookmark
    Dim tx As Range

    Set tx = ActiveDocument.StoryRanges(wdMainTextStory)
    For Each bm In tx.Bookmarks
        bm.Range.Bold = True
    Next
End Sub
If you later want to turn off the bold attribute for bookmarks, you can do so by changing True to False in the line that actually does the property assignment.
Note:
WordTips is your source for cost-effective Microsoft Word training. (Microsoft Word is the most popular word processing software in the world.) This tip (10730) applies to Microsoft Word 2007, 2010, 2013, 2016, 2019, and 2021. You can find a version of this tip for the older menu interface of Word here: Making Bookmarks Bold.

The First and Last Word on Word! Bestselling For Dummies author Dan Gookin puts his usual fun and friendly candor back to work to show you how to navigate Word 2019. Spend more time working and less time trying to figure it all out! Check out Word 2019 For Dummies today!
When you do a search and replace operation in Word, it is possible that you could inadvertently wipe out a bookmark or ...
Discover MoreWord has an irritating habit of placing unwanted bookmarks in a document that you've been editing for a while. These ...
Discover MoreNeed to know what bookmarks are defined in a document? Here's a macro that creates a list of all your bookmarks so that ...
Discover MoreFREE SERVICE: Get tips like this every week in WordTips, a free productivity newsletter. Enter your address and click "Subscribe."
2021-07-31 07:19:07
An alternative that is probably relevant to this problem is also applicable to the problem of recognising footnotes and endnotes in the body of a document.
I use a Style sheet in which I modify the FOOTNOTE REFERENCE Style to BOLD which improves the visibility of the reference both to myself and to the reader using the finalised document.
In addition, for many documents, I make two further changes in that Style "Footnote Reference":
* I Increase the text size - which may necessitate altering the line spacing of the underlying text style, and
* Change the Footnote Reference style to use a different colour (red).
Since I usually print documents on a Black/white printer this has minimal impact on the printed output, but makes the referenced text easier to recognise.
Ciao from "Down under."
JB
jimboyle@optusnet.com.au
Got a version of Word that uses the ribbon interface (Word 2007 or later)? This site is for you! If you use an earlier version of Word, visit our WordTips site focusing on the menu interface.
Visit the WordTips channel on YouTube
FREE SERVICE: Get tips like this every week in WordTips, a free productivity newsletter. Enter your address and click "Subscribe."
Copyright © 2026 Sharon Parq Associates, Inc.
Comments