Please Note: This article is written for users of the following Microsoft Word versions: 2007, 2010, 2013, 2016, 2019, 2021, and Word in Microsoft 365. If you are using an earlier version (Word 2003 or earlier), this tip may not work for you. For a version of this tip written specifically for earlier versions of Word, click here: Controlling Where a Full-page Border is Printed.
Written by Allen Wyatt (last updated May 28, 2022)
This tip applies to Word 2007, 2010, 2013, 2016, 2019, 2021, and Word in Microsoft 365
In other issues of WordTips you learn how you can add a full-page border to a document. Using full-page borders can cause some problems, however. For instance, when you print out your document, you may discover that one (or more) of the sides of your border don't print out.
If you encounter this problem, the reason is because Word is trying to place the page border in an area that your printer considers a non-printable area. With very few exceptions, printers have non-printing areas around the edges of a piece of paper. Non-printing areas on the left and right of the page occur because the printer has to "grip" the paper somewhere, and in those areas where it is being gripped, the printer can't print. Non-printing areas on the top and bottom of a page occur because the printer cannot maintain accurate control of the page as it first enters the printing area or just leaves it.
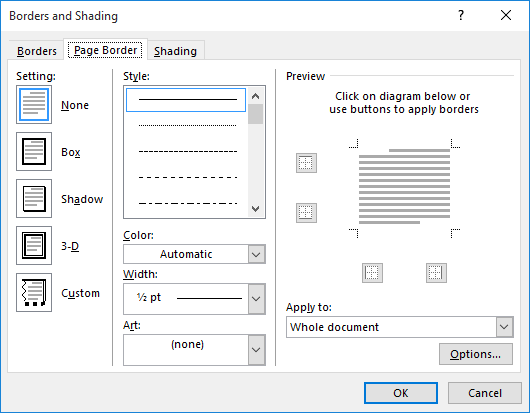
If you want to adjust where a full-page border is printed on a page, follow these steps:

Figure 1. The Page Border tab of the Borders and Shading dialog box.

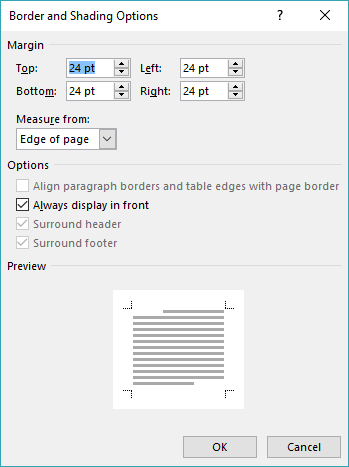
Figure 2. The Border and Shading Options dialog box.
There are a few things to keep in mind as you specify where you want your full-page borders printed. When specifying the location of the borders in step 6, you can specify any value between 0 points and 31 points. This means that the maximum distance for the borders is 31/72 of an inch, or less than half an inch from the paper's edge if you specify that borders are calculated Edge of Page (step 5). If your printer cannot print within the last half inch of the paper, for instance, you won't see the bottom edge of the full-page borders.
To get around this, try changing the way the border is calculated so it is Text (step 5) and then play with different positioning settings. This may take a bit of trial and error. If you still can't get just the results you like, then you can forego using a full-page border and simply place a large rectangle AutoShape (with no fill) on your page. You then have full control over where the sides of the rectangle are printed.
WordTips is your source for cost-effective Microsoft Word training. (Microsoft Word is the most popular word processing software in the world.) This tip (10390) applies to Microsoft Word 2007, 2010, 2013, 2016, 2019, 2021, and Word in Microsoft 365. You can find a version of this tip for the older menu interface of Word here: Controlling Where a Full-page Border is Printed.

The First and Last Word on Word! Bestselling For Dummies author Dan Gookin puts his usual fun and friendly candor back to work to show you how to navigate Word 2019. Spend more time working and less time trying to figure it all out! Check out Word 2019 For Dummies today!
You can instruct Word, when printing your document, to print only the odd- or even-numbered pages. This tip explains how ...
Discover MoreIn Windows, printer drivers translate formatting into a printer control language, like PostScript, that the printer ...
Discover MoreIf you are planning a dinner party or a meeting where guests need to be seated at tables, you may want to create tent ...
Discover MoreFREE SERVICE: Get tips like this every week in WordTips, a free productivity newsletter. Enter your address and click "Subscribe."
2023-12-26 16:55:38
Clare
Thank you!! After reading your tip, I was able to get my Word 2016 to finally print a Page border! This has stumbled me forever previously.
Used the Page Borders Options -> Text setting, and Normal margins when printing.
Got a version of Word that uses the ribbon interface (Word 2007 or later)? This site is for you! If you use an earlier version of Word, visit our WordTips site focusing on the menu interface.
Visit the WordTips channel on YouTube
FREE SERVICE: Get tips like this every week in WordTips, a free productivity newsletter. Enter your address and click "Subscribe."
Copyright © 2026 Sharon Parq Associates, Inc.
Comments