Please Note: This article is written for users of the following Microsoft Word versions: 2007, 2010, 2013, 2016, 2019, and 2021. If you are using an earlier version (Word 2003 or earlier), this tip may not work for you. For a version of this tip written specifically for earlier versions of Word, click here: Where Do You Want Your Endnotes?.
Long-time users of Word know that you can place endnotes in a document, and you can specify for them to appear either at the end of a section or at the end of the document as a whole. What you may not know is that you can choose to suppress endnotes for specific sections of your document.
What does this mean for you? Let's say that you have five sections in your document. The first four are "chapters," and the last one is an index. You may think that you are limited to placing your endnotes at the end of each chapter or after the index. Not so, you can specify that you want the endnotes to appear at the end of the fourth section, just before the index section. Just follow these steps:
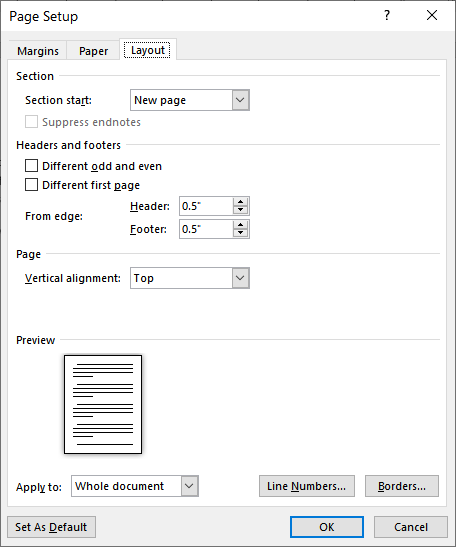
Figure 1. The Layout tab of the Page Setup dialog box.
That's it. What you did was to suppress endnotes in sections 1, 2, and 3. This pushes them to the end of section 4, which is your last chapter—exactly where you wanted them before your index in section 5.
As a final note, if you find that the Suppress Endnotes checkbox is grayed out (step 7), it is because your endnotes are not set up to be at the end of each section. (Reread step 2—you need to make sure that your endnotes are specified to appear at the end of each section.)
WordTips is your source for cost-effective Microsoft Word training. (Microsoft Word is the most popular word processing software in the world.) This tip (9694) applies to Microsoft Word 2007, 2010, 2013, 2016, 2019, and 2021. You can find a version of this tip for the older menu interface of Word here: Where Do You Want Your Endnotes?.

Discover the Power of Microsoft Office This beginner-friendly guide reveals the expert tips and strategies you need to skyrocket your productivity and use Office 365 like a pro. Mastering software like Word, Excel, and PowerPoint is essential to be more efficient and advance your career. Simple lessons guide you through every step, providing the knowledge you need to get started. Check out Microsoft Office 365 For Beginners today!
Endnotes are indispensable in some types of writing. You may want to create endnotes, however, that don't follow the ...
Discover MoreEndnotes are easy enough to add and accumulate in a document. For this reason, Word makes it easy to jump from one ...
Discover MoreAble to add comments everywhere, except in endnotes? This seems to be a limitation in Word, but here are some ways to ...
Discover MoreFREE SERVICE: Get tips like this every week in WordTips, a free productivity newsletter. Enter your address and click "Subscribe."
There are currently no comments for this tip. (Be the first to leave your comment—just use the simple form above!)
Got a version of Word that uses the ribbon interface (Word 2007 or later)? This site is for you! If you use an earlier version of Word, visit our WordTips site focusing on the menu interface.
Visit the WordTips channel on YouTube

FREE SERVICE: Get tips like this every week in WordTips, a free productivity newsletter. Enter your address and click "Subscribe."
Copyright © 2026 Sharon Parq Associates, Inc.
 Please Note:
This article is written for users of the following Microsoft Word versions: 2007, 2010, 2013, 2016, 2019, and 2021. If you are using an earlier version (Word 2003 or earlier), this tip may not work for you. For a version of this tip written specifically for earlier versions of Word, click here:
Please Note:
This article is written for users of the following Microsoft Word versions: 2007, 2010, 2013, 2016, 2019, and 2021. If you are using an earlier version (Word 2003 or earlier), this tip may not work for you. For a version of this tip written specifically for earlier versions of Word, click here:
Comments