Word includes several different ways that you can wrap text around pictures and other objects. Most of those wrapping methods are self-explanatory. There is one wrapping method—through wrapping—that may not make immediate sense.
The way that text is wrapped around an image depends on the wrapping points defined for the image. Wrapping points are nothing but a boundary that text cannot cross when it flows around the image. For many objects and images, the wrapping points define a rectangular box around the image. For other objects and images it may be more irregularly shaped. Consider the following image, which has the wrapping points displayed. (See Figure 1.)
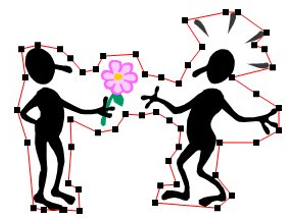
Figure 1. The wrapping points around an image.
These wrapping points define the boundaries of the image. If you specify tight wrapping for the image, then the text is wrapped as close as it can be to the exterior of the image, but no text goes "inside" the image. The following shows how this type of wrapping occurs. (See Figure 2.)
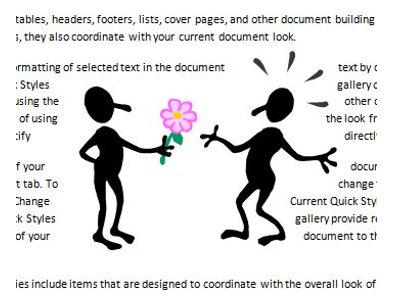
Figure 2. Tight wrapping around an image.
Through wrapping, however, is essentially the same as tight wrapping, except it allows text to wrap so that it fills holes within the image that are created by the path of the wrapping points. See, for instance, the same image with through wrapping applied, as shown in this figure. (See Figure 3.)
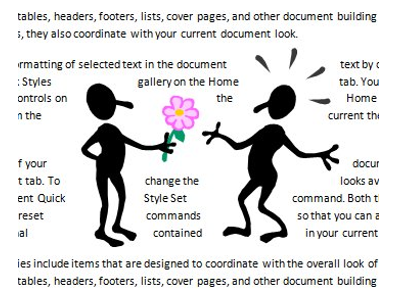
Figure 3. Through wrapping for an image.
For many objects there will be no functional difference between tight and through because the wrapping points define a path in which there are no holes. Perhaps the best example would be for text boxes or tables, which are rectangular items. There are no internal holes, so tight and through wrapping have the same result.
WordTips is your source for cost-effective Microsoft Word training. (Microsoft Word is the most popular word processing software in the world.) This tip (9382) applies to Microsoft Word 2007, 2010, 2013, 2016, 2019, and 2021.

Create Custom Apps with VBA! Discover how to extend the capabilities of Office 365 applications with VBA programming. Written in clear terms and understandable language, the book includes systematic tutorials and contains both intermediate and advanced content for experienced VB developers. Designed to be comprehensive, the book addresses not just one Office application, but the entire Office suite. Check out Mastering VBA for Microsoft Office 365 today!
Lines can help to organize the data on a page or make certain points clearer. Word provides several different ways you ...
Discover MoreInsert a graphic into a document and you expect to be able to see it. What do you do if it isn't displayed, however? Here ...
Discover MoreWord allows you to easily add page borders. If you want to add some special artwork, your limited choices may force you ...
Discover MoreFREE SERVICE: Get tips like this every week in WordTips, a free productivity newsletter. Enter your address and click "Subscribe."
There are currently no comments for this tip. (Be the first to leave your comment—just use the simple form above!)
Got a version of Word that uses the ribbon interface (Word 2007 or later)? This site is for you! If you use an earlier version of Word, visit our WordTips site focusing on the menu interface.
Visit the WordTips channel on YouTube

FREE SERVICE: Get tips like this every week in WordTips, a free productivity newsletter. Enter your address and click "Subscribe."
Copyright © 2026 Sharon Parq Associates, Inc.
Comments