Maria wonders about the best way to copy styles from one document to another.
Sounds like a simple question, right? Well, not really. You see, Word provides several ways that you can copy styles from one document to another. As to which of those methods is "best," it depends on which one you find to be the easiest. With that in mind, I want to take a look at those "several ways" that I mentioned.
If you only have a few styles to copy from one document to another, an easy way to do it is to use the editing tools with which you are already familiar. Just open your source and target documents and make sure both are visible on the screen at the same time. (You probably could figure this out, but the source document is the one from which you want to copy styles and the target document is the one to which you want to copy them.)
Now, select a paragraph in the source document to which you've already applied the style you want to copy. When you select the paragraph, make sure that you include the end-of-paragraph marker at the end of the paragraph. (This is essential.) Press Ctrl+C to copy the paragraph to the Clipboard.
Switch over to the target document and position the insertion point somewhere in the document where you won't mess up anything already in the document. (I often jump to the end of the document and press Enter a few times, then press the Up Arrow once or twice.) Now press Ctrl+V. The contents of the Clipboard—the paragraph you copied from the source document—are pasted into the target document. Word also pastes the style into the target document.
At this point you can delete the paragraph you just pasted (don't press Ctrl+Z—you actually need to delete the paragraph). Even though you delete it, the style remains in the document.
You should be aware that using copy and paste isn't a good approach if the styles you want to copy are the built-in styles in Word or if the style you want to copy already exists in the target document. In these cases, Word doesn't actually copy the style—the pasted text adopts the style already defined within the target document. In the version of Word included with Microsoft 365 you can supposedly modify this behavior, but I've seen inconsistent results in attempting to change how the pasting takes place. The bottom line is that copy and paste still isn't the best approach with built-in styles or a style that already exists in the target document.
Believe it or not, you can use the trusty old Format Painter (on the Home tab of the ribbon) to copy styles from one document to another. The basic idea is that you select something formatted with the desired style in your source document, click the Format Painter, switch to the target document, and finally click on the text you want to possess that style.
Problem is, this method has to be used carefully. You see, how it behaves depends on what formatting you are looking to paint.
The bottom line is that you'll want to be quite careful using this method, or else you won't get the results you expect.
In Word, a template is a document, stored in a special format, that is used as a pattern for new documents. Templates most often contain styles and sometimes macros that you want to use in another document. If you want to use all of the styles from one document in another document, you could therefore use these general steps:

Figure 1. The Templates and Add-ins dialog box.
At this point the target document is essentially using all of the same styles that were in your source document. Further, any styles that were in the source document but are not used in the target document are available for future use in the target document.
This approach may actually seem a bit extreme to some, but if you have a need to use styles from your source document with a lot of different target documents, it can be a great way to proceed. (If this is the case, you'll only need to repeat steps 9 through 16 for each of your target documents.)
Word provides a handy tool that you can use to copy styles or macros from one document to another. This tool, called the Organizer, has been around for a while and has morphed a few times as to what it will do. One thing that has remained constant through all versions of Word (so far, at least—you can never really tell with Microsoft what they will do) is its ability to manage styles.
There are a few ways you can display the Organizer. Here is one way:
Here's another way to display the Organizer:
The concept behind the Organizer is that you can open a document or a template on both the left and right side of the Organizer and then move styles between the two. When you first start the Organizer, you'll notice that on the left side of the dialog box is the document on which you were working when you started the Organizer and on the right side is a different document—it could be your Normal template or it could be another document you had open. (See Figure 2.)
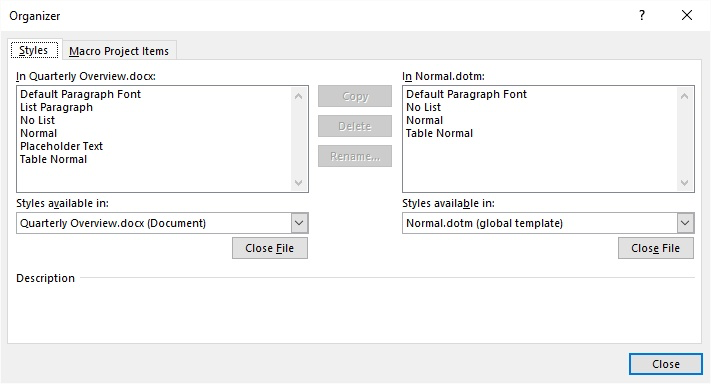
Figure 2. The Styles tab of the Organizer.
You'll want to make sure that your source document or template (the one from which you want to copy styles) is open on the left and the target document or template (the one to which you want to copy styles is open on the right. If this is not the case, you can click the appropriate Close button and then click the Open button to locate and open the desired source or target. (When you click the Close button, it turns into an Open button.)
With your source document on the left and your target document on the right, locate the styles you want to copy from the source document and build a selection set of those styles. You do this by clicking the first style and then holding down the Ctrl key as you click on the other styles.
At this point the Copy button (between the left and right sides of the dialog box) should be "pointing" toward the right, which is where your target document is located. Click the button and the styles in your selection set will be copied to the target. You might be asked if you really want to copy some of the styles (for instance, any built-in styles you've selected), but the styles will be copied to the target.
When you are done copying all the styles you want to copy, you can close the Organizer.
You could, if desired, also use a macro to copy styles from one document to another. This is a good approach when you have lots of styles to copy or you want to copy only styles where the style names match a specific pattern.
For instance, let's say that you have a bunch of styles you've created for use in your company. The name for each of these styles begins with the text "ABCorp," so that you have styles such as "ABCorp Body," "ABCorp Indent," etc. You could use a macro like the following to do the copying:
Sub CopyStyles()
    Dim sSourceText As String
    Dim sTargetText As String
    Dim dSource As Document
    Dim dTarget As Document
    Dim d As Document
    Dim s As Style
    Dim sTemp As String
    Dim J As Integer

    sSourceText = InputBox("Source document?")
    sTargetText = InputBox("Target document?")

    For Each d In Documents
        If d.Name = sSourceText Then
            Set dSource = d
        ElseIf d.Name = sTargetText Then
            Set dTarget = d
        End If
    Next d

    sTemp = ""
    J = 0
    If dSource Is Nothing Then
        sTemp = "Source document doesn't exist. No action."
    End If
    If dTarget Is Nothing Then
        sTemp = "Target document doesn't exist. No action."
    End If
    If sTemp = "" Then
       On Error Resume Next
       For Each s In dSource.Styles
            If s.Type = wdStyleTypeParagraph And Left(s.NameLocal, 6) = "ABCorp" Then
                Application.OrganizerCopy Source:=dSource.FullName, _
                  Destination:=dTarget.FullName, Name:=s.NameLocal, _
                  Object:=wdOrganizerObjectStyles
                J = J + 1
            End If
        Next s
        sTemp = "Copied " & J & " styles to " & sTargetText
    End If
    MsgBox sTemp
End Sub
In order to run the macro, both the source and target must already be open. If you enter the names for each of the documents properly (remember to include the filename extension, such as "MyDoc.docx"), then the macro returns a count of how many styles were copied. Otherwise, it lets you know of any errors locating the source or target documents.
Note:
WordTips is your source for cost-effective Microsoft Word training. (Microsoft Word is the most popular word processing software in the world.) This tip (4628) applies to Microsoft Word 2007, 2010, 2013, 2016, 2019, 2021, and Word in Microsoft 365.

Do More in Less Time! An easy-to-understand guide to the more advanced features available in the Microsoft 365 version of Word. Enhance the quality of your documents and boost productivity in any field with this in-depth resource. Complete your Word-related tasks more efficiently as you unlock lesser-known tools and learn to quickly access the features you need. Check out Microsoft 365 Word For Professionals For Dummies today!
One of the things you can store within templates are styles. When you use styles, it is critical that you understand how ...
Discover MoreStyles are a powerful component of Word. You use them to determine the way that your text should appear. This tip ...
Discover MoreYou can use the shortcuts described in this tip to quickly change the heading levels of the headings in your document. ...
Discover MoreFREE SERVICE: Get tips like this every week in WordTips, a free productivity newsletter. Enter your address and click "Subscribe."
There are currently no comments for this tip. (Be the first to leave your comment—just use the simple form above!)
Got a version of Word that uses the ribbon interface (Word 2007 or later)? This site is for you! If you use an earlier version of Word, visit our WordTips site focusing on the menu interface.
Visit the WordTips channel on YouTube

FREE SERVICE: Get tips like this every week in WordTips, a free productivity newsletter. Enter your address and click "Subscribe."
Copyright © 2026 Sharon Parq Associates, Inc.
Comments