Written by Allen Wyatt (last updated September 9, 2023)
This tip applies to Word 2007, 2010, 2013, 2016, 2019, 2021, and Word in Microsoft 365
When Abdul adds a footnote to a document, the separator line and the first footnote's text appear too far apart from each other for his tastes. He wonders if there is a way to reduce the distance between the separator line and the first footnote's text.
The most likely culprit here is the formatting applied to your footnote separator. This separator appears on its own paragraph and can be formatted just like any other paragraph in your document. The separator isn't normally accessible, however, unless you go through these steps:
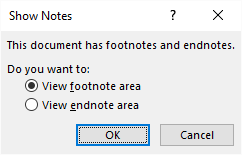
Figure 1. The Show Notes dialog box.
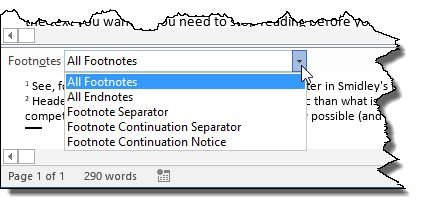
Figure 2. Using the drop-down list to choose what you want to see.
While going through these steps, you may find it helpful to have non-printing characters displayed. That way you can see if there are, for some strange reason, extra spaces, tabs, or hard returns included in the footnote separator. (The easiest way to display non-printing characters is to display the Home tab of the ribbon and click the icon that looks like a backwards P—technically called a pilcrow—that appears in the Paragraph group.)
You should also be aware that if you have long footnotes in your document, it is possible for one to start at the bottom of one page and conclude at the bottom of the next page. In such a case you'll want to repeat the above steps, but in step 7 choose Footnote Continuation Separator and apply your formatting there, as well.
You should realize that the separator lines (indeed, all of the elements that appear in the drop-down displayed in step 7) use the Normal style, by default. If you use the Normal style in your document and change the formatting of that style—perhaps you add additional space after paragraphs that use the style—then the changes will be applied to the separator lines, as well. The only ways around this are to (1) not use the Normal style within your document body or (2) apply a different style to your separator lines.
If there is still too much space between the separator and the first footnote, it could be because of formatting applied to the footnote itself. Footnotes can be formatted just like regular paragraphs, but just like regular paragraphs you'll have the most flexibility and power if you format the style applied to footnotes. You'll want to look at the formatting of the Footnote Text style; it is what is applied to footnotes automatically. Decrease the Space Before setting and, if you want to make sure there is space between the actual footnotes, increase the Space After setting.
WordTips is your source for cost-effective Microsoft Word training. (Microsoft Word is the most popular word processing software in the world.) This tip (2953) applies to Microsoft Word 2007, 2010, 2013, 2016, 2019, 2021, and Word in Microsoft 365.
The First and Last Word on Word! Bestselling For Dummies author Dan Gookin puts his usual fun and friendly candor back to work to show you how to navigate Word 2013. Spend more time working and less time trying to figure it all out! Check out Word 2013 For Dummies today!
Want to print your document without all those footnotes included? It's not quite as easy as you might think, as this tip ...
Discover MoreWhen you print a document that uses footnotes, Word normally places a small line between the end of the document body ...
Discover MoreFootnotes can be a great addition to any document that needs detailed referencing of citations. You can navigate from one ...
Discover MoreFREE SERVICE: Get tips like this every week in WordTips, a free productivity newsletter. Enter your address and click "Subscribe."
There are currently no comments for this tip. (Be the first to leave your comment—just use the simple form above!)
Got a version of Word that uses the ribbon interface (Word 2007 or later)? This site is for you! If you use an earlier version of Word, visit our WordTips site focusing on the menu interface.
Visit the WordTips channel on YouTube

FREE SERVICE: Get tips like this every week in WordTips, a free productivity newsletter. Enter your address and click "Subscribe."
Copyright © 2025 Sharon Parq Associates, Inc.
Comments