Please Note: This article is written for users of the following Microsoft Word versions: 2007, 2010, 2013, 2016, 2019, 2021, 2024, and Word in Microsoft 365. If you are using an earlier version (Word 2003 or earlier), this tip may not work for you. For a version of this tip written specifically for earlier versions of Word, click here: Shading Table Rows.
Written by Allen Wyatt (last updated May 17, 2025)
This tip applies to Word 2007, 2010, 2013, 2016, 2019, 2021, 2024, and Word in Microsoft 365
In Excel it is possible to use conditional formatting to shade every other row (or every nth row) of a data table. You may want to accomplish the same task in Word, and the program provides several approaches you can take. One approach is to use some of the predefined table styles that Word makes available. Follow these steps:
Many of the table formats are "smart," meaning that they can adjust row shading even if you add new rows to the table. How is this done? Glad you asked; that leads to the second method of shading table rows—creating your own table styles.
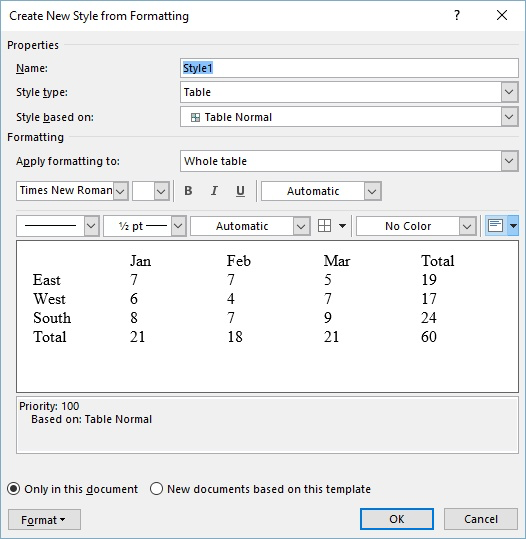
Styles have been available in Word for years and years. You can define a table style that automatically applies shading to either the even or odd rows in a table. (This is how the Table AutoFormats do it.) Follow these steps:

Figure 1. The Create New Style from Formatting dialog box.
You've now created a shading style for either odd or even rows. You can apply this style to the table, as desired. The formatting automatically adjusts as you change the number of rows in the table.
The solutions described so far work great if you want to apply formatting to every other row in a table. They don't work so well if you want the formatting applied to every third, fourth, or fifth row. In this instance it may be best to use a macro to do your formatting. The following is a good example of a macro that can apply shading to every third row in a table:
Sub ShadeRows()
    Dim iRow As Integer
    Dim iHeads As Integer
    Dim iRowTtl As Integer

    If Selection.Information(wdWithInTable) = True Then
        iHeads = InputBox(prompt:="Number of heading rows?", _
          Title:="Headings", Default:="1")

        iRowTtl = Selection.Tables(1).Rows.Count - iHeads
        For iRow = 1 To iRowTtl
            If iRow Mod 3 = 0 Then
                Selection.Tables(1).Rows(iRow + iHeads).Shading.Texture _
                  = wdTexture20Percent
            Else
                Selection.Tables(1).Rows(iRow + iHeads).Shading.Texture _
                  = wdTextureNone
            End If
        Next iRow
    End If
End Sub
The macro asks how many header rows are in the table, and then adjusts the rows to which it applies shading. If the insertion point is not within a table when the macro is run, then nothing happens. You can also change the frequency of shading (for instance, from every third row to every fourth) by changing the Mod formula. Simply change the single line, in this manner:
If iRow Mod 4 = 0 Then
You can also change the amount of shading by changing the wdTexture20Percent constant to another, such as wdTexture5Percent, wdTexture10Percent, wdTexture25Percent, etc.
You should also understand that if you run the macro on a table where cells have been merged vertically, you may get unexpected results, if any. If you change the number of rows in a table, then you will need to run the macro again to reapply the shading.
Note:
WordTips is your source for cost-effective Microsoft Word training. (Microsoft Word is the most popular word processing software in the world.) This tip (6699) applies to Microsoft Word 2007, 2010, 2013, 2016, 2019, 2021, 2024, and Word in Microsoft 365. You can find a version of this tip for the older menu interface of Word here: Shading Table Rows.

Create Custom Apps with VBA! Discover how to extend the capabilities of Office 365 applications with VBA programming. Written in clear terms and understandable language, the book includes systematic tutorials and contains both intermediate and advanced content for experienced VB developers. Designed to be comprehensive, the book addresses not just one Office application, but the entire Office suite. Check out Mastering VBA for Microsoft Office 365 today!
If you've adjusted the height of your table and the rows within the table, you might want to later return all those rows ...
Discover MoreWhen the last row displayed on a page doesn't show the borders you want, it can be confusing to figure out how to get ...
Discover MoreInsert a table in your document and Word assumes that you want borders around the table and its cells. Here's a shortcut ...
Discover MoreFREE SERVICE: Get tips like this every week in WordTips, a free productivity newsletter. Enter your address and click "Subscribe."
There are currently no comments for this tip. (Be the first to leave your comment—just use the simple form above!)
Got a version of Word that uses the ribbon interface (Word 2007 or later)? This site is for you! If you use an earlier version of Word, visit our WordTips site focusing on the menu interface.
Visit the WordTips channel on YouTube
FREE SERVICE: Get tips like this every week in WordTips, a free productivity newsletter. Enter your address and click "Subscribe."
Copyright © 2026 Sharon Parq Associates, Inc.
Comments