Marcia wants to right align text in a column within a table. She wants that text to be right-aligned to a point 25 points from the right edge of the column. If she selects the entire column then chooses 25 pt for the right indent, she gets a message saying "Indent Size is Too Large," even though the column is very wide. If she chooses just one cell at a time, she can right-align the text with a right indent of 25 points. She wonders how to format all the cells in the column at the same time.
There are actually a couple of ways that this indent could be applied, and it depends on which method you are using as to why you are having a problem with it. To set the cell margin, follow these steps:
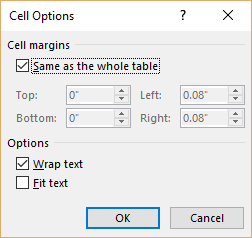
Figure 1. The Cell Options dialog box.
That's it. The important thing is to make sure that you enter your measurement, in step 7, as "25 pt." If you forget to specify the "pt" part, then Word assumes you want a cell margin of 25 inches, and that won't work.
Some users reported that they received different results if they selected cells as opposed to selecting the entire column. To select a column they would position the mouse pointer above the column until it turned into a downward-pointing arrow. Clicking at that point selected the column. To select cells, they would simply click within the first cell and drag down to the last cell they wanted to select. I was not able to verify differing results in my testing, but your results may differ.
Also, you may have noted when you were looking at the Layout tab of the ribbon that there is a tool near the right side of the ribbon (in the Alignment group) named Cell Margins. You should only use this tool if you want to adjust the margins for all cells in the entire table—the change isn't limited to the cells you selected in step 1.
The other way to handle the indent is to skip setting cell margins and, instead, set paragraph margins. You can do that by following these steps:
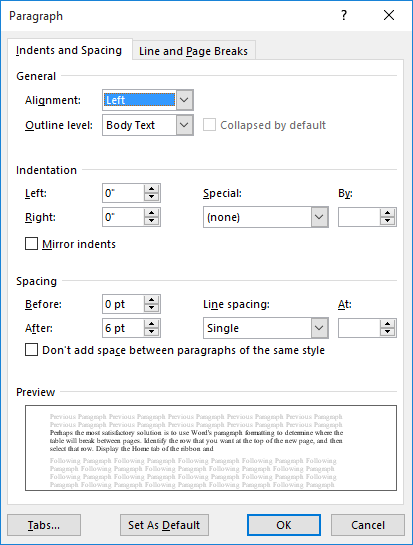
Figure 2. The Indents and Spacing tab of the Paragraph dialog box.
There is a caveat to this approach: Whatever you enter in step 5 is added to whatever the default cell margin is in the table. The default cell margin is 0.08 inches, which comes out to just under 6 points. Thus, you may want to modify the amount you specify in step 5 so you get the right indent you really want.
Both of the above approaches were tested with simple tables, tables with merged cells, and very long (10 pages) tables. It also worked fine if the cells were vertically aligned or if the text direction on the cells was changed. If you still have problems after trying the above, then you can always format a single cell in the table and use the Format Painter to copy the formatting to other cells.
WordTips is your source for cost-effective Microsoft Word training. (Microsoft Word is the most popular word processing software in the world.) This tip (667) applies to Microsoft Word 2007, 2010, 2013, 2016, 2019, 2021, and Word in Microsoft 365.

The First and Last Word on Word! Bestselling For Dummies author Dan Gookin puts his usual fun and friendly candor back to work to show you how to navigate Word 2019. Spend more time working and less time trying to figure it all out! Check out Word 2019 For Dummies today!
Need to format the rows of a table so that your data is showcased better? Here are a few ways you can get the shading you ...
Discover MoreWant to add a border diagonally, through the middle of a table cell? It's easy if you follow the formatting steps ...
Discover MoreIndividual cells in a table can be aligned any way you desire. As pointed out here, just select the cell and apply the ...
Discover MoreFREE SERVICE: Get tips like this every week in WordTips, a free productivity newsletter. Enter your address and click "Subscribe."
There are currently no comments for this tip. (Be the first to leave your comment—just use the simple form above!)
Got a version of Word that uses the ribbon interface (Word 2007 or later)? This site is for you! If you use an earlier version of Word, visit our WordTips site focusing on the menu interface.
Visit the WordTips channel on YouTube

FREE SERVICE: Get tips like this every week in WordTips, a free productivity newsletter. Enter your address and click "Subscribe."
Copyright © 2026 Sharon Parq Associates, Inc.
Comments