Tom recently purchased a new computer with an updated version of Word. In previous versions of Word, Tom could select a paragraph and complete a spelling and grammar check on just the selected text. Now, though, Word checks the entire document even when he has the selection made. Tom wonders how he can check just the text he has selected.
This is, apparently, a change that Microsoft made in Office 365 well over a year ago. Why they made it is a mystery, but Tom isn't the only one bothered by the change. The only thing that can be done is to "upvote" a request to have the previously available feature reinstated, here:
https://word.uservoice.com/forums/304924-word-for-windows-desktop-application/suggestions/36089200
(Why anyone would need to cast votes to reinstate what used to be a standard behavior is beyond me; such things shouldn't be changed in the first place. In other words, have votes to remove it rather than removing it and having to canvas to put it back in?)
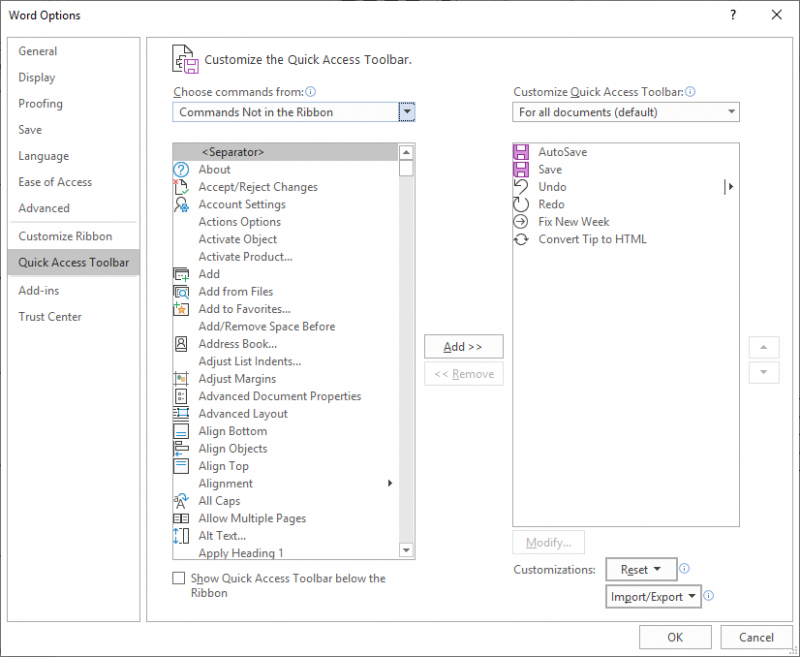
There is one way around this that involves adding a tool to either the Quick Access Toolbar or to the ribbon. Follow these steps to add the tool to the QAT:

Figure 1. The Quick Access Toolbar options of the Word Options dialog box.
Now you can select your text and click the newly added tool. The spelling of the selected text is all that is checked, and when the check is complete Word asks if you want to check the rest of the document.
WordTips is your source for cost-effective Microsoft Word training. (Microsoft Word is the most popular word processing software in the world.) This tip (13744) applies to Microsoft Word 2019 and 2021.

Create Custom Apps with VBA! Discover how to extend the capabilities of Office 365 applications with VBA programming. Written in clear terms and understandable language, the book includes systematic tutorials and contains both intermediate and advanced content for experienced VB developers. Designed to be comprehensive, the book addresses not just one Office application, but the entire Office suite. Check out Mastering VBA for Microsoft Office 365 today!
Don't like it when Word always says a word is spelled right and you know that it isn't? Here's how you can fine-tune the ...
Discover MoreThere are a couple of ways that various parts of a document can have spelling and grammar checking "turned off." This tip ...
Discover MoreWhen you close a document, you might want to do one final check of the spelling, just to make sure that you didn't miss ...
Discover MoreFREE SERVICE: Get tips like this every week in WordTips, a free productivity newsletter. Enter your address and click "Subscribe."
2025-08-26 12:36:29
Barbie
Yes!! This gives me back my old Spellcheck dialog box instead of the new Editor pane! (Which didn't let me use Change All if I had to manually correct the spelling to something that wasn't one of its suggestions, and in the latest version was a real PAIN when I had to click on the document and back)
There is a comparable command for Grammar check; doing them separately is much better for me than dealing with the Editor.
Since Ignore All is no longer persistent between sessions, I start with the cursor where I want to start checking, and when it gets back to an "Error" in the previously checked part of my document I X out. I could no longer do this with Editor, since the latest version seems to do every other error, and then come back to the ones it skipped...
2023-11-30 12:35:27
zz
Thank you, thank you! Invaluable.
2023-04-20 13:50:30
Margaret
Bless you, Mr. Wyatt : )
2021-12-03 14:39:29
Jim Yuill
Allen, very helpful.
BTW: I added "Spelling..." using "Customize Ribbon", and I put it in a group in the Review ribbon.
Thank You!
2021-01-05 23:32:46
Ava
Thank you! This was exactly what I was looking for.
2020-08-27 09:29:51
Andrew
Aisha, the setting in Outlook is under the File->Options->Mail. Click the Editor Options button and on the Proofing tab tick the box for "Check spelling as you type."
Andy.
2020-08-26 16:49:26
Aisha
How do I set this up for the web version of Outlook? I prefer using the web version. I used to have a feature that would underline all misspelled words before I sent my email. This function is now gone. How do I get it back?
Got a version of Word that uses the ribbon interface (Word 2007 or later)? This site is for you! If you use an earlier version of Word, visit our WordTips site focusing on the menu interface.
Visit the WordTips channel on YouTube
FREE SERVICE: Get tips like this every week in WordTips, a free productivity newsletter. Enter your address and click "Subscribe."
Copyright © 2026 Sharon Parq Associates, Inc.
Comments