Written by Allen Wyatt (last updated October 16, 2023)
This tip applies to Word 2007, 2010, 2013, 2016, 2019, and 2021
David notes that in his previous versions of Word each open document would show at the bottom of the screen, in the Windows Taskbar, and he could click on it to open it. Now, with Word 2016, all the Word documents appear in a single icon on his Taskbar. This is incredibly inconvenient for him and wastes his time in switching between documents. David wonders how he can get the documents to show as individual items on the Taskbar again.
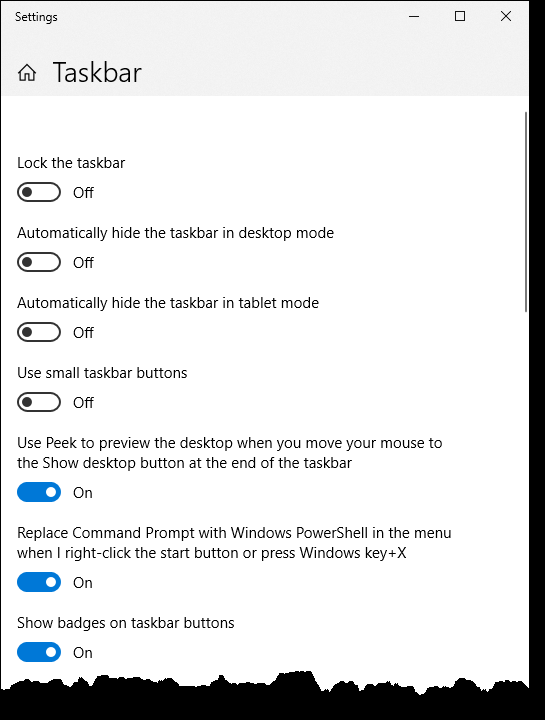
This is a function of Windows, not Word. (Because of this, I suspect that David updated his version of Windows when he updated to Word 2016.) In Windows 10, you need to perform these steps; if you are using an older version of Windows, the steps are similar.

Figure 1. The Taskbar options of the Settings dialog box.
You should now see individual icons for your documents on the Taskbar.
WordTips is your source for cost-effective Microsoft Word training. (Microsoft Word is the most popular word processing software in the world.) This tip (13584) applies to Microsoft Word 2007, 2010, 2013, 2016, 2019, and 2021.

Do More in Less Time! An easy-to-understand guide to the more advanced features available in the Microsoft 365 version of Word. Enhance the quality of your documents and boost productivity in any field with this in-depth resource. Complete your Word-related tasks more efficiently as you unlock lesser-known tools and learn to quickly access the features you need. Check out Microsoft 365 Word For Professionals For Dummies today!
If you are using older custom fonts with newer versions of Word, you may notice a few quirks. This tip can help you ...
Discover MoreWord uses lots of dialog boxes as a way of setting configuration options and gathering information from users. When ...
Discover MoreWhen you start Word, it displays what is called the Start screen. If you just want to see a blank document as in earlier ...
Discover MoreFREE SERVICE: Get tips like this every week in WordTips, a free productivity newsletter. Enter your address and click "Subscribe."
2023-06-02 09:24:34
Andrew
And ... coming soon to Windows 11.
https://www.bleepingcomputer.com/news/microsoft/windows-11-finally-gets-a-never-combine-taskbar-buttons-mode/
2023-06-01 07:09:12
Debbie
Thanks for this, my computer updated windows and having all the Word docs under one button on the taskbar was driving me nuts. Sorted now :)
2022-12-21 14:37:17
Ron S
Please replace the screen capture with one that actually shows the option.
2022-12-21 08:08:28
Lilli Hausenfluck
Mette, When you set up a second monitor, go back to the taskbar settings and a new section appears called Multiple displays. Choose All taskbars and then set it again to say Never or When taskbar is full, which is my preference.
2022-11-03 00:46:52
A
Not in windows 11
2020-09-02 09:11:15
Paul Stregevsky
Mette,
You probably need to buy a monitor utility, like one of these https://helpdeskgeek.com/free-tools-review/best-dual-monitor-software/ .
2020-09-01 07:00:36
Mette Jacobsen
Hello
How do I make this apply to a secondary screen as well?
It is very frustrating to have two different settings on what is essentially the same taskbar.
I have already tried the typical 'clicking around in hopes it will obey me' but it is not working.
Thank you in advance
Kind regards
Mette Jacobsen
2018-11-12 17:15:13
Allen
Allan,
I deleted the comment in error. Feel free to post again.
-Allen
2018-11-11 16:40:52
Allan
"There are currently no comments for this tip. (Be the first to leave your comment—just use the simple form above!)"
Don't understand. Below is a confirmation that I made a comment.
Site: wordribbon.tips.net
Article: Multiple Taskbar Icons for Documents
Comment left by Allan (Nov 10, 2018 at 17:49:45)
Got a version of Word that uses the ribbon interface (Word 2007 or later)? This site is for you! If you use an earlier version of Word, visit our WordTips site focusing on the menu interface.
Visit the WordTips channel on YouTube
FREE SERVICE: Get tips like this every week in WordTips, a free productivity newsletter. Enter your address and click "Subscribe."
Copyright © 2026 Sharon Parq Associates, Inc.
Comments