Chrys constantly works on huge multilingual documents. When he opens a document, he often sees a warning that there are "Too Many Spelling or Grammatical Errors to Continue Displaying Them." This is a bother; he doesn't want to do a manual spelling check (which the warning says he can do). Chrys wants to somehow instruct Word that he wants it to display all the errors, even if there are many of them.
Part of the reason why there are so many spelling errors in your document is because Word is assuming that your prose is all in English when, in fact, you are using multiple languages. You can reduce the number of spelling errors if you format your text to use the languages appropriate to that text. In other words, format your German text as German, your French text as French, and so on. If you do this, then Word knows which spelling dictionaries to use in doing its checking.
The easiest way to do this is to create character styles for each of your languages. For instance, let's say you wanted to create a character style to be used with your German text. You would follow these steps:

Figure 1. The Create New Style from Formatting dialog box.
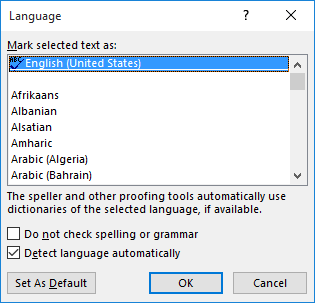
Figure 2. The Language dialog box.
You can repeat these steps for each of the languages you use in the document. Then, select the text you want to format and apply the appropriate character style for that language. Restart Word and open the document to see if you get the same error message.
If you still get the "too many errors" message, then other approaches will need to be taken. The message doesn't appear unless there are in excess of approximately 1,400 spelling errors in the document. This threshold is hardwired and cannot be changed. Even so, Word still does the background spelling check so that it knows how many spelling errors there are—it simply doesn't display them all "as you type" if the threshold is exceeded. Because it knows how many there are, you could use a macro to display the count, in case you are curious.
Sub HighlightSpellingErrors()
    Dim sMsg As String

    sMsg = "There are " & ActiveDocument.SpellingErrors.Count
    sMsg = sMsg & " spelling errors in the document."
    MsgBox sMsg
End Sub
Unfortunately, once Word believes you've passed the 1,400-error threshold, it not only displays the error message, but it also turns off the display of spelling errors in the document. This is why, earlier, I mentioned restarting Word after applying the language-specific character styles in the document; restarting should allow the display of the spelling errors.
If you want to manually turn on the display of spelling errors, you can do so by following these steps:
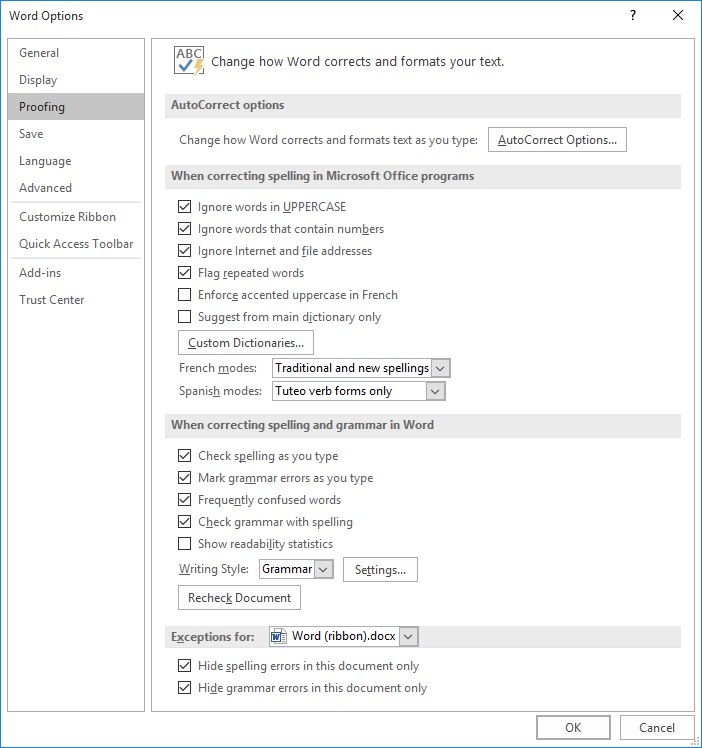
Figure 3. The proofing options of the Word Options dialog box.
Another approach is to turn off spell checking for certain parts of your document. To do this, you use the same steps described earlier in creating language-specific styles. You would create a character style that has the language set to "Do Not Check Spelling or Grammar" (step 7), and you then apply that character style to portions of the document you don't want checked. The idea, again, is to get the error count under the 1,400 threshold. (Remember to restart Word or follow the earlier steps to allow checking if you think you've reduced the error count enough.)
Finally, you could use a macro to highlight all the spelling errors in a document. This approach works regardless of the number of spelling errors, but it provides only a snapshot of the errors at the time the macro is run. This means that it is not dynamic; it will not update as you add new text or as you get rid of spelling errors.
Sub HighlightSpellingErrors()
    Dim r As Range

    ' Clear existing highlighting
    ActiveDocument.Range.HighlightColorIndex = wdNoHighlight

    ' Highlight spelling errors
    For Each r In ActiveDocument.SpellingErrors
        r.HighlightColorIndex = wdYellow
    Next r
End Sub
After running the macro, any highlighting you previously applied in your document is gone and all spelling errors are highlighted in yellow.
Note:
WordTips is your source for cost-effective Microsoft Word training. (Microsoft Word is the most popular word processing software in the world.) This tip (13498) applies to Microsoft Word 2007, 2010, 2013, 2016, 2019, 2021, and Word in Microsoft 365.

The First and Last Word on Word! Bestselling For Dummies author Dan Gookin puts his usual fun and friendly candor back to work to show you how to navigate Word 2019. Spend more time working and less time trying to figure it all out! Check out Word 2019 For Dummies today!
Need to make sure that Word includes abbreviations when you check a document's spelling? Here's how to make sure that ...
Discover MoreWhen you are typing in a document, Word normally checks your spelling in the background, marking possible spelling errors ...
Discover MoreThe spell-checking tool built into Word allows you to easily add words to a custom dictionary. What happens, though, if ...
Discover MoreFREE SERVICE: Get tips like this every week in WordTips, a free productivity newsletter. Enter your address and click "Subscribe."
2017-03-16 05:50:54
Ken Endacott
It is possible to apply NoProofing to selected text with the command:
Review > Language > Set Proofing Language > Do not Check Spelling or Grammar.
It should therefore be possible to set NoProofing to say half the document so that spelling is checked for half the document at a time assuming each half has less than 1400 errors. However Word will only allow up to 48 paragraphs to be set per command, if the selection is greater then the command does nothing. This limit is not documented and can cause frustration if you try to set NoProofing for a large block of text.
The solution is to use a macro to step through the selection and set NoProofing one paragraph at a time, then there is no limit on the size of the selection. At the end the macro resets the display of spelling errors that may have been turned off by the error message. The second macro removes NoProofing.
Sub SetNoProofing()
Dim aPara As Paragraph
For Each aPara In Selection.Range.Paragraphs
aPara.Range.NoProofing = True
Next aPara
Options.CheckSpellingAsYouType = True
ActiveDocument.ShowSpellingErrors = True
Application.ScreenRefresh
End Sub
Sub RemoveNoProofing()
Dim aPara As Paragraph
For Each aPara In Selection.Range.Paragraphs
aPara.Range.NoProofing = False
Next aPara
ActiveDocument.ShowSpellingErrors = True
Application.ScreenRefresh
End Sub
2017-03-15 06:29:11
Lee
Thank you SO MUCH! This tips helps me stay sane in my translation works.
2016-12-03 06:18:10
Gil
I have one long document where I cut and paste a lot of text from other people's documents and from internet sites. Before long, my document accumulates a lot of spelling errors; some times because the other writers use medical terms, or slang, or foreign words, etc.
When I reach the Word limit for highlighting errors, I cut a large section of the document and paste it into a new Word document. If I have removed enough of the offending errors and close and reopen the document) Word will show the spelling errors again. I then clean up the spelling mistakes. I can use the Ignore All spelling command if appropriate for a particular word. I can also use the Replace feature to replace a repeatedly misspelled word with the correctly spelled one.
I then re-paste the text that I moved to the new Word document back into the original main document. If I cleaned up enough errors, I am good to go again.
Got a version of Word that uses the ribbon interface (Word 2007 or later)? This site is for you! If you use an earlier version of Word, visit our WordTips site focusing on the menu interface.
Visit the WordTips channel on YouTube

FREE SERVICE: Get tips like this every week in WordTips, a free productivity newsletter. Enter your address and click "Subscribe."
Copyright © 2026 Sharon Parq Associates, Inc.
Comments