Checking Bilingual Documents

Written by Allen Wyatt (last updated January 31, 2026)
This tip applies to Word 2007, 2010, 2013, 2016, 2019, 2021, 2024, and Word in Microsoft 365


Keryn works at a bilingual university and often has English and Spanish mixed together in the same document. She has to manually select the text and set to review in Spanish. This can be very time consuming. Keryn wonders if there is a way to tell Word to review in two languages, by default. She knows this can increase the likelihood of spelling errors but it would be easier, for her, than selecting and setting languages over and over again.

Word cannot, by default, review in two different languages. As Keryn has discovered, you need to do something in order to tell Word what should be checked in which language. Once that specification is done, then Word can do the review in a single pass.

You can make the "specifying" process easier if you use styles in your document. Language (such as English or Spanish) is an attribute you can specify in a style. So, for instance, you could create a character style named something like "Spanish Text" and make sure that the style definition has the language for that style set to Spanish. Here are the steps to do that:

  1. Position the insertion point somewhere within a Spanish word. (Don't select the word; just make sure the insertion point is within the word.)
  2. Press Alt+Ctrl+Shift+S. Word displays the Styles task pane. (If your fingers get twisted when you try this shortcut, you can display the Home tab of the ribbon and click the small icon at the bottom-right of the Styles group.)
  3. At the bottom of the task pane there are 3 buttons. Click the New Style button. (Hover the mouse pointer over a button to see what it does.) Word displays the Create New Style from Formatting dialog box. The initial settings in the dialog box are based on the style of the paragraph in which the insertion point is located.
  4. Using the Style Type drop-down list, choose Character. In the middle of the dialog box there is a block of text that approximates what the new style will look like. Immediately below is a list of the formatting attributes assigned to the style. (See Figure 1.)
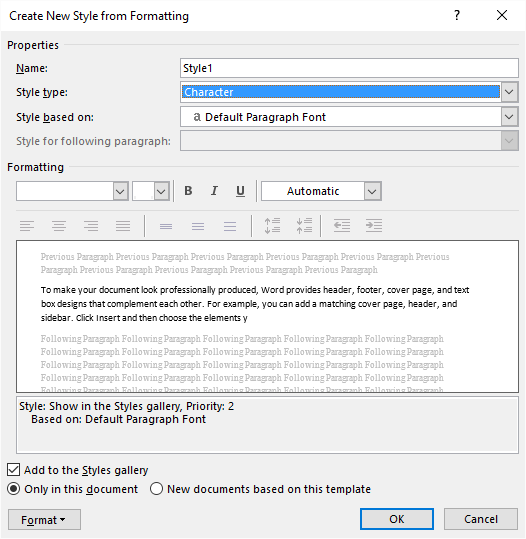
  5. Figure 1. The Create New Style from Formatting dialog box.

  6. Replace whatever is in the Name box with the name you want to use for this style. (For instance, you could specify a name of "Spanish Text.")
  7. Click the Format button and then choose Language. Word displays the Language dialog box. (See Figure 2.)
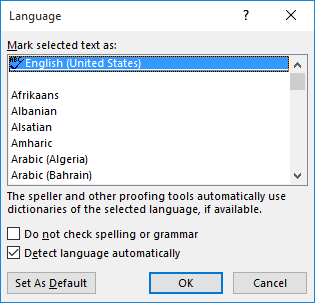
  8. Figure 2. The Language dialog box.

  9. In the list of available languages, locate and select the variation of Spanish you want to use. (There are several variations of Spanish. The one you select should be one for which you have proofing tools available in your copy of Word.)
  10. Click OK to close the Language dialog box.
  11. Click the Format button and then choose Shortcut Key. Word displays the Customize Keyboard dialog box. (See Figure 3.) If you don't want to define a shortcut key for your new style, you can simply ignore this step and skip to step 13.
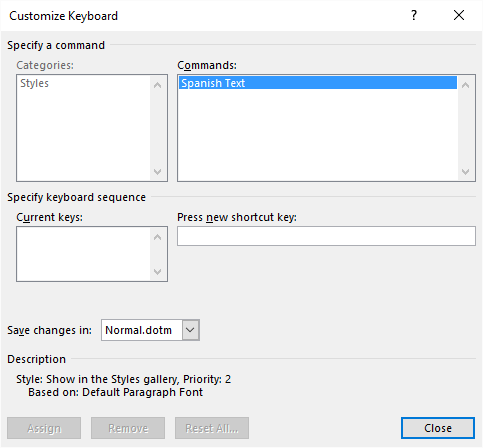
  12. Figure 3. The Customize Keyboard dialog box.

  13. With the insertion point in the Press New Shortcut Key box, press whatever shortcut key you want used for your new style. (A good one to use might be Alt+S.) As you press the shortcut key, just below Current Keys box you'll see a notification if the shortcut key is already assigned to a different function in Word. If so, you can erase the contents of the Press New Shortcut Key box and try a different shortcut key.
  14. Click the Assign button. Your shortcut key moves from the Press New Shortcut Key box over to the Current Keys box.
  15. Click Close to dismiss the Customize Keyboard dialog box.
  16. Click OK to close the Create New Style from Formatting dialog box.
  17. Close the Styles task pane.

You've now created the style you want to use for your Spanish text. You would then apply that style to any words you type in Spanish, and Word would take care of doing the spelling and grammar checks appropriately. If you defined a shortcut key for the style (steps 9 through 12) then you can use the shortcut key to apply the style to whatever text you selected.

The bottom line is that it is much easier to apply a style to selected text than it is to continually change the Language setting for selected text.

WordTips is your source for cost-effective Microsoft Word training. (Microsoft Word is the most popular word processing software in the world.) This tip (13441) applies to Microsoft Word 2007, 2010, 2013, 2016, 2019, 2021, 2024, and Word in Microsoft 365.

Author Bio

Allen Wyatt

With more than 50 non-fiction books and numerous magazine articles to his credit, Allen Wyatt is an internationally recognized author. He is president of Sharon Parq Associates, a computer and publishing services company. ...

MORE FROM ALLEN

Unlocking a Worksheet with an Unknown Password

It is not unusual, in a corporate world, to be handed a worksheet whose source you don't know. If that worksheet is ...

Discover More

Working with Master and Subdocuments

Word has long had the capability of establishing relationships between documents by designating some as master documents ...

Discover More

Converting Forms to Regular Documents

Word allows you to protect documents that are intended to be used as forms. If you want to convert the form responses ...

Discover More

Do More in Less Time! An easy-to-understand guide to the more advanced features available in the Microsoft 365 version of Word. Enhance the quality of your documents and boost productivity in any field with this in-depth resource. Complete your Word-related tasks more efficiently as you unlock lesser-known tools and learn to quickly access the features you need. Check out Microsoft 365 Word For Professionals For Dummies today!

More WordTips (ribbon)

Conditional Style Application

Wouldn't it be great if Word had a conditional formatting capability? Unfortunately, it doesn't, but there are some ...

Discover More

Applying Styles

Styles are a powerful formatting tool for the text in your documents. Once you've created styles that describe how you ...

Discover More

Searching for Styles

If you use styles to format your text, you can later search for words and phrases that are formatted using various ...

Discover More
Subscribe

FREE SERVICE: Get tips like this every week in WordTips, a free productivity newsletter. Enter your address and click "Subscribe."

View most recent newsletter.

Comments

If you would like to add an image to your comment (not an avatar, but an image to help in making the point of your comment), include the characters [{fig}] (all 7 characters, in the sequence shown) in your comment text. You’ll be prompted to upload your image when you submit the comment. Maximum image size is 6Mpixels. Images larger than 600px wide or 1000px tall will be reduced. Up to three images may be included in a comment. All images are subject to review. Commenting privileges may be curtailed if inappropriate images are posted.

What is 3 - 3?

There are currently no comments for this tip. (Be the first to leave your comment—just use the simple form above!)


This Site

Got a version of Word that uses the ribbon interface (Word 2007 or later)? This site is for you! If you use an earlier version of Word, visit our WordTips site focusing on the menu interface.

Videos
Subscribe

FREE SERVICE: Get tips like this every week in WordTips, a free productivity newsletter. Enter your address and click "Subscribe."

(Your e-mail address is not shared with anyone, ever.)

View the most recent newsletter.