Patsy has a document that has headers and footers in it. Each has information at three places: left, centered, and right. If she later changes the margins of the document, the previously centered portion is no longer centered. (The center-aligned tab was set based upon the old line width, which is no longer valid after the margin change.) Patsy wonders if there is a way to set up the header or footers so that the centered information remains centered, even if she needs to change margins.
The traditional way to solve this problem is to put a three-celled, single-row table in the header or footer. You can put text in the left, center, and right cells and then format or align that text any way you like within the cell. As long as the table width is set to 100%, it will adjust automatically to any changes in the overall line width.
There is an even better way to get the desired result: through the use of alignment tabs. Follow these steps:
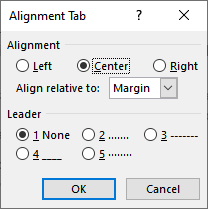
Figure 1. The Alignment Tab dialog box.
If you have non-printing characters visible on your screen, you'll notice that Word displays the alignment tab using the familiar arrow character it normally uses for tabs. While alignment tabs, in this respect, look like regular tabs, they are very different. Regular tabs are set at a particular distance from the left margin, while alignment tabs are set at a relative position (left, center, or right) to both margins. This means that if you later make a formatting change that adjusts those margins (such as Patsy did), change paper size, or even change from portrait to landscape orientation, the alignment tabs adjust the information that follows them relative to the margin change. This is very powerful!
I noted that if you have non-printing characters visible then alignment tabs look like regular tabs. If you need (for some reason) to determine whether a tab character is a normal tab or an alignment tab, one way to do so is to try deleting it. Position the insertion point just to the left of the tab character and press the Delete key. If the tab disappears, then it was a regular tab. If the symbol for the tab character (the arrow) is, instead, simply selected, then that is an alignment tab.
Since alignment tabs were introduced in Word 2007, they are only viable in documents saved in the DOCX or DOCM formats (or templates saved in the newer file format). If you are working on a document using the older DOC file format or you are working in compatibility mode, then alignment tabs have no efficacy—they are treated as regular tabs.
WordTips is your source for cost-effective Microsoft Word training. (Microsoft Word is the most popular word processing software in the world.) This tip (13426) applies to Microsoft Word 2007, 2010, 2013, 2016, 2019, 2021, and Word in Microsoft 365.

Do More in Less Time! An easy-to-understand guide to the more advanced features available in the Microsoft 365 version of Word. Enhance the quality of your documents and boost productivity in any field with this in-depth resource. Complete your Word-related tasks more efficiently as you unlock lesser-known tools and learn to quickly access the features you need. Check out Microsoft 365 Word For Professionals For Dummies today!
When working with existing documents, you may need to delete a header or footer previously created. Here's how you can do ...
Discover MoreDon't want a header or footer to appear on just a portion of your document? It's easy to do when you understand that ...
Discover MoreHeaders and footers add a nice finishing touch to a document you plan on printing. You may want all sorts of information ...
Discover MoreFREE SERVICE: Get tips like this every week in WordTips, a free productivity newsletter. Enter your address and click "Subscribe."
2023-02-26 00:31:22
Tomek
Allen:
Nice hidden gem.
I tried it and it worked as you described. Then the geeky cat in me got curious,so I tried to mix regular tabs with the alignment tabs, and it worked too. Alignment tabs just ignore regular tab settings.
Moreover, I found that you can copy the center alignment tab from the header and paste it in the body of text and it keeps its special behaviour.
Then I found that you can add the Insert Alignment Tab button to your QAT (from All Commands.)
Would it be useful? Maybe. I recently worked on a document where I had several in-line pictures I wanted to center-align between margins. There was one picture per line with some short text to the left as well as to the right. I set it up fine with tabs, but then decided to change the page size and orientation. I had to readjust the tabs as they stayed absolute to the left margin. If I knew this trick I would have used it then.
Got a version of Word that uses the ribbon interface (Word 2007 or later)? This site is for you! If you use an earlier version of Word, visit our WordTips site focusing on the menu interface.
Visit the WordTips channel on YouTube

FREE SERVICE: Get tips like this every week in WordTips, a free productivity newsletter. Enter your address and click "Subscribe."
Copyright © 2026 Sharon Parq Associates, Inc.
Comments