Please Note: This article is written for users of the following Microsoft Word versions: 2007, 2010, 2013, 2016, 2019, and 2021. If you are using an earlier version (Word 2003 or earlier), this tip may not work for you. For a version of this tip written specifically for earlier versions of Word, click here: Changing Spacing Between Table Cells.
Word contains a very powerful table editor, which allows you to create very complex tables. Normally, Word does not add any additional space between the cells in a table. You can manually adjust the amount of space, however. Follow these steps:
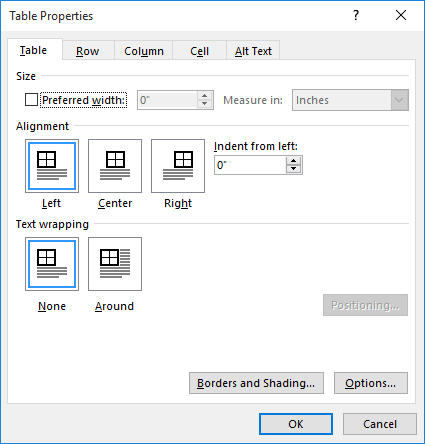
Figure 1. The Table tab of the Table Properties dialog box.
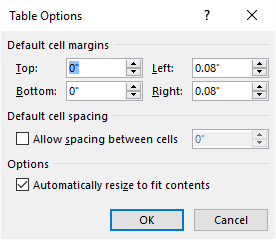
Figure 2. The Table Options dialog box.
WordTips is your source for cost-effective Microsoft Word training. (Microsoft Word is the most popular word processing software in the world.) This tip (13173) applies to Microsoft Word 2007, 2010, 2013, 2016, 2019, and 2021. You can find a version of this tip for the older menu interface of Word here: Changing Spacing Between Table Cells.

Do More in Less Time! An easy-to-understand guide to the more advanced features available in the Microsoft 365 version of Word. Enhance the quality of your documents and boost productivity in any field with this in-depth resource. Complete your Word-related tasks more efficiently as you unlock lesser-known tools and learn to quickly access the features you need. Check out Microsoft 365 Word For Professionals For Dummies today!
Need to make your table a different size? It's easy to do, using the same general technique you use when resizing a ...
Discover MorePress the Tab key in a table, and Word dutifully moves to the next cell in that table. Press it in the last cell of a ...
Discover MoreIf you have problems getting the printout of a table to look correct, it can be frustrating. This tip provides a few ...
Discover MoreFREE SERVICE: Get tips like this every week in WordTips, a free productivity newsletter. Enter your address and click "Subscribe."
2022-04-15 20:54:05
John Mann
@Pawel
I found a couple of ways to trick Word 2010 into giving the appearance of the last 2 rows of a table not having spacing between cells. Neither is entirely satisfactory, but may be good enough for the job .
First Trick
1) Create a table with the required number of rows and columns,
2) then merger the last 2 rows into together to make one cell the sise of the entire 2 rows.
3) Next set the spacing between cells as required - that will include your super-sized bottom cell
4) Into that bottom cell (the one that's the width of the table) insert a table of 2 rows and the correct number of columns
The will give you a table with all but the last 2 rows having spacing between cells, while the bottom 2 rows are in contact. The minor problem is that the left and right end cells of these last 2 rows line up with the equivalent edges of the cells above. It is also a bit tricky adding more rows if needed - especially into the upper rows.
2nd Trick
This is most easily done if you have paragraph markers visible
1) Create a table of the required size except for the last 2 rows
2) Set the spacing between cells as required
3) In the body of the document below the existing table create a new table of the required size without the cell spacing
4) select the paragraph marker between the tables and delete it.
That should move the 2nd table to be immediatly below the first, and look like it's only one table. You may need to play with the spacing below and above paragraphs first.
Hope these suggestions help
2022-03-29 18:38:55
Pawel
Hi, thanks for this tutorial. Do you know if this is also feabisle for one pair of rows only? for instance, spaces between rows 1-12 are custom and I just would like to set the space between the last two rows (13-14) to be 0.
Thanks in advance.
Got a version of Word that uses the ribbon interface (Word 2007 or later)? This site is for you! If you use an earlier version of Word, visit our WordTips site focusing on the menu interface.
Visit the WordTips channel on YouTube

FREE SERVICE: Get tips like this every week in WordTips, a free productivity newsletter. Enter your address and click "Subscribe."
Copyright © 2026 Sharon Parq Associates, Inc.
 Please Note:
This article is written for users of the following Microsoft Word versions: 2007, 2010, 2013, 2016, 2019, and 2021. If you are using an earlier version (Word 2003 or earlier), this tip may not work for you. For a version of this tip written specifically for earlier versions of Word, click here:
Please Note:
This article is written for users of the following Microsoft Word versions: 2007, 2010, 2013, 2016, 2019, and 2021. If you are using an earlier version (Word 2003 or earlier), this tip may not work for you. For a version of this tip written specifically for earlier versions of Word, click here:
Comments