Written by Allen Wyatt (last updated September 15, 2021)
This tip applies to Word 2007, 2010, 2013, and 2016
In Mary's office they routinely create PDF files from Word documents. They do this by using Save As and choosing to save the document as a PDF file. This seems rather "click intensive" to Mary, so she wonders if there is a shortcut available, within Word, for saving a document as a PDF file.
There are two ways that you can approach this task. First, you could add a command to Quick Access Toolbar:
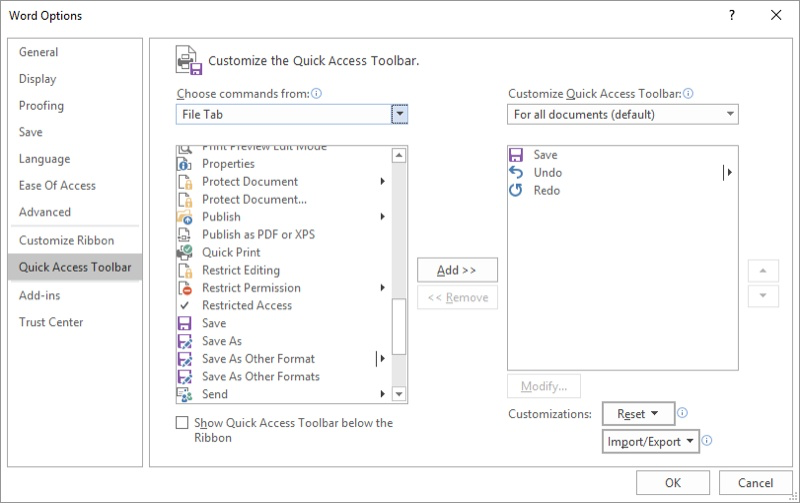
Figure 1. Adding a command to the Quick Access Toolbar.
This tool, when clicked, displays a dialog box that looks very much like a Save As dialog box. All you'll need to do is to provide the name you want used for the PDF file and, optionally, pick a folder where you want the file saved.
You can take a similar approach through the use of a macro, if desired. The difference is that this approach actually does display the Save As dialog box.
Sub SaveAsPDF1()
    With Dialogs(wdDialogFileSaveAs)
        .Format = wdExportFormatPDF
        .Show
    End With
End Sub
As with all macros, you can add it to the Quick Access Toolbar or create a shortcut key to invoke it.
Both approaches discussed so far display a dialog box into which you must type a file name and pick a location for the PDF file. If you want to bypass the dialog box completely, a different macro approach may work for you.
Sub SaveAsPDF2()
    Dim sName As String
    Dim sPath As String

    With ActiveDocument
        sName = Left(.Name, InStr(.Name, ".") - 1)
        sName = sName & ".pdf"
        sPath = .Path & "\"

        .ExportAsFixedFormat _
          OutputFileName:=sPath & sName, _
          ExportFormat:=wdExportFormatPDF
    End With
End Sub
This macro figures out the folder for the currently open document and then saves the PDF into that folder using the same name as the document. So, for instance, if you are working on a document called "MyDoc.docx," then this macro will save the PDF as "MyDoc.pdf." No dialog box is displayed; the PDF file is simply created and saved.
If you prefer for your PDF files to be saved in a different folder, all you would need to do is assign the full path to that folder to the sPath variable. As an example, let's say that you want all your PDF files to be saved in a common folder. Just replace this line:
sPath = .Path & "\"
with a line similar to this one, modified for your desired path:
sPath = "c:\mypath\pdfs\"
Note:
WordTips is your source for cost-effective Microsoft Word training. (Microsoft Word is the most popular word processing software in the world.) This tip (12240) applies to Microsoft Word 2007, 2010, 2013, and 2016.

Do More in Less Time! An easy-to-understand guide to the more advanced features available in the Microsoft 365 version of Word. Enhance the quality of your documents and boost productivity in any field with this in-depth resource. Complete your Word-related tasks more efficiently as you unlock lesser-known tools and learn to quickly access the features you need. Check out Microsoft 365 Word For Professionals For Dummies today!
You can change the order in which pages are printed (normal or reversed) using the Print dialog box or the print settings ...
Discover MoreSome printers allow you to print on both sides of a piece of paper. If you want to print a portion of your document ...
Discover MorePutting words on the printed page is easy in Word. Rotating those words in different manners can be a bit trickier. This ...
Discover MoreFREE SERVICE: Get tips like this every week in WordTips, a free productivity newsletter. Enter your address and click "Subscribe."
2026-02-14 20:44:30
Tomek
Thank you, Allen, for replying to my request.
The macro you proposed works well and does exactly what I wanted. Moreover, the first loophole you mentioned (pasting values into validated cells) is actually handled correctly. This is important for me as I often paste the data from another workbook, which is extracting the game score results from social media, where participants share them with the group. If I mis-align the pasted data, they will almost certainly break validation rules, and your macro will let me know.
It even works when the cell's or cells' value is changed by a macro, which standard validation does not check.
You are correct that I have large areas of validated data, not just two cells, but modifying the macro to check all the validated cells when only a few cells were changed would be inefficient. However, I can easily modify your macro to check all validated cells and run it on demand, say before archiving a full month of data.
Thanks again.
Got a version of Word that uses the ribbon interface (Word 2007 or later)? This site is for you! If you use an earlier version of Word, visit our WordTips site focusing on the menu interface.
Visit the WordTips channel on YouTube

FREE SERVICE: Get tips like this every week in WordTips, a free productivity newsletter. Enter your address and click "Subscribe."
Copyright © 2026 Sharon Parq Associates, Inc.
Comments