Please Note: This article is written for users of the following Microsoft Word versions: 2007, 2010, 2013, 2016, 2019, 2021, 2024, and Word in Microsoft 365. If you are using an earlier version (Word 2003 or earlier), this tip may not work for you. For a version of this tip written specifically for earlier versions of Word, click here: Converting Lists to Text.
Written by Allen Wyatt (last updated April 5, 2025)
This tip applies to Word 2007, 2010, 2013, 2016, 2019, 2021, 2024, and Word in Microsoft 365
If you have used Word's numbered list feature, you have probably noticed that the numbers at the beginning of each list item cannot be selected. Further, as you delete or add items in your list, the other items in the list are renumbered to compensate for your actions.
In most instances, this is exactly how you expect and want your numbered lists to work. There may be times, however, when you want the lists to be "frozen," meaning that the numbers won't change. In these instances, the automatic numbering feature can seem more of a frustration than a nicety.
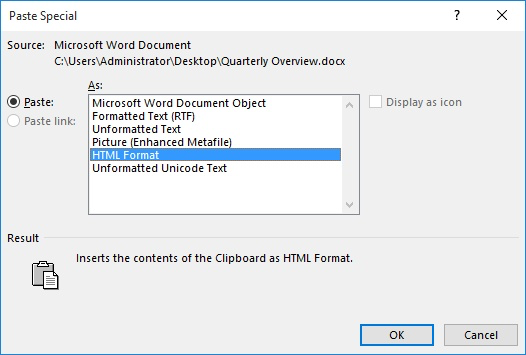
There are two ways around this problem. The first, which I refer to as the brute force method, involves a bit of cutting and pasting. All you need to do is follow these general steps:

Figure 1. The Paste Special dialog box.
These actions replace the existing dynamic list with the text of itself, and Word automatically converts the automatic numbering to text.
There are, of course, several different drawbacks to this. First of all, you lose any other special formatting you may have in the list items. If you have some words formatted differently than the paragraph defaults (for instance, bold or italic words), these are eliminated and must be manually redone.
An easier approach is to use a macro to do the job for you. VBA includes a special method that removes the drawbacks already noted and does the conversion much cleaner. None of your other formatting, other than the automatic list numbers, is affected. The following is the ListPlain macro:
Sub ListPlain()
    Dim lp As Paragraph

    For Each lp In ActiveDocument.ListParagraphs
        lp.Range.ListFormat.ConvertNumbersToText
    Next lp
End Sub
Notice how short the macro is. It also runs very quickly, and affects all numbering in the entire document. Any numbered lists that rely on Word's automatic numbering are affected, as are any LISTNUM fields.
Note:
WordTips is your source for cost-effective Microsoft Word training. (Microsoft Word is the most popular word processing software in the world.) This tip (11072) applies to Microsoft Word 2007, 2010, 2013, 2016, 2019, 2021, 2024, and Word in Microsoft 365. You can find a version of this tip for the older menu interface of Word here: Converting Lists to Text.

Do More in Less Time! An easy-to-understand guide to the more advanced features available in the Microsoft 365 version of Word. Enhance the quality of your documents and boost productivity in any field with this in-depth resource. Complete your Word-related tasks more efficiently as you unlock lesser-known tools and learn to quickly access the features you need. Check out Microsoft 365 Word For Professionals For Dummies today!
Want to make sure your paragraph numbering looks the same on different computer systems? It's a harder task in Word than ...
Discover MoreWhen you convert a paragraph to a numbered list, Word adds a number at the start of the paragraph, as you would expect. ...
Discover MoreWord provides tools that allow you to add numbered lists to your documents. Sometimes the quirks built into these tools ...
Discover MoreFREE SERVICE: Get tips like this every week in WordTips, a free productivity newsletter. Enter your address and click "Subscribe."
2025-04-06 08:01:08
Simon Freeman
Could this macro be adapted to run over selected text - ie over just one list in a document with several.
Got a version of Word that uses the ribbon interface (Word 2007 or later)? This site is for you! If you use an earlier version of Word, visit our WordTips site focusing on the menu interface.
Visit the WordTips channel on YouTube
FREE SERVICE: Get tips like this every week in WordTips, a free productivity newsletter. Enter your address and click "Subscribe."
Copyright © 2026 Sharon Parq Associates, Inc.
Comments