Dave recently upgraded his copy of Word and noticed that the text displayed in Draft view wraps on the screen differently than it used to. In his earlier version of Word the text would wrap at the right margin, as it was shown on the Ruler. In the newer version the text extended past the right margin (as shown on the Ruler) and only wraps when the right side of the document window is reached.
The problem being described isn't really a problem. It is a "feature" of Word that has been available for many, many years. You can control this feature by following these steps:
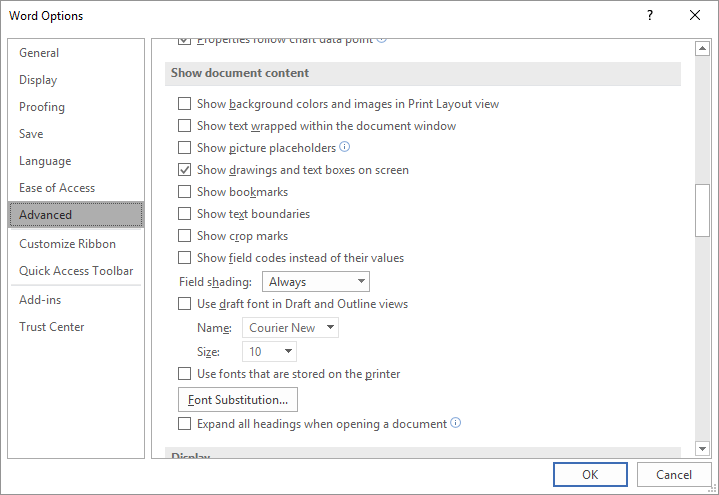
Figure 1. The advanced options in the Word Options dialog box.
The check box in step 4, when selected, makes the text in Draft and Outline views extend the full width of the document window, without regard to where the margin is set. This only affects what you see on the screen; it does not affect any printouts. If the check box is cleared, then the margins are minded and the text wraps where you expect it to wrap.
The need for this feature is rooted in history. The original intent of Draft view (which used to be called Normal view) was to speed up work by foregoing an exact WYSIWYG format. In this view, Word does not worry about line breaks, margins and page breaks in the same manner as in the Print Layout view. Likewise, graphics objects are not displayed. The point is to release computer resources to facilitate doing the work of entering and editing content. The purpose of the Show Text Wrapped Within the Document Window setting is to allow even more information to appear on-screen, since WYSIWYG isn't being paid attention to in Draft view anyway.
It is not unusual for people, these days, to bypass using Draft view and instead using Print Layout view. The Show Text Wrapped Within the Document Window setting has no bearing on this view, since the essence of Print Layout view is to show a very close representation of what your final printout will look like. If you want to use Draft view, there is nothing wrong with that (I do it all the time), but you'll need to pay attention to settings such as the Show Text Wrapped Within the Document Window check box so that your display looks like you want it to.
WordTips is your source for cost-effective Microsoft Word training. (Microsoft Word is the most popular word processing software in the world.) This tip (10690) applies to Microsoft Word 2007, 2010, 2013, 2016, 2019, 2021, and Word in Microsoft 365.

Discover the Power of Microsoft Office This beginner-friendly guide reveals the expert tips and strategies you need to skyrocket your productivity and use Office 365 like a pro. Mastering software like Word, Excel, and PowerPoint is essential to be more efficient and advance your career. Simple lessons guide you through every step, providing the knowledge you need to get started. Check out Microsoft Office 365 For Beginners today!
A great way to work on different parts of the same document at the same time is to create windows. These function as ...
Discover MoreAbbreviations appear all over the place in our society. If you want to understand how Word recognizes them (which it has ...
Discover MoreShould you put two spaces after a sentence or just one? Ask different people and you will get different answers. To Word ...
Discover MoreFREE SERVICE: Get tips like this every week in WordTips, a free productivity newsletter. Enter your address and click "Subscribe."
There are currently no comments for this tip. (Be the first to leave your comment—just use the simple form above!)
Got a version of Word that uses the ribbon interface (Word 2007 or later)? This site is for you! If you use an earlier version of Word, visit our WordTips site focusing on the menu interface.
Visit the WordTips channel on YouTube

FREE SERVICE: Get tips like this every week in WordTips, a free productivity newsletter. Enter your address and click "Subscribe."
Copyright © 2026 Sharon Parq Associates, Inc.
Comments