Please Note: This article is written for users of the following Microsoft Word versions: 2007, 2010, 2013, and 2016. If you are using an earlier version (Word 2003 or earlier), this tip may not work for you. For a version of this tip written specifically for earlier versions of Word, click here: Using Multiple Tables of Contents.

Using Multiple Tables of Contents

Written by Allen Wyatt (last updated August 28, 2023)
This tip applies to Word 2007, 2010, 2013, and 2016


8

Word allows you to include multiple tables of contents in a single document. Thus, you can have a table of contents for each chapter of a book, even if all the chapters are in the same document.

The easiest way to create multiple tables of contents is to use styles. What you want to do is to create a set of styles for the headings you want included in each TOC. For example, you might use styles named “Chapter1Heading1”, “Chapter1Heading2”, and so on for the first chapter, and “Chapter2Heading1”, etc., for the second chapter. Once you are done creating all the styles for your headings, you'll need to apply those styles to the actual headings in your document. (How you create and apply styles is beyond the scope of this tip, but has been covered extensively in other WordTips.)

With your styles defined and applied to all the appropriate headings in your document, you are ready to generate the tables of contents. You can do this by following these steps:

  1. Position the insertion point at the location in the document where you want the table of contents.
  2. Display the References tab of the ribbon.
  3. At the left of the ribbon click the Table of Contents tool. Word displays a few options.
  4. Click Insert Table of Contents. Word displays the Table of Contents dialog box. (See Figure 1.)
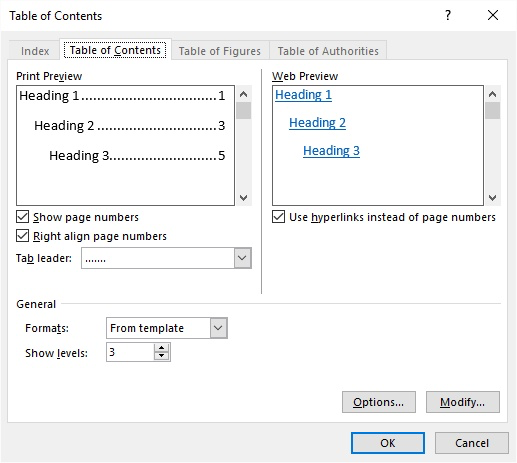
  5. Figure 1. The Table of Contents tab of the Table of Contents dialog box.

  6. Click on the Options button. Word displays the Table of Contents Options dialog box. (See Figure 2.)
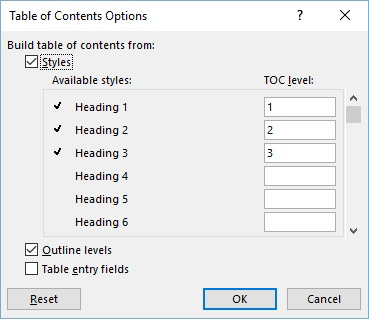
  7. Figure 2. The Table of Contents Options dialog box.

  8. Change the TOC Level column to reflect which styles you are using in the table of contents you are inserting. Thus, if you were using doing a TOC for Chapter 1, beside the “Chapter1Heading1” style you would place a 1 in the TOC Level column.
  9. Click on OK to close the Table of Contents Options dialog box.
  10. Click on OK to close the Table of Contents dialog box and generate the table of contents.

You should note that if, before following the above steps, your document already contains a TOC that was generated from a building block (done by selecting one of the predefined TOC styles), when you close the Table of Contents dialog box in step 8 the previous TOC is selected and you are asked if you want to replace it with the new TOC. In most instances you won't want to do that, you'll want to add the new TOC to any you've already defined.

There is another approach you can use that is well suited if you simply want to add a second TOC that applies to just a small portion of your document. This approach relies on the use of bookmarks. Follow these general steps:

  1. Select all of the text you want included in the TOC and assign a bookmark (such as PARTx) to the text. (How you create bookmarks is, again, beyond the scope of this tip by has been covered elsewhere in WordTips.)
  2. Create a TOC based on the headings in your document. When you are done, this TOC will apply to the entire document.
  3. Position the insertion point just before the TOC you just created.
  4. Press Alt+F9. All of the fields in your document are changed so that they show the field codes instead of the results of the field codes. This means that you'll see the field code for the TOC you just entered; it will look something like this:
  5.      { TOC \o "1-2" \h \z \u }
    
  6. Modify the field code so that it looks similar to this:
  7.      { TOC \o "1-2" \h \z \u \b PARTx }
    
  8. Press Alt+F9. This toggles Word so that it shows the results of the field codes. Your TOC should again be visible, but it still needs to be updated.
  9. Position the insertion point within the TOC and press F9. If prompted, indicate you want to update the entire table.

This approach (of using bookmarks) is also covered at one of Microsoft's sites, here:

http://office.microsoft.com/en-us/word-help/add-a-table-of-contents-for-each-section-HA102322445.aspx

Even though the page indicates that the steps shown are for Word 2007 and Word 2010, they also work just fine in later versions of the program.

WordTips is your source for cost-effective Microsoft Word training. (Microsoft Word is the most popular word processing software in the world.) This tip (10080) applies to Microsoft Word 2007, 2010, 2013, and 2016. You can find a version of this tip for the older menu interface of Word here: Using Multiple Tables of Contents.

Author Bio

Allen Wyatt

With more than 50 non-fiction books and numerous magazine articles to his credit, Allen Wyatt is an internationally recognized author. He is president of Sharon Parq Associates, a computer and publishing services company. ...

MORE FROM ALLEN

Checkboxes in a Merged Document

When creating a mail-merge document, you may want to include some special characters, such as check-marked boxes, in the ...

Discover More

Determining if Num Lock is On

Need to know if the Num Lock key is on or off? You can use a short bit of macro code to figure out the state of the key.

Discover More

Condensing and Expanding Headings

When working in Outline view, you'll undoubtedly have the need to expand or condense information under your headings. It ...

Discover More

Do More in Less Time! Are you ready to harness the full power of Word 2013 to create professional documents? In this comprehensive guide you'll learn the skills and techniques for efficiently building the documents you need for your professional and your personal life. Check out Word 2013 In Depth today!

More WordTips (ribbon)

Paragraph Numbers instead of Page Numbers in a TOC

Word is great at creating a simple, straightforward table of contents. If you want a more non-traditional TOC, however, ...

Discover More

Problems with TOC Styles

If you generate a table of contents for your document, there may be some unexpected surprises in the way the TOC appears. ...

Discover More

Adding Column Headings to a Table of Contents

Word makes it easy to create a Table of Contents. If you want column headings in that table, getting them takes a bit of ...

Discover More
Subscribe

FREE SERVICE: Get tips like this every week in WordTips, a free productivity newsletter. Enter your address and click "Subscribe."

View most recent newsletter.

Comments

If you would like to add an image to your comment (not an avatar, but an image to help in making the point of your comment), include the characters [{fig}] (all 7 characters, in the sequence shown) in your comment text. You’ll be prompted to upload your image when you submit the comment. Maximum image size is 6Mpixels. Images larger than 600px wide or 1000px tall will be reduced. Up to three images may be included in a comment. All images are subject to review. Commenting privileges may be curtailed if inappropriate images are posted.

What is 7 - 2?

2023-06-20 18:20:47

Nanc

I was pretty good until step 5. Then the Options don't show the styles you just created. Does 1, 2 and 3 have anything to do with indents?


2020-10-02 05:29:14

Gailyb213

Great article, thank you.

Can the multiple TOCs have different formats? I want the TOC in the Master document to show page numbers but the TOC in each sub document to only show the heading titles.


2020-08-12 08:03:21

Will Kendall

This is really useful - thank you. However I have run into an issue. When I try to edit the second table of contents I have to start formatting again. Can you advise how I edit the setup of the second TOC?


2018-10-09 09:54:37

HelleN

thankyou! really helpful


2017-12-12 07:55:07

Mike Diesel

Correction to my Step 4. You have can't just type a field code. So you have to use Alan's step 4 above. But if you have to create a second TOC, you CAN copy that field code and edit it with the new bookmark.


2017-12-10 05:24:53

Mike Diesel

My comment continued: The last part of this tip was incredibly valuable to me.
I thought my comments were linked to the tip, but if not: https://wordribbon.tips.net/T010080_Using_Multiple_Tables_of_Contents.html

Today I created chapter-level TOCs for seven chapters in my new book!
Rather than including the Level 1 heading for the chapter, it looks better to:
1. Type a bold line that says "Table of Contents for Chapter XX" (not a heading)
2. The tedious part is to select the entire chapter AFTER its HEADING1, all the way almost to the Heading1 for the next chapter
3. Assign the selected text a bookmark. (Alt-I k)
Copy that bookmarkname to the clipboard so you don't forget the name.
4. After the line from Step 1, type in a line {TOC \o \h \z \u \b bookmarkname}
4. Click on that line and press F9 (If the above line is still visible, toggle field codes with Alt-F9)
5. If necessary, fix up any formatting problems, not only for Headings, but also other paragraphs that aren't headings but that you have assigned an outline level because you want it to appear in the TOC. See 4th paragraph of https://word.tips.net/T001345_Problems_with_TOC_Styles.html

P.S. All my books are in one very slow .docx. I am publishing a 3rd edition of my first 4 books in January. I estimate I can add chapter level TOCs to the those 30 chapters in 4-5 hours. Then a few hours to fix up formatting (step 5 above.) 4 books in one day of work. WOW!

Thanks, Alan

After I got the hand of this, for each new chapter, steps 1-3 took less than 5 minutes!
Then f9

Then 0-15 minutes to fix up formatting problems as explained above.


2017-12-09 12:26:43

Mike Diesel

1. This tip is written backwards. The good stuff is at the END of the article! Who wants to create multiple new Styles?

I read this several times over the last 2 years and each time, gave up in disgust :(
Meanwhile I have published 4 books missing the chapter level TOCs :(
google "diesel 1430 books"

Today I FINISHED it, and the last part is GREAT. :)

2. But after setting a BOOKMARK for the entire chapter (or whatever) why not just type
{TOC \o \h \z \u \b BOOKMARK}
then F9 that?

Thanks for all the great tips. I have bought numerous books from sharonparc.

P.S. My soon to be published 3rd edition of these books will include the chapter level TOCs from this poorly-presented, but incredible tip. I plan to add an acknowledgement to WT & SP in that edition.


2017-06-17 11:48:43

ABRAHAM M PAYTON JR

On more than one occasion your article mentioned previous "Word Tips." Wouldn't it be more helpful to some of your readers if there was a link or links to the "Word Tips" referenced? Your seasoned readers may not care. But as someone who just got on the ride for the first time it would be a tremendous help. Thank you.


This Site

Got a version of Word that uses the ribbon interface (Word 2007 or later)? This site is for you! If you use an earlier version of Word, visit our WordTips site focusing on the menu interface.

Videos
Subscribe

FREE SERVICE: Get tips like this every week in WordTips, a free productivity newsletter. Enter your address and click "Subscribe."

(Your e-mail address is not shared with anyone, ever.)

View the most recent newsletter.