Please Note: This article is written for users of the following Microsoft Word versions: 2007, 2010, 2013, 2016, 2019, and 2021. If you are using an earlier version (Word 2003 or earlier), this tip may not work for you. For a version of this tip written specifically for earlier versions of Word, click here: Adding Serial Commas in a Sentence.
Written by Allen Wyatt (last updated April 24, 2023)
This tip applies to Word 2007, 2010, 2013, 2016, 2019, and 2021
One of the most common issues faced by Emily when editing involves the insertion of the serial comma in an in-line list of items, before the final conjunction between list items. Emily's office enforces the use of the serial comma for clarity and to avoid such potentially awkward phrasings as, "I dedicate this book to my parents, Mother Teresa and Jesus." However, many writers do not like to use this comma, so Emily spends a good amount of time editing it into almost every paragraph of text she comes across. Emily notes that it would make her life easier if she had a macro that would search from the insertion point to the end of the current sentence and insert a comma before the next occurrence of the common conjunctions "and" and "or", but only if there is no comma already there.
What Emily is referring to is variously know as a "serial comma" or an "Oxford comma." Its use has been debated for decades by grammarians. (I don't want to get into a debate about it here, but will say that the use of an Oxford comma can improve clarity when it comes to inline lists, as Emily notes.)
Emily is looking for a rather simple solution to the problem, one that will search for the common conjunctions and insert a comma, as necessary. The best way to handle this situation is with a macro, as she notes. Here is one that will perform the task:
Sub SerialComma()
    Dim MySelection As Selection

    Selection.MoveRight Unit:=wdSentence, Extend:=wdExtend
    Set MySelection = Selection
    Selection.Find.ClearFormatting
    Selection.Find.Replacement.ClearFormatting
    With Selection.Find
        .Text = "([!,.?;:]) and "
        .Replacement.Text = "\1, and "
        .Forward = True
        .Wrap = wdFindStop
        .Format = False
        .MatchCase = False
        .MatchWildcards = True
    End With
    Selection.Find.Execute Replace:=wdReplaceAll
    MySelection.Select
    With Selection.Find
        .Text = "([!,.?;:]) or "
        .Replacement.Text = "\1, or "
    End With
    Selection.Find.Execute Replace:=wdReplaceAll
    MySelection.Select
    Selection.Collapse
End Sub
The macro first selects everything from the current insertion point to the end of the current sentence. Then, using a wild card search, it searches for an occurrence of the word "and" that doesn't follow a punctuation mark. If it finds it, it replaces the occurrence with a comma and the word "and". It will then do a similar search-and-replace operation for the word "or".
This macro can, of course, be assigned to a shortcut key or the Quick Access Toolbar to make adding this type of comma a snap.
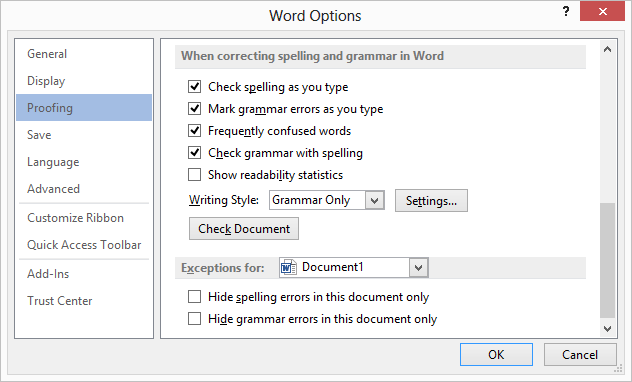
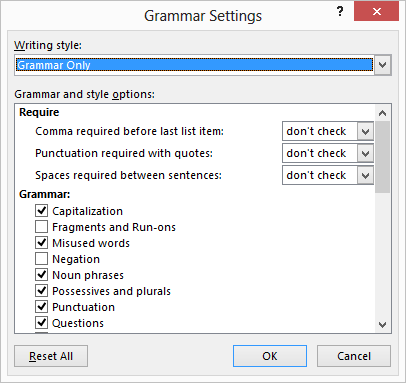
I recognize that this macro may not work for all grammatical permutations. (English is rather "squishy" that way.) It may be better to simply let Word check your document for you and flag anything that it questions when it comes to the presence of the Oxford comma (or lack thereof). You can make this change in this manner if you are using Word 2007, Word 2010, or Word 2013:

Figure 1. The Proofing options of the Word Options dialog box.

Figure 2. The Grammar Settings dialog box.
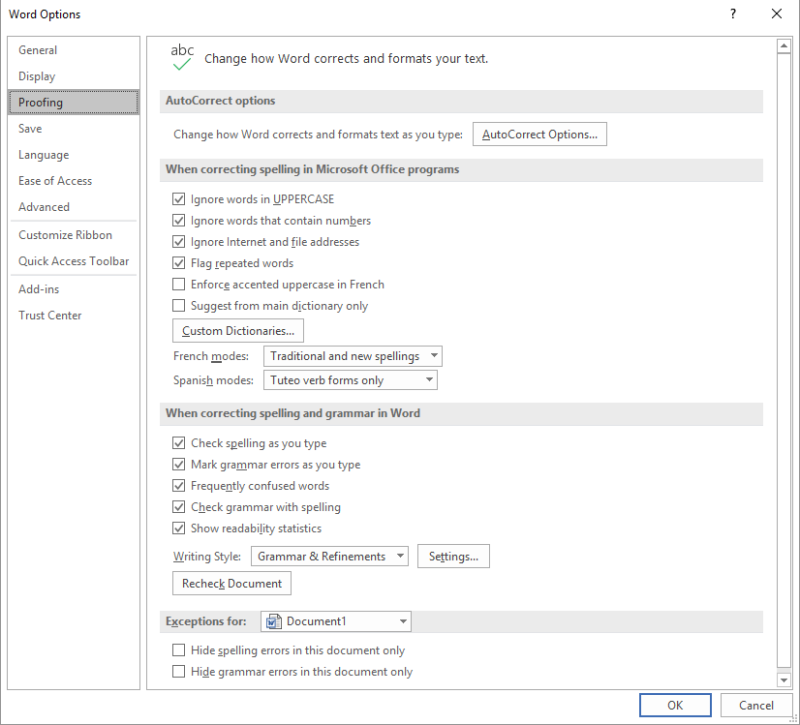
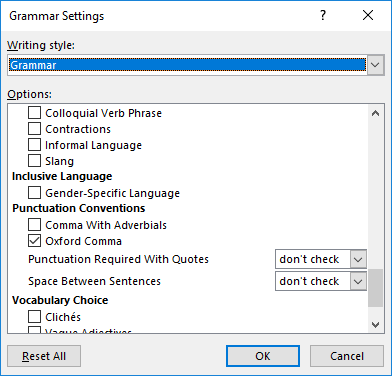
If you are using Word 2016 or a later version, use the following steps instead:

Figure 3. The Proofing options of the Word Options dialog box

Figure 4. The Oxford Comma Selected in Grammar Settings dialog box
The setting won't insert the last comma for you, but it will catch those instances where the comma is not present.
Note:
WordTips is your source for cost-effective Microsoft Word training. (Microsoft Word is the most popular word processing software in the world.) This tip (9295) applies to Microsoft Word 2007, 2010, 2013, 2016, 2019, and 2021. You can find a version of this tip for the older menu interface of Word here: Adding Serial Commas in a Sentence.

Create Custom Apps with VBA! Discover how to extend the capabilities of Office 365 applications with VBA programming. Written in clear terms and understandable language, the book includes systematic tutorials and contains both intermediate and advanced content for experienced VB developers. Designed to be comprehensive, the book addresses not just one Office application, but the entire Office suite. Check out Mastering VBA for Microsoft Office 365 today!
If you use justified paragraphs, you know that if you press Shift+Enter, it can lead to some odd spacing between words ...
Discover MoreEver wonder why you can't undo just a single edit you made a few minutes earlier? The short answer is that it could make ...
Discover MoreThere are lots of little "gotchas" that can make the difference between a finished document and a polished document. One ...
Discover MoreFREE SERVICE: Get tips like this every week in WordTips, a free productivity newsletter. Enter your address and click "Subscribe."
2022-09-17 13:25:31
James Martin
Interesting. Oxford comma seems pointless,I don't use it. We have a new political Minister in the UK, who has emailed staff to not use it, it has really annoyed them! I would use this though to annoy the Minister!
2018-09-19 10:25:24
Jennifer Thomas
Same concerns about this as in previous comments, so I tested it and it DOES put a comma before each 'And'.
Example:
My parents, Buddha and Maya Angelou are important influences in my life and work.
becomes
My parents, Buddha, and Maya Angelou are important influences in my life, and work.
Macros for grammar almost never work out as well as you hope because of the complexity of the language, so use your own brain as the primary resource for checking and turn on Grammar checker for assistance and a motivation to see if you really remember what your English teacher said all those years ago.
2018-09-18 03:45:25
Peter
I fail to see the point of having a macro that will put I so many incorrect commas. Surely the best way of achieving what is required is to use MS Word’s existing grammar checked to insert Oxford commas only where correct to do so? This is illustrated in Figure 4. The other huge advantage of MS Word’s own check is that you also get to choose on a case-by-case basis if the comma is inserted. The macro blindly puts them in everywhere.
2018-09-16 13:34:30
Bonnie Granat
For the macro, what happens if the text is "apples and oranges"? Is the macro going to put a comma after "apples"? We wouldn't want that.
2018-09-15 10:33:34
Carol Saller
Do I understand that this macro would put a comma before every "and" in your document (as long as there wasn't already some punctuation there)? There are normally many, many instances of "and" that must not be preceded by a comma. Wouldn't this macro cause just as much trouble as it would save? (As always, thanks for the continued Word Tips - I never miss a week!)
Got a version of Word that uses the ribbon interface (Word 2007 or later)? This site is for you! If you use an earlier version of Word, visit our WordTips site focusing on the menu interface.
Visit the WordTips channel on YouTube
FREE SERVICE: Get tips like this every week in WordTips, a free productivity newsletter. Enter your address and click "Subscribe."
Copyright © 2026 Sharon Parq Associates, Inc.
Comments