Please Note: This article is written for users of the following Microsoft Word versions: 2007, 2010, 2013, 2016, 2019, and 2021. If you are using an earlier version (Word 2003 or earlier), this tip may not work for you. For a version of this tip written specifically for earlier versions of Word, click here: Understanding Background Saving.
Written by Allen Wyatt (last updated September 29, 2018)
This tip applies to Word 2007, 2010, 2013, 2016, 2019, and 2021
You already know that it is important to periodically save your documents. This helps protect your work in case of catastrophic power failure or inadvertent massive edits (such as those imposed by an errant macro). When your document is small, saving to disk can be done very quickly. As your document grows, or as you start saving your document to storage devices that aren't that speedy, saving can take quite a bit longer to do.
To overcome the delay normally associated with saving a document, Word uses what is known as "background saving." This simply means that Word allows you to continue working as it actually writes your document to disk. The benefit is that you can keep right on working as Word does its housekeeping. You can tell when a background save is taking place because an animated disk appears on the status bar. When the disk disappears, the save is complete.
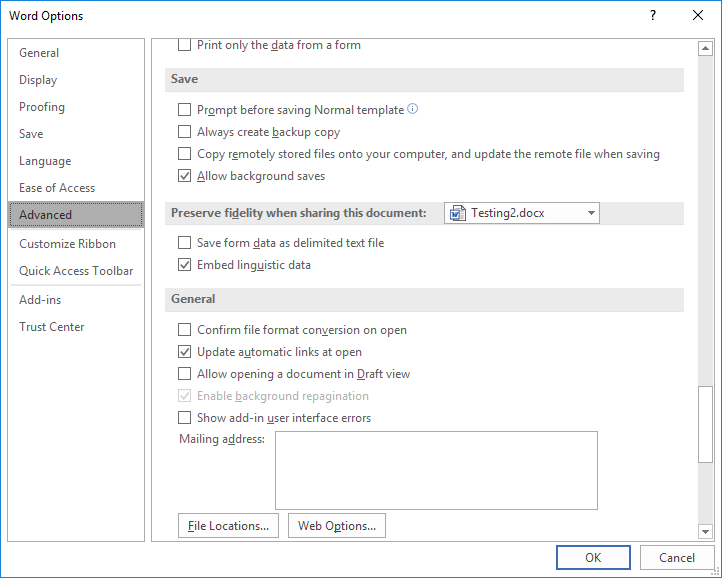
You can control whether the program utilizes background saving in the following manner:

Figure 1. The Save section of the Advanced options of the Word Options dialog box.
Understand that background saving isn't a protection against losing information if you forget to save or if Word crashes or you lose power. All it does is to make your normal saving process faster by allowing the saving to happen in the background after you click on the Save tool.
WordTips is your source for cost-effective Microsoft Word training. (Microsoft Word is the most popular word processing software in the world.) This tip (6106) applies to Microsoft Word 2007, 2010, 2013, 2016, 2019, and 2021. You can find a version of this tip for the older menu interface of Word here: Understanding Background Saving.

Discover the Power of Microsoft Office This beginner-friendly guide reveals the expert tips and strategies you need to skyrocket your productivity and use Office 365 like a pro. Mastering software like Word, Excel, and PowerPoint is essential to be more efficient and advance your career. Simple lessons guide you through every step, providing the knowledge you need to get started. Check out Microsoft Office 365 For Beginners today!
After using Word for a while, you may notice some "litter" of unused files on your hard drive. This tip explains how ...
Discover MoreIt is often helpful to have a list of all the documents in a given directory or folder. Word doesn't have a built-in way ...
Discover MoreWord allows you to save your documents in a wide variety of formats. If you want to limit the formats that are available, ...
Discover MoreFREE SERVICE: Get tips like this every week in WordTips, a free productivity newsletter. Enter your address and click "Subscribe."
There are currently no comments for this tip. (Be the first to leave your comment—just use the simple form above!)
Got a version of Word that uses the ribbon interface (Word 2007 or later)? This site is for you! If you use an earlier version of Word, visit our WordTips site focusing on the menu interface.
Visit the WordTips channel on YouTube
FREE SERVICE: Get tips like this every week in WordTips, a free productivity newsletter. Enter your address and click "Subscribe."
Copyright © 2026 Sharon Parq Associates, Inc.
Comments