Please Note: This article is written for users of the following Microsoft Word versions: 2007, 2010, 2013, 2016, 2019, 2021, and Word in Microsoft 365. If you are using an earlier version (Word 2003 or earlier), this tip may not work for you. For a version of this tip written specifically for earlier versions of Word, click here: Embedding Fonts in a Document.
The fonts you use in a document determine exactly how that document appears when viewed or printed. If you are sharing your documents with others, you will want to make sure that they have the same fonts you used in the document. If they don't, then they may not be able to read the information you send.
Why is this? If you use a particular font in a document, then send that document to another person who does not have that font on their system, Word tries to figure out what font it can use as a substitute for the font you used. In some cases, the results are an unreadable mess with symbols being substituted for characters and vice-versa. Even if the substituted font results in a readable document, your precise formatting may no longer apply since Word uses the character widths and sizing of the substituted font, not the original. Thus, text will flow differently on the target system and lines or pages will not break at the same place as originally intended.
Word does provide a potential solution to this mess: you can embed fonts in a document. Word allows you to embed fonts in your document, with a couple of caveats. First of all, the fonts must be TrueType fonts, and second, they must be available for embedding. Figuring out if a font is TrueType is easy enough—you can take a look at the Windows Font folder to figure that out, or you can simply look for the telltale TT next to the font name in Word's Font drop-down list.
Figuring out if a font is embeddable is another issue. When a font is created by the designer, it can be set to one of four levels of embedding compatibility:
Word respects the wishes of the font designer, according to the possible settings show here. If a designer marks a font as "not embeddable," then you cannot embed it in a document. More precisely, you can instruct Word to embed TrueType fonts, but Word ignores your instruction when it comes to the font that is marked as not embeddable.
So how do you find out if a font is embeddable? If you are using Windows 7 or a later version you can right-click on the font file, choose Properties, and then display the Details tab of the dialog box. You should be able to find on that tab an Embeddability field that shows how (and if) the font can be embedded. Note that not all fonts list Properties in the context menu when you right-click on the font.
If a font is not embeddable, then you are faced with a decision: whether to use the font or not. If you do use it, then the document will only display properly on systems where the font is really installed. If you don't use it, then you will need to find a different font that meets your design and sharing needs.
Once you know that a font can be embedded in a document, you need to instruct Word to do the actual embedding. You do this by following these steps:
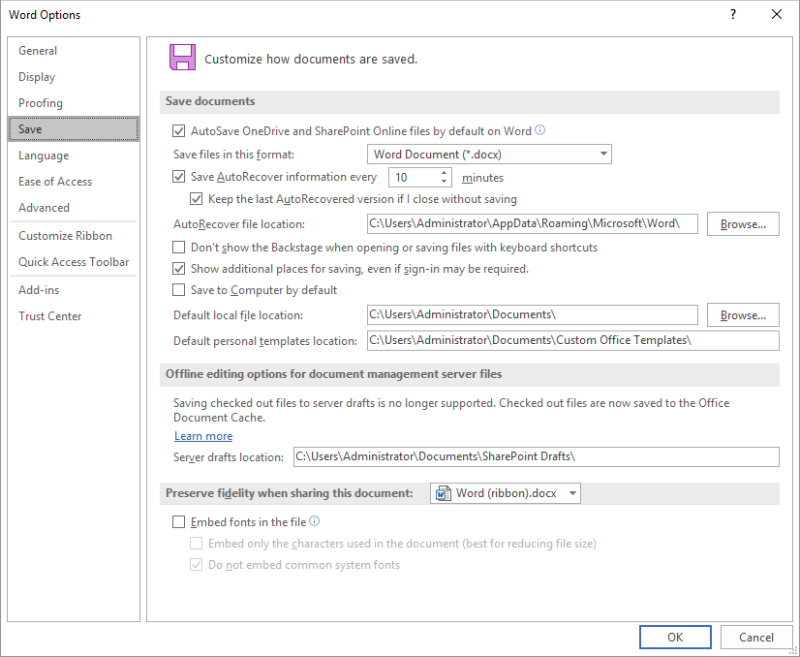
Figure 1. The Save options in the Word Options dialog box.
You should know that when you embed a font, the size of your document can be significantly increased. If you don't choose the check box in step 4, then Word embeds the entire font. In either case (full font or just characters), the size of your document is increased by the size of the font being embedded, plus some overhead required by Word.
WordTips is your source for cost-effective Microsoft Word training. (Microsoft Word is the most popular word processing software in the world.) This tip (6073) applies to Microsoft Word 2007, 2010, 2013, 2016, 2019, 2021, and Word in Microsoft 365. You can find a version of this tip for the older menu interface of Word here: Embedding Fonts in a Document.

Create Custom Apps with VBA! Discover how to extend the capabilities of Office 365 applications with VBA programming. Written in clear terms and understandable language, the book includes systematic tutorials and contains both intermediate and advanced content for experienced VB developers. Designed to be comprehensive, the book addresses not just one Office application, but the entire Office suite. Check out Mastering VBA for Microsoft Office 365 today!
You can use Find and Replace to change the attributes of text in your document. When you want to make changes to lots and ...
Discover MoreWhen you create a document, Word is constantly checking behind the scenes to make sure that what you type makes sense. ...
Discover MoreIf you want to have a blank page at the end of a document section, you can insert one manually or you can use the ...
Discover MoreFREE SERVICE: Get tips like this every week in WordTips, a free productivity newsletter. Enter your address and click "Subscribe."
There are currently no comments for this tip. (Be the first to leave your comment—just use the simple form above!)
Got a version of Word that uses the ribbon interface (Word 2007 or later)? This site is for you! If you use an earlier version of Word, visit our WordTips site focusing on the menu interface.
Visit the WordTips channel on YouTube

FREE SERVICE: Get tips like this every week in WordTips, a free productivity newsletter. Enter your address and click "Subscribe."
Copyright © 2026 Sharon Parq Associates, Inc.
 Please Note:
This article is written for users of the following Microsoft Word versions: 2007, 2010, 2013, 2016, 2019, 2021, and Word in Microsoft 365. If you are using an earlier version (Word 2003 or earlier), this tip may not work for you. For a version of this tip written specifically for earlier versions of Word, click here:
Please Note:
This article is written for users of the following Microsoft Word versions: 2007, 2010, 2013, 2016, 2019, 2021, and Word in Microsoft 365. If you are using an earlier version (Word 2003 or earlier), this tip may not work for you. For a version of this tip written specifically for earlier versions of Word, click here:
Comments