Highlighting Found Text

Written by Allen Wyatt (last updated January 29, 2024)
This tip applies to Word 2007, 2010, 2013, 2016, 2019, and Word in Microsoft 365


12

When Wayne uses the Find feature of Word to locate text in his document, he can have it highlight all instances of whatever it is that he's searching for. This is great, but Wayne would like the highlighting to be permanent, so that it doesn't go away as he makes additional edits in the document. He wonders if there is a way to search for something and apply the highlighter to all instances of what is found.

This is actually easier to do than you might, at first, presume. You cannot do it, however, simply using the Find feature—you must use Find and Replace by following these steps:

  1. Press Ctrl+H. Word displays the Replace tab of the Find and Replace dialog box.
  2. Click the More button, if it is available. Word expands the Find and Replace dialog box. (See Figure 1.)
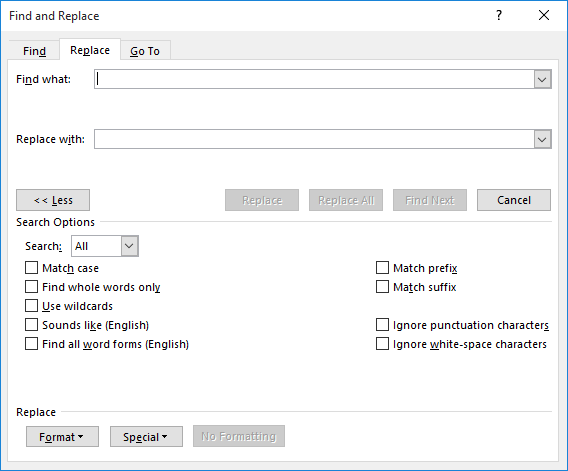
  3. Figure 1. The Replace tab of the Find and Replace dialog box.

  4. In the Find What box, enter the text you want to find and highlight.
  5. In the Replace With box, enter ^&. This informs you Word that you want to replace whatever is found with whatever it is that you actually found (the contents of the Find What box).
  6. With the insertion point still in the Replace With box, click the Format button. Word expands some options.
  7. Click the Highlight option. The word "Highlight" should now appear under the Replace With box.
  8. Click the Replace All button. Word makes all the changes, effectively adding a permanent highlight to everything you were searching for.
  9. Click the Close button to dismiss the Find and Replace dialog box.

That's it; your highlighting is done. After these steps, the instances of what you searched for are probably highlighted in yellow. If you want a different highlight color, you might try changing the highlight color selected in the Highlight tool on the Home tab of the ribbon before going through the steps. (This may not have an effect on all versions of Word.)

It should also be noted that step 4 is technically optional—you don't need to place ^& in the Replace With box. You could, if desired, simply leave the box blank. I think it is a good "safety feature," however, to place the ^& code in the box, as this can help avoid any potential mistakes that will actually delete what you are searching for.

WordTips is your source for cost-effective Microsoft Word training. (Microsoft Word is the most popular word processing software in the world.) This tip (1270) applies to Microsoft Word 2007, 2010, 2013, 2016, 2019, and Word in Microsoft 365.

Author Bio

Allen Wyatt

With more than 50 non-fiction books and numerous magazine articles to his credit, Allen Wyatt is an internationally recognized author. He is president of Sharon Parq Associates, a computer and publishing services company. ...

MORE FROM ALLEN

Preventing Changes to Formatting and Page Size

When you create workbooks for others to use, you might want to make sure that they can't change the formatting and paper ...

Discover More

Fixing the Decimal Point

Don't want to always type the decimal point as you enter information in a worksheet? If you are entering information that ...

Discover More

Adjusting Column Width Using the Ribbon

If you want to resize the width of your table columns, you can do it using a mouse, but you can get more precise widths ...

Discover More

Create Custom Apps with VBA! Discover how to extend the capabilities of Office 2013 (Word, Excel, PowerPoint, Outlook, and Access) with VBA programming, using it for writing macros, automating Office applications, and creating custom applications. Check out Mastering VBA for Office 2013 today!

More WordTips (ribbon)

Getting Rid of Trailing Spaces in Footnotes and Endnotes

The Find and Replace tool can get rid of trailing spaces in paragraphs quite nicely. If those spaces are at the end of ...

Discover More

Replacing with a Subscript

The Find and Replace capabilities of Word are quite powerful. One type of replacing may not seem possible at ...

Discover More

Keeping a Replace Operation Displayed

The Find and Replace tool is designed to help you find and replace information as quickly as possible. However, you may ...

Discover More
Subscribe

FREE SERVICE: Get tips like this every week in WordTips, a free productivity newsletter. Enter your address and click "Subscribe."

View most recent newsletter.

Comments

If you would like to add an image to your comment (not an avatar, but an image to help in making the point of your comment), include the characters [{fig}] (all 7 characters, in the sequence shown) in your comment text. You’ll be prompted to upload your image when you submit the comment. Maximum image size is 6Mpixels. Images larger than 600px wide or 1000px tall will be reduced. Up to three images may be included in a comment. All images are subject to review. Commenting privileges may be curtailed if inappropriate images are posted.

What is 6 - 0?

2023-12-20 00:15:40

Aivz

It works! thank you!


2023-11-12 23:08:21

saeid

Was a geeky one . Thanks a bunch !!


2023-09-11 12:03:58

Lily

Thank you !!! I got it.


2023-06-06 09:05:02

Will

Thanks for the tip!!!


2022-10-26 13:07:21

Chandana

Thanks a lot.


2021-03-21 10:50:25

Larry Schwartz

In re Highlighting Found Text, I often have to work with documents that have been converted from PDF to Word. The converted document contain hyphens where a word was split at the end of a line in the original document. However, many line-ending split words end up in the middle of a line in the Word document. I have to go through and delete all the superflous hyphens. If I use Find and Replace to find the hyphens and delete them, it is extremely difficult to find the next place in the document that Word has identified because it is small. I have resorted to changing all hyphens to a red, bold-faced, dollar sign with a large point size. I then do a Find & Replace to null, or Find Next, if I want to keep the hyphen. Now, the result of each Find is easy to see. When finished with the document, I just do a Replace All to convert the remaining dollar signs back to a normal-sized hyphen.


2021-03-21 00:26:46

Steve Susoyev

Hello and thank you for your excellent tips and explanations. I have a question about a feature that seems to have disappeared from Word 2016. In previous versions, I could select a word, then hit F8, then Find, and all of the text between my current cursor location and the Found text would be selected. This is not longer working for me. I've read your article on "Extend" using F8, but that isn't quite what I'm after. I just want to SELECT all of the text between my current location and the first instance of the text I'm Finding.

There are all kinds of reasons to use this feature and I can't believe Microsoft would have gotten rid of it.

Thanks for any help you can give me!

Steve


2020-11-12 04:38:17

mh

thank you it was very useful


2019-12-13 22:27:54

Rip van edit

Thank you so much for this! I have Microsoft office 365 and it works.

I can't explain this clearly, but I was having issues because when I did a search, Word had a highlight/select rectangle that hovered over the word and covered my existing highlight color when using the Find option (based on Windows color theme from what I read). For instance, I had a word highlighted in green and did a search for that word. Well a yellow highlight box to show what word is being found covered my green. So, I couldn't see if my word had the correct highlight color. I couldn't find anything online, except an old forum that said was based on a Windows theme/color setting & I couldn't find an option to change what I needed. So when doing a search, I had to close the Navigation menu to see if my green was there, then add highlight color if there wasn't one, then reopen the navigation menu to go to the next selection. It was a pain.

Now I know I can just leave words unhighlighted and do a search and add highlight at the same time. Thank you so much!


2018-09-05 03:12:52

Ken

Wayne

The reason that nothing was highlighted is probably because no color is set for highlighting. The highlight color used by Find & Replace is whatever is shown in the Text Highlight Color icon in the Font group of the Home ribbon. Thus you could highlight one set of words in one color, change the Text Highlight Color and highlight another set of words in the new color.

As for the 808 replacements in 529 words is is most likely because you are replacing characters that might appear more than once in a word.


2018-09-04 13:37:22

PJEF

Wayne, I can't read this, but when I do something like this, I just repeat what it is I want MSWord to find (and highlight, say) exactly as is in the "Replace with" box. If I want to highlight all instances of "And", I would again type in "And" and make sure to select the "match case" and "whole words" boxes. This will ONLY look for "And", and will not edit "and" nor partially edit the first part of "Android". After I repeat the exact text I want to highlight in the "Replace with" box, I click on Format / Highlight.
Was there something in this procedure that you did differently?
Patti


2018-09-01 18:37:03

Wayne C

Thanks for the info (I believe you are responding to a question I posted) but after trying the above steps twice on a Windows computer running Office 365 Business, I found that it didn't work. Something weird happened. In a document with 529 words, I got a message saying that it had made 808 replacements! No words were highlighted. I took a screenshot and will try to attach it.

(see Figure 1 below)

I see that the image is too small to read very well so I will try to attach a cropped image.

Figure 1. Highlighting Issues, Screenshot 2


This Site

Got a version of Word that uses the ribbon interface (Word 2007 or later)? This site is for you! If you use an earlier version of Word, visit our WordTips site focusing on the menu interface.

Videos
Subscribe

FREE SERVICE: Get tips like this every week in WordTips, a free productivity newsletter. Enter your address and click "Subscribe."

(Your e-mail address is not shared with anyone, ever.)

View the most recent newsletter.