Please Note: This article is written for users of the following Microsoft Word versions: 2007, 2010, 2013, 2016, 2019, 2021, and Word in Microsoft 365. If you are using an earlier version (Word 2003 or earlier), this tip may not work for you. For a version of this tip written specifically for earlier versions of Word, click here: Creating Tables with Specific Column Widths.
Word allows you to easily create tables, but getting your column widths "just so" can be challenging, at times. For instance, what if you want a twelve-column table with the first two columns a certain width, and the rest of the columns sharing the remaining horizontal space? Here's an easy way to get the desired result:
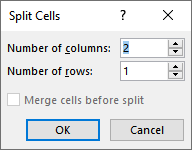
Figure 1. The Split Cells dialog box.
Your row is now just as you wanted. To create more rows just like it, select the row and then choose to insert additional rows above the selected row. After you insert the first row, just press F4 repeatedly until you have created the number of desired rows.
WordTips is your source for cost-effective Microsoft Word training. (Microsoft Word is the most popular word processing software in the world.) This tip (5921) applies to Microsoft Word 2007, 2010, 2013, 2016, 2019, 2021, and Word in Microsoft 365. You can find a version of this tip for the older menu interface of Word here: Creating Tables with Specific Column Widths.

The First and Last Word on Word! Bestselling For Dummies author Dan Gookin puts his usual fun and friendly candor back to work to show you how to navigate Word 2019. Spend more time working and less time trying to figure it all out! Check out Word 2019 For Dummies today!
Tables can be a great addition to many documents, as they allow you to arrange and present information in a clear and ...
Discover MoreInserting a table in a document is easy. Did you know that you can also insert a table within another table? Word allows ...
Discover MoreAdding a table to your document is easy. Adding one that doesn't extend from margin to margin may seem a bit harder. ...
Discover MoreFREE SERVICE: Get tips like this every week in WordTips, a free productivity newsletter. Enter your address and click "Subscribe."
2023-12-18 10:03:03
Andrew
Another neat way for an existing table is to select any contiguous columns of the table and then EITHER:
• From the context menu (right clicking) select "Distribute Columns Evenly"
• Or, sometimes when the context menu is grayed-out, you can click on "Distribute Columns" from the Layout Menu on the ribbon.
And this works for evenly spacing rows too - using "Distribute Rows Evenly" or "Distribute Rows."
These methods are really great to use especially when dealing with "structured" tables (i.e., tables with merged cells). And because table spacing can get all borked in any number of ways - just remember to select the entire rows or columns of interest.
Andy.
Got a version of Word that uses the ribbon interface (Word 2007 or later)? This site is for you! If you use an earlier version of Word, visit our WordTips site focusing on the menu interface.
Visit the WordTips channel on YouTube

FREE SERVICE: Get tips like this every week in WordTips, a free productivity newsletter. Enter your address and click "Subscribe."
Copyright © 2026 Sharon Parq Associates, Inc.
 Please Note:
This article is written for users of the following Microsoft Word versions: 2007, 2010, 2013, 2016, 2019, 2021, and Word in Microsoft 365. If you are using an earlier version (Word 2003 or earlier), this tip may not work for you. For a version of this tip written specifically for earlier versions of Word, click here:
Please Note:
This article is written for users of the following Microsoft Word versions: 2007, 2010, 2013, 2016, 2019, 2021, and Word in Microsoft 365. If you are using an earlier version (Word 2003 or earlier), this tip may not work for you. For a version of this tip written specifically for earlier versions of Word, click here:
Comments