Please Note: This article is written for users of the following Microsoft Word versions: 2007, 2010, 2013, 2016, 2019, and 2021. If you are using an earlier version (Word 2003 or earlier), this tip may not work for you. For a version of this tip written specifically for earlier versions of Word, click here: Understanding Page Sizes.
Written by Allen Wyatt (last updated August 11, 2025)
This tip applies to Word 2007, 2010, 2013, 2016, 2019, and 2021
You probably know that you can specify a size for the paper on which you print your Word documents. It is easy to change to a common page size; just display the Layout tab of the ribbon (Word 2016 or a later version) or Page Layout tab (earlier versions of Word.) If you click the Size tool (in the Page Setup group) Word shows you some of the more common page sizes that people use. Select one, and your document is reformatted for that page size.
However, you may want to set your own custom page size, which Word completely supports. You can do this through the use of the Page Setup dialog box. There are two ways you can display the proper tab in the dialog box:
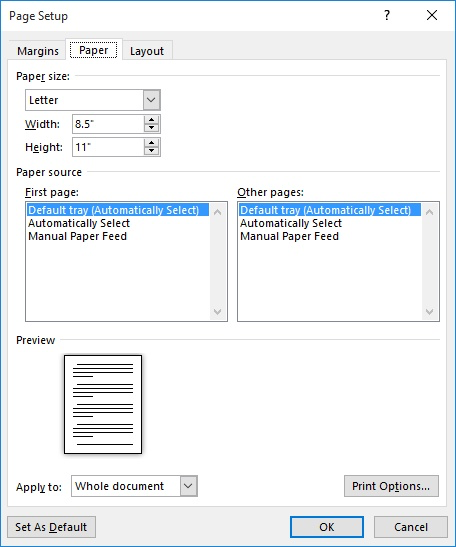
Regardless of the method you use, you should make sure that the Paper tab is displayed. (See Figure 1.)

Figure 1. The Paper tab of the Page Setup dialog box.
If you want to specify a custom paper size, you can do so by simply adjusting the Width and Height settings in the dialog box. As you do so, notice that the Paper Size setting changes to Custom Size. Word allows you to set any page height and width between .1 inches and 22 inches. (These limits are hard-coded into Word and cannot be changed.) If you want to print documents with larger dimensions, then you need to choose a different program—other than Word—to do your printing.
Be aware that if you specify a custom size for printing, the results may not be exactly what you think they will be. For instance, if you specify a page width of 15 inches, but the printer can only handle paper up to 10 inches wide, then the resulting printout will not be satisfactory, and the printer may actually reject the print job. You should make sure that you specify paper sizes that are within the limits of what your printer can actually handle.
WordTips is your source for cost-effective Microsoft Word training. (Microsoft Word is the most popular word processing software in the world.) This tip (5336) applies to Microsoft Word 2007, 2010, 2013, 2016, 2019, and 2021. You can find a version of this tip for the older menu interface of Word here: Understanding Page Sizes.

The First and Last Word on Word! Bestselling For Dummies author Dan Gookin puts his usual fun and friendly candor back to work to show you how to navigate Word 2019. Spend more time working and less time trying to figure it all out! Check out Word 2019 For Dummies today!
Figuring out how you want the text in your document to appear on the printed page can sometimes be a bit perplexing. Word ...
Discover MoreDo you need to have your document fit within a certain number of pages? This can be close to impossible to do within ...
Discover MoreMost of the time we print on whatever is a standard paper size for our area, such as letter size or A4 paper. However, ...
Discover MoreFREE SERVICE: Get tips like this every week in WordTips, a free productivity newsletter. Enter your address and click "Subscribe."
2019-04-30 17:39:23
TW
Louise, I believe this is what you are looking for.
On the Page Layout Tab, click on Margins, choose Custom Margins, in the middle of the page setup window you’ll see multiple pages with normal in the box, click the down arrow and choose Book Fold.
2019-04-27 11:20:59
Louise
I am using word 2010. Can you tell me how to split an A4 sheet into 2 separate pages. The old 2007 version had this option on the set up page but the newer versions don’t seem to have it.
Thank you.
Got a version of Word that uses the ribbon interface (Word 2007 or later)? This site is for you! If you use an earlier version of Word, visit our WordTips site focusing on the menu interface.
Visit the WordTips channel on YouTube
FREE SERVICE: Get tips like this every week in WordTips, a free productivity newsletter. Enter your address and click "Subscribe."
Copyright © 2026 Sharon Parq Associates, Inc.
Comments