Robert knows how to create and modify styles. He's wondering, though, how to change what is shown in Word's style gallery. For instance, he wonders how to add his own styles to it or rearrange the order in which styles appear in the gallery.
Before getting into modifying the style gallery, it is important to realize what the style gallery actually is. To best illustrate what it is, make sure the Home tab of the ribbon is displayed. Then, click the small icon at the lower-right corner of the Styles group. Word displays the Styles task pane at the right side of the document. Now, at the bottom of the Styles task pane, click the Options button. Word displays the Style Pane Options dialog box. (See Figure 1.)
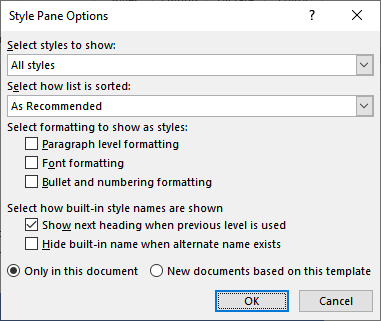
Figure 1. The Style Pane Options dialog box.
Using the Select Styles to Show drop-down list at the top of the dialog box, choose the Recommended option. Click OK to close the dialog box, and now the Styles task pane should show the styles it considers "recommended."
The key thing to realize here is that in a default installation of Word, the styles shown as recommended in the Styles task pane are the same styles shown in the style gallery. (Go ahead and compare them; I'll wait. They are the same.) This may give you the impression that the two are mirror images of each other. This is largely true, but not exactly. (More on that in a moment.)
In the following sections, I'm going to assume that you keep the Home tab of the ribbon displayed and that you keep the Styles task pane displayed at the right side of your document.
Changing what appears in style gallery is quite easy. To delete a style from the style gallery, just right-click on that style in the Styles task pane and, from the resulting Context menu, choose Remove from Style Gallery. (You do still have the recommended styles displayed in the Styles task pane, don't you?) The style is immediately removed from the style gallery, but it remains on the recommended list. If you want, you can also right-click on the style in the style gallery and chose Remove from Style Gallery in that Context menu. Either approach will work just fine.
To add a style to the style gallery, use the Style Pane Options dialog box (displayed after you click Options in the Styles task pane) to display all styles. Then, within the list of styles, locate the style you want added. Right-click on it and choose the Add to Quick Style Gallery option. The style is immediately added to the style gallery. You won't, however, see it displayed in the recommended styles in the Styles task pane.
When it comes to the style gallery, remember that the number of styles visible in the style gallery depends on how wide it appears in Word. This means you may need to use the arrows at the right edge of the style gallery in order to see the style you just added.
There is another way to control the style's presence in the style gallery. Follow these steps:
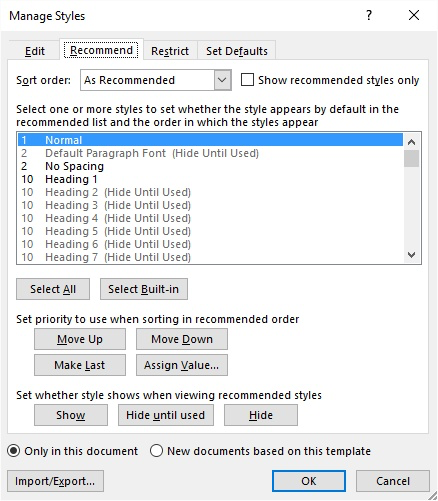
Figure 2. The Modify Style dialog box.
Once you've removed and added styles to the style gallery, you probably want to change the order in which they appear in the gallery. This is tied more closely to how styles appear in the recommended list in the Styles task pane.
Remember that when you delete styles from the style gallery, they are not removed from the recommended styles list. Remember, as well, that when you add styles to the style gallery, they are not added to the recommended styles list. That being said, they order in which they appear in the style gallery is controlled by how they appear in the recommended styles list.
Sound confusing? It can be. For me, I like to make sure that—as in the default condition of Word—the styles in the style gallery match those in the recommended styles list. To me, it just makes things clearer.
So, let's look at the esoteric and rather convoluted way that Word determines the order in which styles appear in the recommended styles list and, therefore, the style gallery. What you need to do is to display the Manage Styles dialog box. At the bottom of the Styles task pane you can see three buttons. The third button is the one you need to click. (If you are unsure about which button to use, hover the mouse button over each, in turn, and you can quickly locate the one that is used to manage styles.) When you do, you'll see the Manage Styles dialog box, and you should make sure that the Recommend tab is visible. (See Figure 3.)

Figure 3. The Recommend tab of the Manage Styles dialog box.
This tab is responsible for what is displayed in the list of recommended styles, and the order in which those styles are displayed, top to bottom. It also controls the order in which styles appear (left to right) in the style gallery.
Before making any changes, you need to know two things. First, changes are not committed until you click the OK button to close the dialog box. Second, where the changes are stored depends on the radio button selected at the bottom of the dialog box. By default, any changes you make are stored in the document you have open. If you want the changes to be available to all documents based on the template attached to the current document, then you should choose the New Documents Based on This Template radio button.
Now, for the rest of the controls in the dialog box. To change the order in which a style appears (in the recommended styles list or in the style gallery) is to select a style in the list of those available in the dialog box. Then use the controls below the list to affect the visibility and ordering of the style.
The Hide, Hide Until Used, and Show buttons only affect what is shown in the recommended styles list. Whether the style is displayed in the style gallery or not is controlled as described earlier in this tip.
At the left of each of the styles in the list is a number which indicates the order in which the style is displayed in the recommended list and the style gallery. You can select a style and use the Move Up, Move Down, or Make Last buttons to affect where the style is placed in the list. You can also click the Assign Value button to more efficiently set an ordering value for the style.
Look very carefully at the list of styles and you'll note something odd. (I say "odd," but I consider it poor design on the part of Microsoft.) Also included in the list of styles are all the table styles. These styles don't serve any real purpose in being in the list, yet there they are. They all have an ordering value of 40 or higher, and you cannot change the value assigned to any of them. (Go ahead and select a table style in the list of styles and you'll see that all the controls below the list become inactive.) None of the table styles appear in the style gallery or recommended list, either. They do, however, appear in the gallery of table styles that is shown on the Table Design tab of the ribbon, but there is no way to control the order of what is in that table-specific gallery.
So, the table styles are just included, for no real reason, in the Recommend tab of the Manage Styles dialog box, cluttering up the list. For this reason, if you assign ordering values to the regular, non-table styles, I would choose a value of 1 through 39 (to keep your styles before the table styles in the list) or a value of 100 (to have "last" appear to the left of the style).
If I wanted to start my style gallery with a clean slate, I would first remove the styles, individually, from the style gallery, as described earlier in this tip. (Right-click on each and choose Remove from Style Gallery.)
Once the style gallery is empty, I would then display the Recommend tab of the Manage Styles dialog box. In turn, I would click Select All, Hide, and Make Last. This hides all the styles and makes them the lowest priority. Clicking these buttons won't affect the table styles at all, even though you selected them when you clicked Select All.
Now, with the clean slate, I would locate all the styles I want to use and, in turn, click the Show button and the Assign Value button to give them a value that represents the order in which I want them to be ordered.
Finally, I would click the New Documents Based on This Template radio button, at the bottom of the dialog box, to make sure my changes are saved.
After making all the changes desired in the Manage Styles dialog box, when you click OK all of your changes are implemented. You should immediately notice that the styles in the Styles task pane are updated to reflect those you specified in the Manage Styles dialog box. They won't, however, show in the style gallery. If they don't, then right-click each style in the recommended list and choose the Add to Quick Style Gallery option to show them in the style gallery.
At this point your recommended list and your style gallery should be "in sync" so that they both show the same styles, in the same order.
If, in the Manage Styles dialog box, you indicated you want your changes to be stored in the template, then when you exit Word (or close the document to which the template is attached), you'll be asked if you want to also save changes to the template. Assuming you do save the changes, then any future documents you create that are based on that template will reflect your changes to both the recommended list and to the style gallery.
There are a couple of caveats to this, however. The first occurs when you attach the updated template to an existing document. If you indicate, when attaching, that you want to update styles in the document, then your changes will be combined with whatever recommended list and style gallery was in effect before you attached the template. This can be frustrating, and why Microsoft doesn't just replace the information is beyond me.
The second caveat concerns sharing the document with others. If the others don't have access to the template you used, then you cannot guarantee that their style gallery and recommended list will look as you may have intended. Further, if they make changes, save the document, and then send it back to you, then you may experience the "blended" gallery and list issue again.
This tip was way longer than I anticipated when I wrote it, but there are a lot of factors at play when it comes to the style gallery and your styles. Give the ideas here a try, though, and you may find that you can better configure Word to your needs.
WordTips is your source for cost-effective Microsoft Word training. (Microsoft Word is the most popular word processing software in the world.) This tip (4271) applies to Microsoft Word 2007, 2010, 2013, 2016, 2019, 2021, and Word in Microsoft 365.

Do More in Less Time! An easy-to-understand guide to the more advanced features available in the Microsoft 365 version of Word. Enhance the quality of your documents and boost productivity in any field with this in-depth resource. Complete your Word-related tasks more efficiently as you unlock lesser-known tools and learn to quickly access the features you need. Check out Microsoft 365 Word For Professionals For Dummies today!
When you are working with Word in an organization (regardless of how many people), standardizing styles and their use can ...
Discover MoreWhen using styles in a document, you can increase your productivity by letting Word know what paragraph style you expect ...
Discover MoreAlternating styles can come in handy when you have to switch between one type of paragraph and another, automatically, as ...
Discover MoreFREE SERVICE: Get tips like this every week in WordTips, a free productivity newsletter. Enter your address and click "Subscribe."
2024-09-08 12:42:47
Ken Kast
What a tutorial! Thank you for so clearly and completely addressing this topic.
Got a version of Word that uses the ribbon interface (Word 2007 or later)? This site is for you! If you use an earlier version of Word, visit our WordTips site focusing on the menu interface.
Visit the WordTips channel on YouTube

FREE SERVICE: Get tips like this every week in WordTips, a free productivity newsletter. Enter your address and click "Subscribe."
Copyright © 2026 Sharon Parq Associates, Inc.
Comments