Written by Allen Wyatt (last updated November 19, 2022)
This tip applies to Word 2007, 2010, 2013, 2016, 2019, 2021, and Word in Microsoft 365
Alan often uses Win+Shift+S to start the Snipping tool and grab a portion of the screen. If he then pastes that image into a document, the result is very large, much larger than the original. This means that he then has to reduce the image size to approximate the original that he snipped. Alan wonders why this happens and how, in Word, he can make the snipped image the same size as the original.
The Snipping tool (Snip & Sketch) is an interesting little tool. It is certainly handy, but the way that it captures images seems a bit strange. If you start the tool (not by using the shortcut that Alan mentions, but by using Snip & Sketch from the Start menu in Windows), you can choose New and then capture a portion of the screen. What is then shown on the screen is the exact size of what you captured. Save that image, however, and when you insert it into Word, it is larger than what was shown on the screen. This is the same behavior that Alan notes when he captures and pastes. (See Figure 1.)
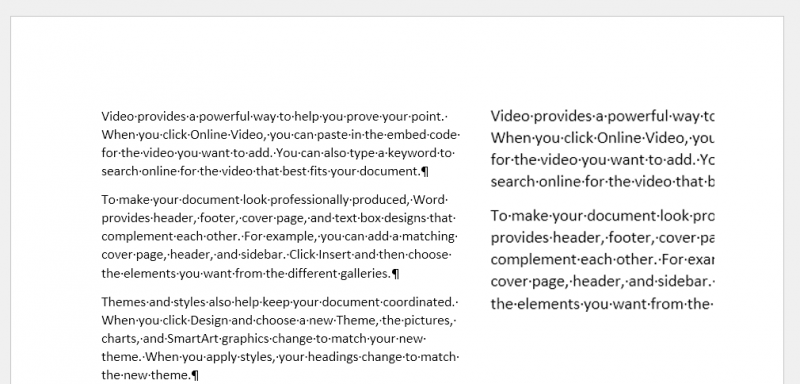
Figure 1. The actual Word document on the left and the snipped and pasted image on the right.
This enlarging seems to be a function of Word, not of the Snipping tool. If you use the Snipping tool, as described above, to create a snip that is saved in a file, then that file can be opened in a different program, such as an image editing program. Do so, and you'll see that the image, displayed at 100%, is the same as what you snipped, whereas in Word the same image (at 100%) is larger.
This behavior on Word's part actually seems to have something to do with the zoom factor in effect when you use the Snipping tool. (I know—this sounds crazy, but bear with me.) I have a high-resolution 4K monitor, and I normally use Word at a greater-than-100% zoom factor. Take a look, again, at Figure 1, above. When I snipped the image at the right side of the screen, the zoom factor for the document was 120% and when I pasted it into the document it was 120%.
What, however, happens if I put the zoom factor at 100% and capture and paste the snip into the document? The top snip in Figure 2 shows that the pasted snip is the exact size of the original. However, the bottom snip in Figure 2 was grabbed while the document was zoomed to 150%, and it is obviously much larger than the original. The snip was larger whether I pasted it while at 150% zoom or at 100% zoom. In other words, the zoom factor in effect while pasting had no effect; it was only the zoom factor while snipping. (See Figure 2.)
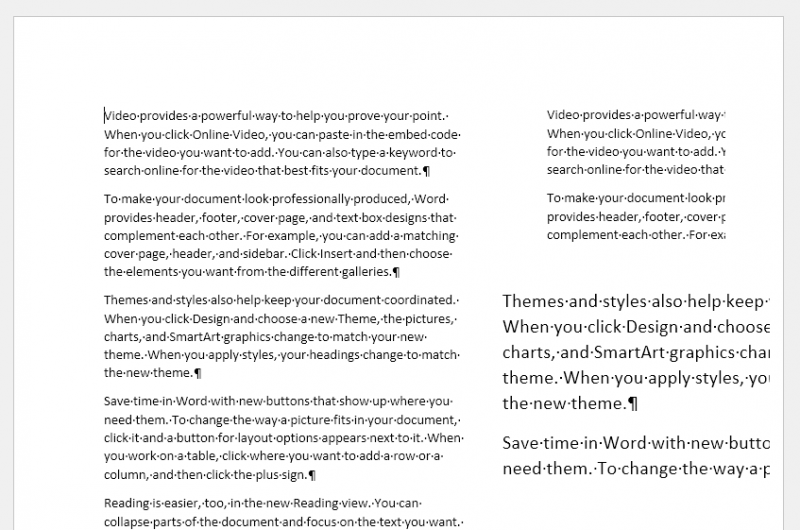
Figure 2. Two snips taken at different Word zoom factors.
To continue testing this, I then decreased the document zoom factor to only 70% and used the Snipping tool again. When I pasted the snip into the document, true to form it was much smaller than the original text. The pasted snip was 70% of the original regardless of the zoom factor in effect while I was pasting. (See Figure 3.)
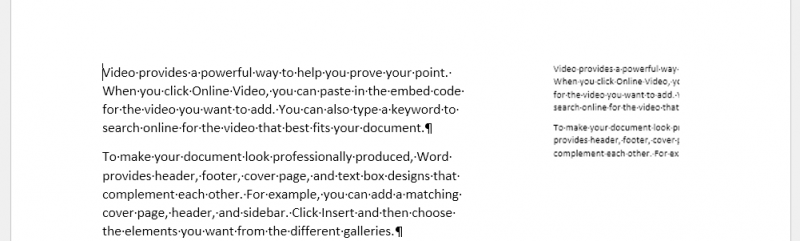
Figure 3. Pasting a snip taken at a 70% zoom factor.
This strange zoom-factor related behavior seems to only occur when snipping portions of screens within Word. I ran the same steps with the exception of snipping portions of screens from other programs (such as a Web browser), and the snip that was pasted into the Word document was done at the same size as the original, zoomed according to the zoom factor in effect within Word at the time of the pasting, as one would expect.
If the results of this testing holds true for Alan, then the answer to his question is to only do screen snips within Word when your zoom factor is set to 100%. If you are snipping from other programs, then the zoom factor within Word seems to have no bearing.
The bizarre behavior of Word relative to snips and Word's own zoom factor presents another consideration. You may be tempted to use a macro to go through all the images in a document and reduce them by some consistent scale. For instance, if you do a bunch of snips from within a Word document while your zoom factor is at 120%, you may use a macro to scale them all to 80% of their original size, which would make the "correct." The problem with such an approach, however, is that you may have a mix of document-snipped images (which need to be scaled) and snips from other programs (which don't need to be scaled).
WordTips is your source for cost-effective Microsoft Word training. (Microsoft Word is the most popular word processing software in the world.) This tip (1584) applies to Microsoft Word 2007, 2010, 2013, 2016, 2019, 2021, and Word in Microsoft 365.

Do More in Less Time! An easy-to-understand guide to the more advanced features available in the Microsoft 365 version of Word. Enhance the quality of your documents and boost productivity in any field with this in-depth resource. Complete your Word-related tasks more efficiently as you unlock lesser-known tools and learn to quickly access the features you need. Check out Microsoft 365 Word For Professionals For Dummies today!
You can use the Find and Replace feature of Word to replace inline graphics with other graphics. This tip explains how ...
Discover MoreWant to insert a whole bunch of images in your document all at once? The macro in this tip shows you how easy it is to ...
Discover MorePut numeric information in a table and you can then convert that information to a graphical chart using Microsoft Graph ...
Discover MoreFREE SERVICE: Get tips like this every week in WordTips, a free productivity newsletter. Enter your address and click "Subscribe."
2022-11-22 23:44:54
Please let me know if you find any of the macros I posted or my other comments useful, or if you need any additional explanations. You can post your comment or, if you prefer, send me an e-mail - my address is not hidden.
2022-11-22 23:35:09
The following two macros will rescale the snips that have already been placed in the document to the specified percentage of the original size.
I considered basing the scale on the user input, but opted for the much simpler hard-coded scale in the macro, as the macro can be easily adjusted by the user, and once optimized would likely not need to be changed. The scale is controlled by the variable vrScale, which expresses percentage of the original size. That means that if you scale the image to 30% and then rerun the macro using 50% the image will become 50% of what was originally pasted not 50% of 30% =15%.
The two macros will adjust the size of all InLine and Floating images respectively in the selected part of the document. There are two macros because InLine images and Floating ones are treated very differently by Word, and require slightly different code, however they could be easily combined into one. On the other hand I expect the user to preferably use one of these wrapping options, so I kept them separate.
Please note that if the selection is non-contiguous consisting of several parts, only images in the part selected last will be adjusted. An exception to this is if you select several individual floating images only (with Ctrl-click) then the ResizeFloatingImages macro will rescale all of those.
Also, make sure that when selecting a range of a document, you actually include the images you want re-scaled. With floating images it is sometimes tricky; pay attention: the selected images should be highlighted.
And final note: the macros do not distinguish between types of various selected objects so their size may be adjusted for some types, or they may fail for others (two examples of the latter is if the objects selected are text boxes or Word drawing shapes). Error handling could be added to the macros, but they would become significantly more complicated.
' --------------------------------------
Public Sub ResizeInlineShapes()
'This procedure rescales all inline images in the selection
'to the percentage of original size specified by the variable vrScale
vRScale = 50 'Adjust the scale parameter (as %) to best fit your needs.
For i = 1 To Selection.InlineShapes.Count
Selection.InlineShapes(i).LockAspectRatio = True
Selection.InlineShapes(i).ScaleHeight = vRScale
Next
'------------------------------------
End Sub
Public Sub ResizeFloatingImages()
'This procedure rescales all floating images in the selection
'to the percentage of original size specified by the variable vrScale
vRScale = 40 'Adjust the scale parameter (as %) to best fit your needs.
For i = 1 To Selection.Range.ShapeRange.Count
Selection.Range.ShapeRange(i).LockAspectRatio = True
Selection.Range.ShapeRange(i).ScaleWidth vRScale / 100, msoTrue
Next
End Sub
'---------------------------------------
2022-11-22 23:27:40
As I mentioned in my first comment, I was planning to test macro approach to re-scaling the pasted images that were snipped by the Snip and Sketch tool The first two macros can be used to replace the Paste command, and will paste the image from the clipboard and immediately apply the scaling to the image just pasted. There are two macros: one will paste the image in-line the second as a floating object; they are slightly different because Word treats these two types of images differently.
'------------------------------------
Sub PasteResizeInLine()
'This procedure is meant to be used in connection with the Windows Snipping tool.
'This procedure will paste the content of the clipboard into the document
'as an In-Line image, then check whether the last or the only element pasted
'actually is an InLine image. If so, it will rescale the image to 50% of its original size retaining the proportions.
'Beware: it will paste whatever was in the Clipboard, so it is the user responsibility to make sure the Clipboard contains a valid image.
'Any valid image will will be pasted InLine, independent of the default setting for inserting pictures, then the original setting will be restored.
'
Dim CurWrapType
CurWrapType = Options.PictureWrapType 'saves current defaut wrap type
Options.PictureWrapType = wdWrapMergeInline
On Error GoTo MTClipboard
Selection.Paste
Selection.MoveLeft Unit:=wdCharacter, Count:=1, Extend:=wdExtend 'selects graphic just pasted
If Selection.InlineShapes.Count = 1 Then
Selection.InlineShapes(1).LockAspectRatio = True
Selection.InlineShapes(1).ScaleWidth = 50 'adjust the scale value (in %) to best fit your needs.
Else
MsgBox "There was no valid image pasted, or there was more than a single image pasted"
End If
Options.PictureWrapType = CurWrapType 'reset this setting to original
Exit Sub
MTClipboard:
If Err.Number = 4605 Then
MsgBox "The Clipboard is empty"
Else
MsgBox "Unexpected error: " & Err.Number
End If
Options.PictureWrapType = CurWrapType 'reset this setting to original
End Sub
'---------------------------------------------
Sub PasteResizeFloating()
'This procedure is meant to be used in connection with the Windows Snipping tool.
'This procedure will paste the content of the clipboard into the document
'as a Floating image, then check whether the last or the only element pasted
'actually is a floating image. If so, it will rescale the image to 40% of its original size retaining the proportions.
'Beware: it will paste whatever was in the Clipboard, so it is the user responsibility to make sure the Clipboard contains a valid image.
'Any valid image will will be pasted Floating, independent of the default setting for inserting pictures, then the original setting will be restored.
Dim CurWrapType
CurWrapType = Options.PictureWrapType 'saves current defaut wrap type
Options.PictureWrapType = wdWrapMergeSquare 'change this to other WrapType as required (except inline)
On Error GoTo MTClipboard
Selection.Paste
If Selection.ShapeRange.Count = 1 Then
Selection.ShapeRange(1).LockAspectRatio = True
Selection.ShapeRange(1).ScaleWidth 0.4, msoTrue 'Adjust the scale parameter (as a factor not %) to best fit your needs.
Else
MsgBox "There was no valid image pasted, or there was more than a single image pasted"
End If
Options.PictureWrapType = CurWrapType 'reset this setting to original
Exit Sub
MTClipboard:
If Err.Number = 4605 Then
MsgBox "The Clipboard is empty"
Else
MsgBox "Unexpected error: " & Err.Number
End If
Options.PictureWrapType = CurWrapType 'reset this setting to original
End Sub
'----------------------------------------------
2022-11-19 23:22:13
Tomek
One more thing:
Blurring of images happens not only when you insert images from files, but also when copying from an image editor and pasting into Word.
2022-11-19 23:17:44
Tomek
This comment is an attempt to answer Thierry Hoornaert's complaint about unsharp image placed into Word documents.
One scenario for this happening is when an image from a graphic file is inserted into a document when the following setting and parameters are not synchronized:
1. Image size and Quality, Default Resolution for the Word document is set to a low value Say 96 ppi. This setting is in Options, Advanced about one screen down from the top. There is a choice to apply this to the present document, or all new documents. This setting is usually inherited fro the document template,
2. An option "Do not compress images in file" is unchecked,
3. The resolution of the picture to be inserted is set to a higher value, say 300 ppi.
When the image is inserted, it will be down-sampled to the resolution specified in p.1. hence likely will result in a blurry image.
Changing the default resolution does not affect images already inserted, so those cannot be un-blurred.
The same setting is used also in PowerPoint, and if incorrect will result in blurry pictures in your presentation.
To prevent this un-sharpening you have to make sure that people you collaborate with, have this setting correct on their machines. Best ask them to to modify not only the document they work on but also the template their documents are based on; frequently this would be the Normal template. Alternatively, send them the document that is based on your template (and to avoid their computer automatically modifying these setting do not use your Normal template but one they likely do not have). Or even better, sent them the document template with correct settings, and ask that this be used to create any new documents for collaboration with you.
Just for completeness, the image resolutions available in Word usually are 96, 150, 220, 330 and High fidelity, at least on my machine (Win.10 Pro; Office in MS 365 Family).
For illustration of the effect I am attaching a screenshot (see Figure 1 below)
PS: I vaguely remember seeing this topic in one of earlier Allen's tips, but I could not locate it.
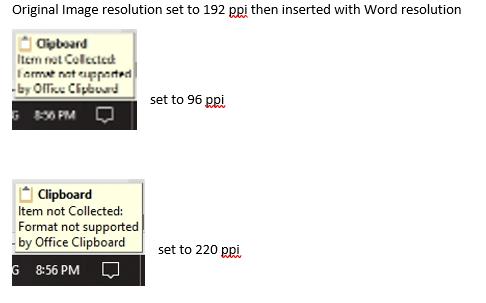
Figure 1.
2022-11-19 22:17:53
Tomek
Note: what I wrote below is what I observed on my machine: Win.10 Pro with Office in MS 365 Family.
Another comment I have is on a weird way the snipping tool behaves in relation to clipboard whether it is started by a shortcut key or or a command from the Start menu.
The first thing to understand is that there is a Windows clipboard and also an Office Clipboard. Contents of the latter can be viewed inside an Office application like Word by clicking on a small down arrow in the bottom right of the Clipboard group on the Home tab of the Ribbon.
Often, whatever you place in Windows clipboard shows also as the most recent item in the Office clipboard (it can keep several items), but Snip and Sketch tool is an exception. Windows may even show a message saying Clipboard: Item not collected: Format not supported by Office Clipboard. (see Figure 1 below)
To see that message you have to check "Show Status Near Taskbar When Copying" in the Office Clipboard options.
However, the snipped content is actually placed in the Windows Clipboard and can be pasted into Word or other application. You can check this by pressing Windows-key +V to view the content of the Windows clipboard if you have Windows Clipboard history turned on.
The older application - Snipping Tool - did not have this weirdness - whatever was snipped showed up in Office Clipboard automatically.
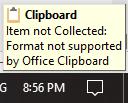
Figure 1.
2022-11-19 16:35:17
I have a slightly different explanation that may make understanding what happens with a snipped image a little bit clearer/easier.
When you snip a portion of your screen display, it is placed into your clipboard essentially as a bitmap image. Its size is defined in pixels, exactly reflecting number of pixels selected by the snip tool. When you paste it into a Word document, it becomes an image that is displayed by default at a resolution of 96 pixels per inch (ppi). Hence, if you select a portion of the display that is exactly 96 pixels wide, it will occupy exactly 1 inch in the Word document (printed or as indicated by rulers, not its physical size on your screen). This is true as long as the picture fits between the margins. If it does not fit, then Word will automatically scale it to fit, but that is whole different story. This applies also to pasting inside a text box, or into a table cell, but there are additional settings that control what happens there, again - whole different story.
If you change the zoom of your source application, the area you want to select will also change its size in pixels. So if your source is a Word document, but you zoomed the document to say 200%, when you select the same content you need to select 96x2=192 pixels wide, which when pasted into your target document will take 2 inches of width. Mind you, this applies to the source document which is zoomed. If you want to snip one of the buttons in the Ribbon, they do not change with the document zoom factor.
I hope this will help with understanding the mechanics of such snip and paste operation. I am planning to post some additional comments for this tip, including some macros that can help with scaling the snips individually while pasting them, or afterwards as an operation on several pasted images at once. If interested, check one of the "Notify me abut new comments..." check-boxes, or send me an e-mail directly (I un-hid my e-mail address so that you can do that).
2022-11-19 05:40:20
Thierry Hoornaert
Thank you for this very useful tip. Sometimes I zoom in to make sure I select the exact portion (e.g. text) of the document.
I think it may be 'word'while to also analyse why Word is pasting unsharp snippings from e.g. browser applications, or even jpg exported from PowerPoint slides. The result is not being able to read the text from the inserted image, especially when using picture styles. Frequently I receive the (unsharp) snips from someone else, or even the Word file with these snips, so I'm not sure how they did it, and what tips I can give them to produce sharper screenshots.
Got a version of Word that uses the ribbon interface (Word 2007 or later)? This site is for you! If you use an earlier version of Word, visit our WordTips site focusing on the menu interface.
Visit the WordTips channel on YouTube

FREE SERVICE: Get tips like this every week in WordTips, a free productivity newsletter. Enter your address and click "Subscribe."
Copyright © 2026 Sharon Parq Associates, Inc.
Comments