Please Note: This article is written for users of the following Microsoft Word versions: 2007, 2010, 2013, 2016, 2019, 2021, and Word in Microsoft 365. If you are using an earlier version (Word 2003 or earlier), this tip may not work for you. For a version of this tip written specifically for earlier versions of Word, click here: Understanding Smart Cut and Paste.
Word includes a default feature, which tries to make your editing chores just a little easier. This feature, called smart cut and paste, adds or removes spaces when you are cutting or pasting text. This may sound odd, but it is really helpful in many situations. For instance, if you are pasting a word into a sentence, smart cut and paste makes sure that spaces are added around the word so that it doesn't "run in" to the words you are pasting near.
Likewise, when you cut a word from a sentence, sometimes the cut might result in two spaces left: the ones that used to surround the word being pulled. Instead, smart cut and paste results in one of the spaces being automatically deleted so the resulting sentence has (at least) the proper number of spaces in it.
You can control smart cut and paste in the following manner:
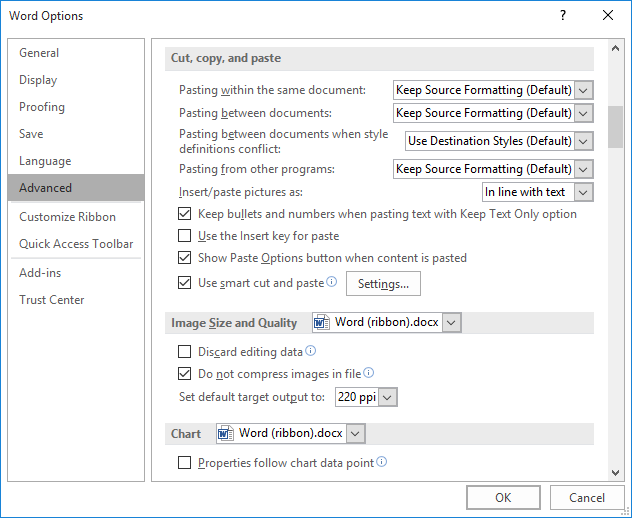
Figure 1. The advanced options of the Word Options dialog box.
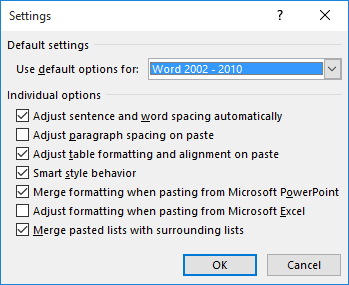
Figure 2. The Settings dialog box.
Note in step 4 that the Settings dialog box provides a number of different settings you can specify for how smart cut and paste work. These are the options available:
WordTips is your source for cost-effective Microsoft Word training. (Microsoft Word is the most popular word processing software in the world.) This tip (8) applies to Microsoft Word 2007, 2010, 2013, 2016, 2019, 2021, and Word in Microsoft 365. You can find a version of this tip for the older menu interface of Word here: Understanding Smart Cut and Paste.

Learning Made Easy! Quickly teach yourself how to format, publish, and share your content using Word 2021 or Microsoft 365. With Step by Step, you set the pace, building and practicing the skills you need, just when you need them! Check out Microsoft Word Step by Step today!
When you copy information from one document and paste it into another, you may not always get what you expect. If the ...
Discover MoreWhen you need to perform certain editing tasks over and over again, you start to look for ways to make your work faster ...
Discover MoreNeed to quickly count a group of items in a document? Here's a drop-dead easy way to get that count.
Discover MoreFREE SERVICE: Get tips like this every week in WordTips, a free productivity newsletter. Enter your address and click "Subscribe."
There are currently no comments for this tip. (Be the first to leave your comment—just use the simple form above!)
Got a version of Word that uses the ribbon interface (Word 2007 or later)? This site is for you! If you use an earlier version of Word, visit our WordTips site focusing on the menu interface.
Visit the WordTips channel on YouTube

FREE SERVICE: Get tips like this every week in WordTips, a free productivity newsletter. Enter your address and click "Subscribe."
Copyright © 2026 Sharon Parq Associates, Inc.
 Please Note:
This article is written for users of the following Microsoft Word versions: 2007, 2010, 2013, 2016, 2019, 2021, and Word in Microsoft 365. If you are using an earlier version (Word 2003 or earlier), this tip may not work for you. For a version of this tip written specifically for earlier versions of Word, click here:
Please Note:
This article is written for users of the following Microsoft Word versions: 2007, 2010, 2013, 2016, 2019, 2021, and Word in Microsoft 365. If you are using an earlier version (Word 2003 or earlier), this tip may not work for you. For a version of this tip written specifically for earlier versions of Word, click here:
Comments