Please Note: This article is written for users of the following Microsoft Word versions: 2007, 2010, 2013, 2016, 2019, and 2021. If you are using an earlier version (Word 2003 or earlier), this tip may not work for you. For a version of this tip written specifically for earlier versions of Word, click here: Adding an Optional Break.
One of the special characters available in Word is the no-width optional break. This character is primarily intended for use in Asiatic languages but can be of use to those of us working in English. Consider the following sentence: The best solution is to write/revise/reissue documents. In this case, you've created a very long word consisting of three individual words separated by slashes. As the artificially long word reaches the end of a line, Word treats it as a single word and will move the entire thing to the next line, if wrapping is necessary.
One way around this problem is to insert a no-width optional break after each slash:
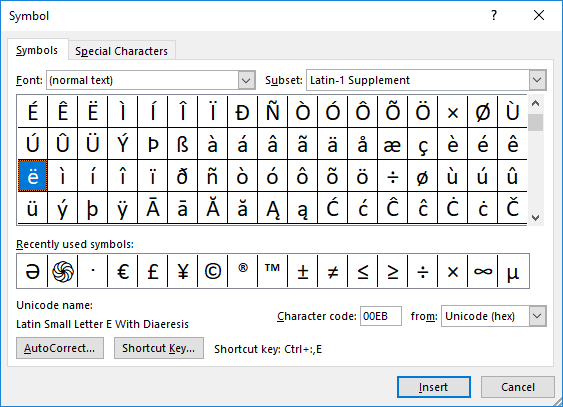
Figure 1. The Symbol dialog box.
What you see on the screen when you insert the no-width optional break depends on how you have configured your system. If you have non-printing characters hidden, then you won't see a thing, but the character is still there. (You can detect it by moving across the character position by using the left or right arrow keys.) If you have non-printing characters visible on the screen (Word Options | Display | Show All Formatting Marks), then the character shows up as a small, gray double-wall box.
As an interesting side note, you must choose the Show All Formatting Marks on the Display options. If you instead choose the individual character options (Tab Characters, Spaces, Paragraph Marks, Hidden Text, and Optional Hyphens), the no-width optional break still won't be visible—you must choose All.
Now, as your artificially long word approaches the end of the line, Word wraps the text based on the position of the no-width optional break. Since the character has no width, the result is that it appears like the word wraps right after the slash.
For grammatical purists in the audience, I know that the absolute best solution is to do away with slashes between words. For instance, it would be better to say, "The best solution is to write, revise, or reissue documents." Unfortunately, not all clients want the grammatically correct solution, or they have a penchant for slashes. In that case, the no-width optional break can be very handy.
WordTips is your source for cost-effective Microsoft Word training. (Microsoft Word is the most popular word processing software in the world.) This tip (11555) applies to Microsoft Word 2007, 2010, 2013, 2016, 2019, and 2021. You can find a version of this tip for the older menu interface of Word here: Adding an Optional Break.

The First and Last Word on Word! Bestselling For Dummies author Dan Gookin puts his usual fun and friendly candor back to work to show you how to navigate Word 2019. Spend more time working and less time trying to figure it all out! Check out Word 2019 For Dummies today!
When you paste information into Word from the internet, you may get more than just the plain text you hoped for. This tip ...
Discover MoreJust about everyone knows the simple ways of copying and pasting using the Clipboard. What if you want to copy and paste, ...
Discover MoreWant a little more space just before some of your punctuation characters? You can add that spacing in a variety of ways, ...
Discover MoreFREE SERVICE: Get tips like this every week in WordTips, a free productivity newsletter. Enter your address and click "Subscribe."
2024-08-27 11:20:01
Donna
Thank you, Andrew! I appreciate your help. I am sick of losing all my customizations in Word so am compiling a macro with all my keybindings. This helps immensely!
2024-08-26 10:14:25
Andrew
Donna, in a macro to bind the key (as opposed to a macro) directly to Ctrl-X,I (my preference) I use this command:
KeyBindings.Add KeyCode:=BuildKeyCode(wdKeyX, wdKeyControl), KeyCode2:=wdKeyI, KeyCategory:=wdKeyCategorySymbol, Command:=ChrW(8203)
Andy.
2024-08-23 10:11:55
Donna
Oh, I had been trying to figure out how the syntax would work for the keybinding, but this is better, thanks, Andrew!
2024-08-22 13:13:48
Andrew
Donna, does your macro look like this?
Selection.InsertSymbol CharacterNumber:=8203, Unicode:=True
2024-08-21 10:36:57
Donna M Bullard
Thank you, Andrew! I've been working on my keyboard layout and preparing to write a macro to keybind the keys to my liking, so your suggestion falls right into place for me. I very much appreciate your help.
2024-08-19 11:01:33
Andrew
Donna,,
Same problem here. Years ago I used a macro to insert the character until I learned to be able to directly bind it. Then your situation happened to me also, so now I've changed it to binding my keystroke to zero-width space character (8203 = U+200B). Word's default is to insert a zero-width-non-joiner (8204 = U+200C) which so far works fine.
Note, in either case, I think it the character needs to be defined in the font being used, but I haven't tested this since I'm usually using the major fonts which all seem to have it.
Andy.
2024-08-16 13:17:51
Donna M Bullard
Hi, Allen...I have used your tips for years, thank you for this site. I, too, am having issues with the NWOB. It can be assigned to a hot key but doesn't show or work. I think the only way to make it work is to save it down as an older Word version, but I find this solution unacceptable. I suspect something they've updated has made this non-functional. There is something there because using the directional keys where the code is supposed to be, it stays in one place for two movements, but nothing shows and the line doesn't break. Do you have any power to convince MS that they've screwed up yet again? I don't know what they're doing lately, but I saw a rant by a man who was unhappy with the quality of MS employees, calling them graphic designers instead of computer programmers, which is blatanly obvious in their recent "updates." I wish there was a way to make direct contact with these people or their handlers so they would listen to reasonable requests for program operation.
2023-05-12 12:25:40
Debs
Follow-up to my 05/12/23 10:16 comment: Pasted entire document into new document. By default, Compatibility Mode was turned on in the new document. The NWOBs worked. Not only did they work, but the ones I attempted to insert in the previous document WERE THERE.
2023-05-12 10:16:14
Debs
I have Show All Formatting Marks selected, yet Word 365 still will not insert the No-Width Optional Break. Then I opened a new document and it inserted fine, even though Show All Formatting Marks was NOT selected. I am baffled.
2023-05-05 08:56:38
Tomek
@Kiwerry,
Try to check it in all-English document, with English keyboard and English as the spelling language. I will send you my test document in which it worked for me.
2023-05-05 04:57:40
Kiwerry
@ Tomek: thanks for the suggestion. You are correct about me working in German as well. On my machine, the Word UI interface is set to English and English and German are both in the proofing language list, but if I create a new document German is the default.
I copied your comment into a new document, selected it and changed the language to English; the red underlining disappeared. I then tried inserting various characters into the word "inserted" and adding text to the left of it until "inserted" either jumped to the next line or broke at the character. The latter only happened in the case of the Optional_Hyphen, but not in the case of the NoWidth_Optional_Break. I noticed that when I added the NoWidth_Optional_Break the word was underlined in red, so maybe the language was changed by the insertion. I will investigate this and the question of changing the document language rather than just the selection language further. Your comment has given me a lead to follow, thanks again.
2023-05-04 21:04:38
@Kiwerrry,
I guess I might have found the cause of what you observed. I know that you are often writing in German.
I created a new document while having the German keyboard active, pasted some text from a German newspaper, made sure that the spellchecking language is set to German, and inserted the character. I observed the same behaviour as you did, and then realized that I actually inserted no-width non break instead of no-width optional break. Both characters look the same on screen.
I hope this helps,
Welcome back from your travels,
Tomek
PS: there may be more to it, but I didn't have time to test it further.
2023-05-03 04:47:36
Kiwerry
P.P.S. Word is definitely putting the character there, but for some reason, the character is not being treated as expected. No breaking occurs.
A search lead me to
https://itsourcecode.com/ms-word/how-to-insert-symbol-in-ms-word-symbol-and-special-characters/
, where a description of how to search for special characters follows the description of how to insert them. The list of special characters in Find/Replace did not include the "No-Width Optional Break" (NWOB) but on my selecting Non-breaking Space as a test I found it inserted ^s, and I simply changed the s to an o to achieve the ^o. I put a # character in the Replace field and clicked "Replace All". It found and replaced eight occurrences (see Figure 1 below) , so the character is definitely there.
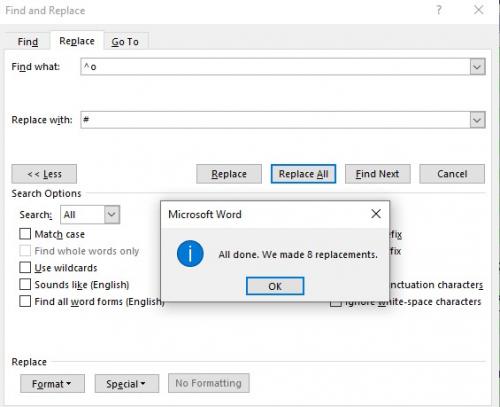
Figure 1.
2023-05-03 02:38:29
JohnPF
As with Kiwerry's post on 5/2/23, I'm not able to get this tip to work.
2023-05-02 11:12:45
Kiwerry
P.S. A character is being inserted, but it is invisible (despite "Show All Formatting Marks" being on) and is not having the desired effect. Any comments as to why this should be so, or whether I have misunderstood what it was supposed to achieve, welcome.
Something inserted? I tried recording a macro, and this is the relevant line:
Selection.InsertSymbol CharacterNumber:=8204, Unicode:=True, Bias:=0
2023-05-02 09:54:58
Kiwerry
Thanks, Allen (and belated congratulations on your Wedding Anniversary - may you both keep healthy).
Does the ability to insert a "No-Width Optional Break" (NWOB) depend on the character set chosen?
In my Word (365) my attempts to insert the NWOB from the Special Characters into a long pathname as described, failed every time. Clicking another special character (e.g. non-breaking space) worked but not NWOB
Environment: Word 365 on Windows 10, new blank document (not in compatibility mode - I had to make a detour to fix new documents being opened in compatibility mode - not that it made a difference, but any port in a storm ...), Font Calibri (Body) 11 pt.
Failed? Two criteria applied:
1) "Show All Formatting Marks" on (others visible), nothing appeared when I clicked "Insert".
2) After trying to insert NWOBs after the \ character in the path I moved to the start of the line and added words to the left of the path, expecting to see the path break where I thought I had inserted the NWOBS. Nothing like that happened; after I had added enough words to make the line too long, the complete path was moved to the next line.
2022-04-04 17:47:43
John Mann
I found this on my Word 2010. I had never really paid any attention to the Special Characters tab in the past, so found this quite interesting.
I did notice that although the No-Wdith Optional Break doesn't have a keyboard short cut assigned, it's possible to add one, by first selecting the No-Wdith Optional Break, the pressing the Shortcut button. I assigned Ctrl+Shift+Alt+Spacebar (not likely to conflict with anything else).
I also notice that there is an AutoCorrect button, but I haven't experimented with that one.
2020-10-27 13:47:44
Richard Gardner
I cannot find this on my microsoft word for mac (office 365 subscription, but downloaded software on my computer). The special characters are there but not this one.
2020-08-24 09:34:06
Andrew
I do this all the time for pathnames, but there are two issues I've had to learn to deal with:
First, make sure you add the no-width optional break <b>after</b> the pathname has been made active (converted to a hyperlink), otherwise it will become part of the link address (and not just the display text) and it will not resolve to the correct location when clicked.
Second, sometimes--more than occasionally but not regularly--the no-width optional break somehow migrates from the displayed text to the link address, making it unresolvable. I have yet to figure out when or why, but it is <b>annoying</b>.
Andy.
2020-08-21 15:06:10
Laura D
This tip is great for long URLs without hyphens in narrow table cells. I never knew there was a way to break them without adding an unwanted character. Thanks!
2020-07-06 12:46:39
Watt
No-Width Optional Break no longer has a character symbol when you Show All Formatting Marks (it used to). No-Width Non Break does. And no "super-hidden" character apparently exists; i.e., when Show All Formatting Marks is unchecked and you pass the cursor over the special character using the right or left arrow key, it does not pause for any break character. But No-Width Optional Break does still create the desired break effect.
I have MS Office 356 ProPlus v. 1908 (build 11929.20838 click-to-run).
2019-08-14 16:20:46
Kyle
This no-width optional break character would be handy for lines showing pathnames.
2019-08-05 19:50:07
Penny
If you are going to use this regularly, suggest you record a macro for it and then add the macro to your Quick Access Toolbar. Saves a great deal of time and is always there when you want it.
2019-08-05 10:52:49
Larry
It would be nice if you actually showed the figure containing the "No Break Space". Ideal would be with the "No Break Space" selected instead of the "Latin Small Letter E with Diaeresis"
2019-08-05 09:46:18
Mary
I've been wondering about this option for years. I used to do this in WordPerfect (I think) Ctrl-space. Thanks for the tip!
2019-08-04 16:18:15
Allan
I agree. For some reason on most of Allen's descriptive images he almost always has some other function checked rather than the one under discussion. Strange.
That said, I want to thank Allen for the tremendous good he does with these tips. I would be lost without seeing them every day.
2019-08-03 06:29:12
Timothy Rylatt
It would be more helpful if your screenshot of the Insert Symbol dialog displayed the relevant information.
(see Figure 1 below)
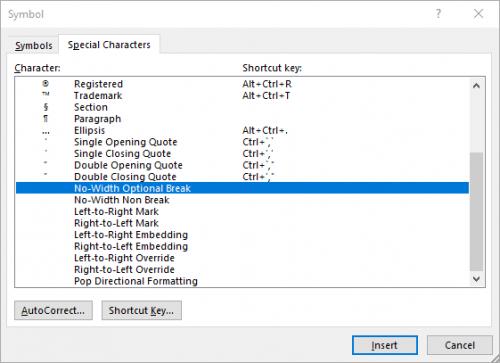
Figure 1.
Got a version of Word that uses the ribbon interface (Word 2007 or later)? This site is for you! If you use an earlier version of Word, visit our WordTips site focusing on the menu interface.
Visit the WordTips channel on YouTube

FREE SERVICE: Get tips like this every week in WordTips, a free productivity newsletter. Enter your address and click "Subscribe."
Copyright © 2026 Sharon Parq Associates, Inc.
 Please Note:
This article is written for users of the following Microsoft Word versions: 2007, 2010, 2013, 2016, 2019, and 2021. If you are using an earlier version (Word 2003 or earlier), this tip may not work for you. For a version of this tip written specifically for earlier versions of Word, click here:
Please Note:
This article is written for users of the following Microsoft Word versions: 2007, 2010, 2013, 2016, 2019, and 2021. If you are using an earlier version (Word 2003 or earlier), this tip may not work for you. For a version of this tip written specifically for earlier versions of Word, click here:
Comments