Written by Allen Wyatt (last updated December 2, 2024)
This tip applies to Word 2007, 2010, 2013, 2016, 2019, 2021, and Word in Microsoft 365
Melinda has been charged with creating an operation manual for her company. The manual will include quite a few mandatory images. She's been adding the images, but the document has become quite large. Melinda wonders if there is a "best way" to reduce the impact that all these images have on the size of the document, yet still maintain image quality.
The answer to this can be a bit involved, so it is best to start with the end product in mind—what do you intend to do with the final operation manual? Is it destined to be used as a Word document? Is it destined to be used as an on-screen PDF file? Is it destined to be used as an online Web site? Is it destined to be printed?
The answer to this "intended use" question should drive what you do with the images. The reason is because any steps you take to reduce image size (which, naturally, reduces document size) reduces the quality of the images contained within the document.
There are two ways that image resolution can be expressed. If you take a picture with your camera or with your phone, then the size of the image is simply expressed in pixels. For instance, I took a picture with my phone, and the size was 4284x5712.
The second way that image resolution is expressed is dots per inch (dpi) or pixels per inch (ppi); these two terms are essentially synonymous. This is the way in which Word expresses image resolution because it is the traditional way to handle resolution in the printing trade. Understanding how these two "resolution methods" relate to each other can help you understand why your documents get so large when you start inserting pictures.
Let's say your document is a standard 8.5x11 page size, and that you have 1-inch margins on all sides. This means that the area for the content on your page is 6.5x9. If I insert that phone picture I mentioned a moment ago, then the 4284 horizontal pixels are placed into the 6.5-inch width of the margins on the page, which means that Word tries to cram 659 pixels (dots) per inch in what it displays. (You get this by dividing 4284—the number of pixels—by 6.5—the number of inches available. This gives 659.077 pixels per inch, which I just rounded to 659 dpi for our purposes.)
Word also applies this same dpi to the vertical height, and the 5712 pixels ends up taking approximately 8.667 inches in height. (5712 pixels divided by 659.077 dpi is 8.667 inches.)
When Word sizes the image to fit in the available space, all that original data is still there, even though Word can't use it all. So, your 6.5x8.667 picture (what you see in the document) ends up adding quite a bit of size to your document. More on that in a moment, though.
The solution is to make sure your images are resized to fit your needs, at the dpi/ppi resolution that best meets your intended use for the document. If your document is intended for on-screen use as either a Word document or as a PDF, then lower image resolution is generally just fine. Most images intended for this use are fine at either 72 dpi or 96 dpi. If, however, your document is intended to be printed, then you will want a high resolution, such as 300 dpi or even 600 dpi. (The resolution you choose depends on the resolution that can be printed by the printer you will be using. Commercial printers—those used by commercial printing firms or even copy shops—routinely print at 300 dpi or 600 dpi. Some even print at 1200 dpi or higher. So, you'll need to check with your intended printing device.)
Finally, if you intend the document to eventually be used as a web page, in an HTML format, then you will typically want to use images that are 300 dpi to accommodate those who access the web page using high-resolution monitors.
Once you figure out the resolution of the images you need to use, then you can figure out what to do with your document's images to maintain a reasonable file size. Remember that 4284x5712 image I mentioned just a bit ago? I used image editing software to size the image to 6.5x8.667 inches and saved it in PNG format at various dpi resolutions. Here are the resultant file sizes for the image:
You can see that the resolution of the image can affect the size of your document dramatically as you add more and more images. The file sizes for your images may differ depending on the format used (JPG, PNG, TIF, etc.), what compression settings you use (if the image format uses compression), and the composition of the image (how much of the same colors are used within the image). The file sizes noted above, though, should drive home the point that resolution is a huge determinant in file size for an image.
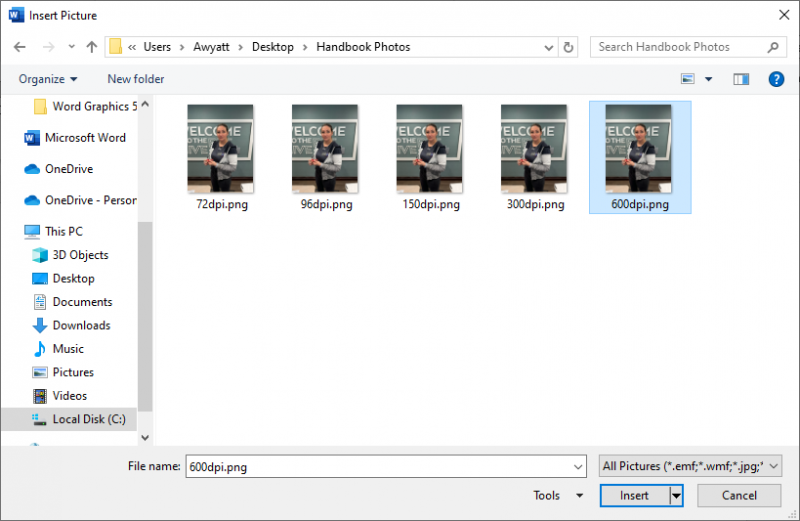
If you must use high-resolution images in your document—again, because of your intended use of the finished document—then you should not embed the image within the document itself. Instead, put all your images in a common folder for the document and then link to the image. To link an image instead of embedding it, follow these steps:

Figure 1. The Insert Picture dialog box with an image selected.
If lower-resolution images (72 dpi or 96 dpi) images are sufficient for your needs, then you should be OK just inserting the images directly, without using a link. In other words, go ahead and embed them unless you are doing so with scores of images.
All of this being said, there is one time when you should not link images, and that is if you want to send the document to someone via e-mail. Only embedded images are sent with a document; linked items won't be visible when the recipient opens the document on their system. If you link images, you'll want to do something like generating a PDF from the Word document and then sending the PDF to the remote recipient. This goes double when you are working with a commercial printer. You'll want to check with them to determine the best way to create a PDF that will give the best results on their printing equipment.
There is one other thing that should be mentioned about inserting images. According to some sources, it is best to use the Picture tool on the Insert tab of the ribbon to insert your pictures instead of using Ctrl+V to insert an image that you copied from a different document or from some other place. The reasoning is that when you paste, Word uses different import filters than if you use the ribbon commands. The import filters used by pasting pull in additional information that can make the size of your image larger than it needs to be. Plus, pasting means that you are embedding and cannot link the image to a file on disk.
Before progressing much further, though, you probably already understand that Word allows you to resize and crop images once they are added to your document. This can be a very handy option to use, but you need to realize that Word is not a graphics program. Even though Word provides the tools, if you have lots of images to add to your document, it is better to use a specialized graphics program to process the image before you insert it into your document. If you know how you want the image cropped, how you want it sized, and what resolution you want, you can do all of this in the graphics program instead of leaving it up to Word. If you take this approach, then your images will look better, they will be better suited for your needs, and they will take less room in your document.
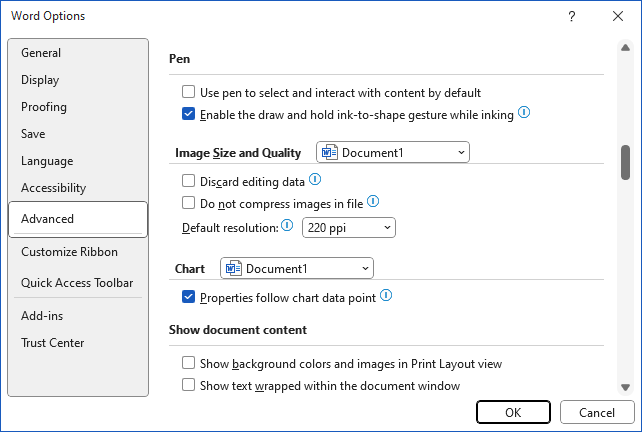
If you are working with a document that already has images in it, there are things you can do to minimize the effect of the images on your document size. The first thing you can do is to specify a default resolution for your images. Follow these steps:

Figure 2. Setting image specifications.
As already discussed, when you resize or crop images within Word, the program doesn't get rid of the data related to the original image. It saves this because you may, at some point, want to restore the image to its original glory. This occurs even if Word resizes the image as you insert it, like I described earlier with the phone picture. If you choose the Discard Editing Data checkbox (step 5), then Word will get rid of any of the image data it doesn't need, meaning it only keeps the portion of the picture necessary to display what you see on the screen.
The Do Not Compress Images in File checkbox (step 6) and the Default Resolution drop-down list (step 7) work in concert with each other. Basically, if an image is a higher resolution than what you specify, Word will compress the image's data so it matches your resolution setting. This means that you should choose, in the drop-down list, a resolution that is closest to your desired target resolution—the resolution most appropriate for your intended use of the document—as described earlier in this tip.
Word doesn't really apply the settings you make here until you actually save the document. Once it does apply them, however, then you cannot recover the data that Word purges. The upshot of this is that if you crop an image or resize it smaller, and you later want to "uncrop" it or make it larger, you will need to delete the inserted image and go back to the original image file to get the best results.
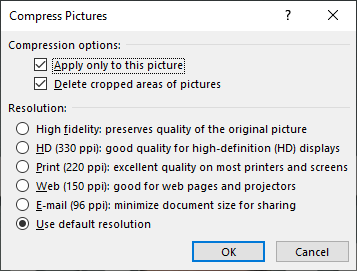
There is another way that you can force the compression of images in your document, and it is a good idea to perform these steps after you set the defaults just mentioned:

Figure 3. The Compress Pictures dialog box.
If some of the resolution settings (step 5) are grayed out, it is because Word only displays settings that are of lesser quality than the image you selected in step 1. The program does this because you are compressing files—thus the title of the dialog box—not upsizing them to a higher resolution. In addition, the version of Word you are using can affect what resolutions are available for both settings and compression purposes.
Whenever you compress pictures in this way, or even when you set the defaults as described earlier, understand that it is the quality of only embedded pictures that is modified. If you link to an external image file, the external file is not affected in the least.
One final thing—notice that Word only offers a limited number of image resolutions—330 ppi, 220 ppi, 150 ppi, and 96 ppi in the version of Word provided with Office 365. If you need to use a different resolution, then you'll need to process the image in a graphics program to get the resolution you want. For instance, if you are preparing the document for commercial printing and you need 600 dpi, or even if you want to use the much smaller 72 dpi, then make sure you set the resolution (and image size) before importing the image into Word.
WordTips is your source for cost-effective Microsoft Word training. (Microsoft Word is the most popular word processing software in the world.) This tip (13939) applies to Microsoft Word 2007, 2010, 2013, 2016, 2019, 2021, and Word in Microsoft 365.

The First and Last Word on Word! Bestselling For Dummies author Dan Gookin puts his usual fun and friendly candor back to work to show you how to navigate Word 2013. Spend more time working and less time trying to figure it all out! Check out Word 2013 For Dummies today!
Word cand other Office applications are often provided with special add-ins that expand what you can do with the ...
Discover MoreInsert a graphic into a document and you expect to be able to see it. What do you do if it isn't displayed, however? Here ...
Discover MoreNeed to keep your drawing shapes together in one place? The drawing canvas may be exactly what you are looking for.
Discover MoreFREE SERVICE: Get tips like this every week in WordTips, a free productivity newsletter. Enter your address and click "Subscribe."
2024-12-02 08:51:47
Rebekah Rainey
Awkward title
2024-11-23 20:23:02
Tomek
To clarify my previous comment: the links could work whether you send the document via e-mail, or share it through the network, particularly on shared drive or via such tools as SharePoint.
Also, i would consider placing only lower resolution images, or even thumbnails, in the document (keep the document size small), and make such graphic element clickable, opening in a proper viewing program the original full resolution picture. Of course, this is only for documents that will be used on-screen.
2024-11-23 20:14:36
Tomek
re: All of this being said, there is one time when you should not link images, and that is if you want to send the document to someone via e-mail. Only embedded images are sent with a document; linked items won't be visible when the recipient opens the document on their system.
As Melinda is working on a **company** manual, the linked images may be working fine if they exist on the company network drives, and the links to them can be created such that they will have the same address pointer for all computers on the network.
2024-11-23 12:12:01
Brian Lair
What a great primer on handling pictures in Word. I imagine Melinda got all the info she needed and more!
2024-11-23 07:43:46
Robert Love
Very useful article. I was amused to read "Word is not a graphics problem". That's a matter of opinion. Actually, I think you meant "Word is not a graphics program". That's not a matter of opinion. And it's quite correct.
Got a version of Word that uses the ribbon interface (Word 2007 or later)? This site is for you! If you use an earlier version of Word, visit our WordTips site focusing on the menu interface.
Visit the WordTips channel on YouTube
FREE SERVICE: Get tips like this every week in WordTips, a free productivity newsletter. Enter your address and click "Subscribe."
Copyright © 2025 Sharon Parq Associates, Inc.
Comments