Nancy just started working at a small company, so she inherited a computer (and Word) from the person she replaced. The previous employee configured tons of Word's settings to his liking, which Nancy understands. She wonders, though, if there is a way to "reset" Word to its default settings so I can get back to a state where she can start making changes according to her preferences.
In order to reset Word, you need to essentially delete the places where Word stores settings. There are two such places: the Normal template and the Word Registry key. In addition, you'll want to make sure that you get rid of any documents that Word may load by default.
Before you start deleting things, however, you need to jump into Word and jot down a piece of information:
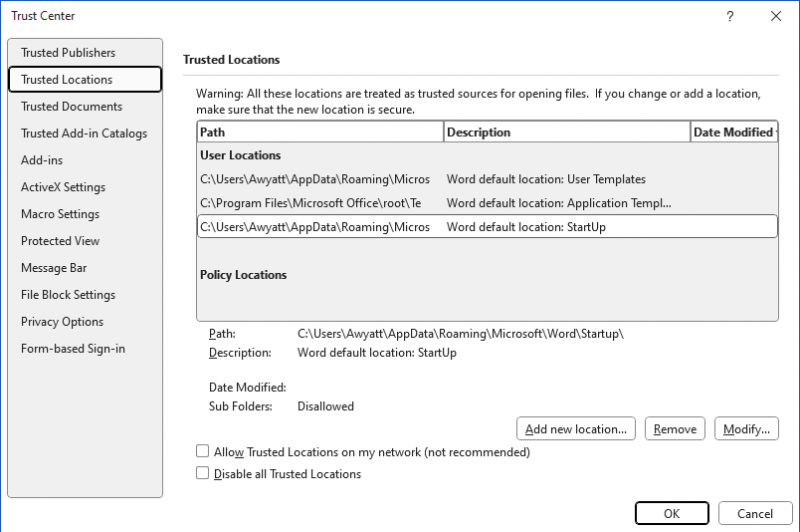
Figure 1. The Trusted Locations area of the Trust Center.
Now you can get out of Word entirely and start to delete places that Word stores settings. First, you'll want to get rid of the Normal template. Use the Windows Search tool to locate the files Normal.dot and Normal.dotm. If you find either of them, simply delete them. Note that deleting Normal.dot will delete macros, as well, but that shouldn't be an issue, since you are wanting to reset Word.
Next, you'll need to edit the Windows Registry, in this manner:
HKEY_CURRENT_USER\Software\Microsoft\Office\16.0\Word
Next, it is a good idea to locate the Startup folder. This the folder path you should have jotted down near the very beginning of this tip. Use the Explorer to navigate to the folder and then delete anything within it. (Anything in the Startup folder is normally loaded and run when you start Word.)
After these things are complete, you should be able to restart Word and start making the configuration changes and customizations you want to make.
WordTips is your source for cost-effective Microsoft Word training. (Microsoft Word is the most popular word processing software in the world.) This tip (13947) applies to Microsoft Word 2007, 2010, 2013, 2016, 2019, 2021, and Word in Microsoft 365.

The First and Last Word on Word! Bestselling For Dummies author Dan Gookin puts his usual fun and friendly candor back to work to show you how to navigate Word 2019. Spend more time working and less time trying to figure it all out! Check out Word 2019 For Dummies today!
When you use Word, it normally performs several tasks in the background while you are typing. One of those tasks is to ...
Discover MoreWord allows you to either display or hide non-printing characters that are in your document. This configuration setting ...
Discover MoreIf you are having difficulties getting Word to insert the date exactly the way you want, it could have to do with how you ...
Discover MoreFREE SERVICE: Get tips like this every week in WordTips, a free productivity newsletter. Enter your address and click "Subscribe."
There are currently no comments for this tip. (Be the first to leave your comment—just use the simple form above!)
Got a version of Word that uses the ribbon interface (Word 2007 or later)? This site is for you! If you use an earlier version of Word, visit our WordTips site focusing on the menu interface.
Visit the WordTips channel on YouTube

FREE SERVICE: Get tips like this every week in WordTips, a free productivity newsletter. Enter your address and click "Subscribe."
Copyright © 2026 Sharon Parq Associates, Inc.
Comments