Please Note: This article is written for users of the following Microsoft Word versions: 2007, 2010, 2013, 2016, 2019, 2021, and Word in Microsoft 365. If you are using an earlier version (Word 2003 or earlier), this tip may not work for you. For a version of this tip written specifically for earlier versions of Word, click here: Getting Rid of Blue Squiggly Underlines.
Ivan noted that on his PC the text he writes is frequently "marred" by squiggly underlines in blue. Right-clicking gives him options of Ignore Once, Ignore Rule, or Replace Direct Formatting with Style Normal. Ivan wants to turn off the blue squiggly underlines and is wondering how to do it.
Word likes squiggly underlines and has used them differently in different versions of Word. The most common squiggly underline is red, which marks a potential spelling error. In some versions of Word you'll see green squiggly underlines, which indicate a potential grammar error. The blue squiggly underlines were originally used to mark formatting inconsistencies, which is why Ivan saw the options he noted—particularly "Replace Direct Formatting with Style Normal"—when he right-clicked the blue-squiggly-underlined word or phrase.
You can turn off this marking of formatting inconsistencies by making a configuration change in Word:

Figure 1. The advanced options of the Word Options dialog box.
In some versions of Word, though, blue squiggly underlines are also used to mark grammar errors. (Yes, Microsoft has changed this—in some versions it was green, in some versions blue. Go figure!). If you turn off the setting noted above and you still have blue squiggly underlines, then follow these steps:
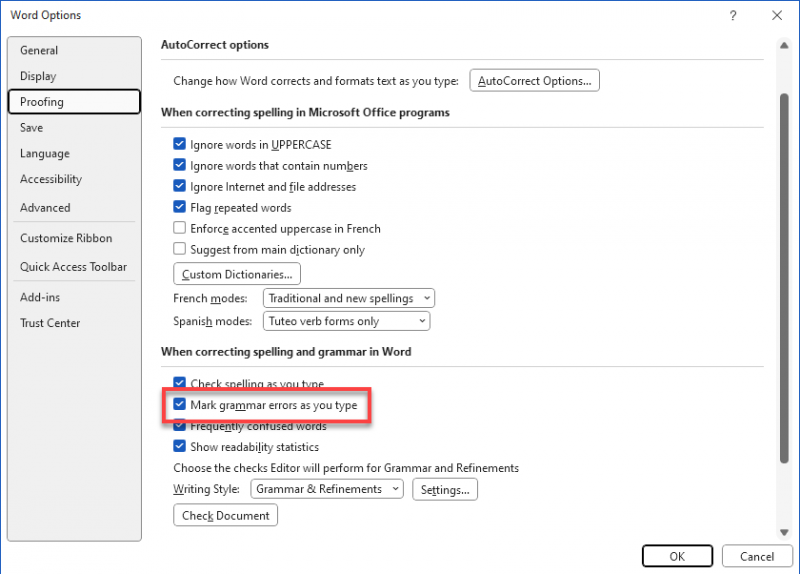
Figure 2. The proofing options of the Word Options dialog box.
That should do it; your blue squiggly underlines should be gone.
WordTips is your source for cost-effective Microsoft Word training. (Microsoft Word is the most popular word processing software in the world.) This tip (6053) applies to Microsoft Word 2007, 2010, 2013, 2016, 2019, 2021, and Word in Microsoft 365. You can find a version of this tip for the older menu interface of Word here: Getting Rid of Blue Squiggly Underlines.

Create Custom Apps with VBA! Discover how to extend the capabilities of Office 365 applications with VBA programming. Written in clear terms and understandable language, the book includes systematic tutorials and contains both intermediate and advanced content for experienced VB developers. Designed to be comprehensive, the book addresses not just one Office application, but the entire Office suite. Check out Mastering VBA for Microsoft Office 365 today!
Have you ever started a new document only to find that the settings in Word seem to be different than what you expected? ...
Discover MoreDo you have bothersome boxes appear around the text in your document? Here's how you can get rid of them and make your ...
Discover MoreWant to change the number of "undo" steps available when editing? You can't, because Word doesn't' really have a maximum. ...
Discover MoreFREE SERVICE: Get tips like this every week in WordTips, a free productivity newsletter. Enter your address and click "Subscribe."
There are currently no comments for this tip. (Be the first to leave your comment—just use the simple form above!)
Got a version of Word that uses the ribbon interface (Word 2007 or later)? This site is for you! If you use an earlier version of Word, visit our WordTips site focusing on the menu interface.
Visit the WordTips channel on YouTube

FREE SERVICE: Get tips like this every week in WordTips, a free productivity newsletter. Enter your address and click "Subscribe."
Copyright © 2026 Sharon Parq Associates, Inc.
 Please Note:
This article is written for users of the following Microsoft Word versions: 2007, 2010, 2013, 2016, 2019, 2021, and Word in Microsoft 365. If you are using an earlier version (Word 2003 or earlier), this tip may not work for you. For a version of this tip written specifically for earlier versions of Word, click here:
Please Note:
This article is written for users of the following Microsoft Word versions: 2007, 2010, 2013, 2016, 2019, 2021, and Word in Microsoft 365. If you are using an earlier version (Word 2003 or earlier), this tip may not work for you. For a version of this tip written specifically for earlier versions of Word, click here:
Comments