Bob just installed a new computer system, along with a new version of Word. On this new system, he cannot get the setting of the Show/Hide tool (on the Home tab of the ribbon) to be persistent. Every time he starts the system, the tool is automatically selected, which is contrary to how Bob wants to use Word. He's tried deleting and recreating the Normal template, but that didn't do it. He wonders how he can get Word to remember the status of this tool from one session to another.
It should be noted, up front, that the Show/Hide tool is nothing but a toggle that shows the status of a setting in the Word Options dialog box. Follow these two steps to get to the proper area of the dialog box:
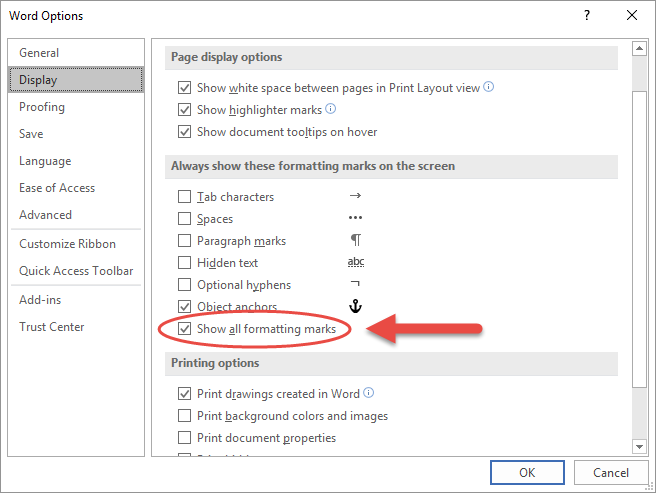
Figure 1. The Display settings of the Word Options dialog box.
Note the Show All Formatting Marks setting in the dialog box. It is the status of this setting that is reflected by the Show/Hide tool. Changes to this setting are reflected in the Show/Hide tool, and changes to the Show/Hide tool are reflected in the setting. (For ease of reference, I'll simply refer to this as the "Show/Hide setting" in the balance of this tip.)
There are three schools of thought on where the Show/Hide setting is stored. Some say it is stored with the document, some say it is stored in the Normal template, and still others say it is stored in the Windows Registry. Microsoft has not published any information that definitively answers where it is stored, but my testing seems to offer the greatest credence to the third location—the Windows Registry.
On a new Word installation, if you start the program, change the Show/Hide setting, and then close the program, the next time you start the program, the condition of the setting (either on or off) is the same as when you last closed the program. This occurs without the need to save a document or modify the Normal template.
Further, if you open two documents, turn the Show/Hide setting off in one of them, save that document, and then close that document, you'll still have the other document open with the Show/Hide setting turned on. Exit Word and restart the program, and the Show/Hide setting should still be turned on. Open the document you previously saved, and it will now be displayed with the Show/Hide setting turned on.
If your installation of Word is not behaving in this manner, it is possible that the Registry key used by Word to store configuration information has somehow become unstable or corrupted. One way to deal with this is to get out of Word entirely and delete the data key. When you then restart Word, the program will recognize that the data key is gone and will rebuild it automatically. Follow these steps:
HKEY_CURRENT_USER\Software\Microsoft\Office\16.0\Word\Data
Remember that any time you make changes in the Registry you run the risk of really messing up your machine. Don't delete or change anything else in the Registry except what is detailed above. If desired, you may want to back up the Registry before making any changes. (You can find out how to do Registry backups in any decent Windows tutorial book.)
Another caveat is that by renaming or removing the data key (and thereby forcing Word to start over from scratch) you lose many of your other customizations. Thus, you may want to have in mind exactly what those customizations are so that you can redo them after restarting Word.
If this still doesn't work (and it really should), then you may want to consider adding this macro to your Normal template:
Sub AutoOpen()
    ActiveWindow.ActivePane.View.ShowAll = False
End Sub
This one-line macro makes sure that the Show/Hide setting is turned off whenever you start Word.
Mentioning macros made me think of one other thing—if you have any add-ons installed in Word or any custom macros, you may want to check to make sure that these are not modifying the Show/Hide setting as they are running. The easiest way to figure that out is to disable any add-ons and see if the problem goes away.
Note:
WordTips is your source for cost-effective Microsoft Word training. (Microsoft Word is the most popular word processing software in the world.) This tip (2398) applies to Microsoft Word 2007, 2010, 2013, 2016, 2019, 2021, 2024, and Word in Microsoft 365.

Discover the Power of Microsoft Office This beginner-friendly guide reveals the expert tips and strategies you need to skyrocket your productivity and use Office 365 like a pro. Mastering software like Word, Excel, and PowerPoint is essential to be more efficient and advance your career. Simple lessons guide you through every step, providing the knowledge you need to get started. Check out Microsoft Office 365 For Beginners today!
When you start Word, it makes an assumption about where your documents are stored. If you want to force Word to change ...
Discover MoreWhen you open a document that you previously edited, Word displays a message the right side of the screen about jumping ...
Discover MoreThe Navigation pane can be quite handy for quickly jumping to different areas of your document. If the size of the text ...
Discover MoreFREE SERVICE: Get tips like this every week in WordTips, a free productivity newsletter. Enter your address and click "Subscribe."
There are currently no comments for this tip. (Be the first to leave your comment—just use the simple form above!)
Got a version of Word that uses the ribbon interface (Word 2007 or later)? This site is for you! If you use an earlier version of Word, visit our WordTips site focusing on the menu interface.
Visit the WordTips channel on YouTube

FREE SERVICE: Get tips like this every week in WordTips, a free productivity newsletter. Enter your address and click "Subscribe."
Copyright © 2026 Sharon Parq Associates, Inc.
Comments