Roger is trying to create a customized table of contents. This TOC needs to include not only full paragraphs, but also selected text within a Body Text paragraph. For instance, within the text "Work to be done at City Memorial Hospital during the month of May..." Roger would want only the hospital name to appear in the TOC. He could create a character style to apply to the hospital name, but Word only shows paragraph styles as being usable in a custom TOC. Roger wonders if there is a way around this.
There are actually two ways around this particular issue. The first involves the manual (or semi-manual) creation of a TOC, and the second involves a very esoteric feature called "style separators."
There are two primary ways that a TOC can be created in Word—using styles or using TC field codes. Most people use the styles approach because it is fast and easy. But if you need special text in your TOC (as Roger does), then using TC fields can be helpful. Follow these steps to mark an entry:
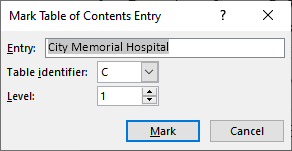
Figure 1. The Mark Table of Contents Entry dialog box.
You can continue to mark as many other text phrases as desired. When you are ready to add your TOC, then you'll need to modify your process only a bit to take advantage of the entries you marked:
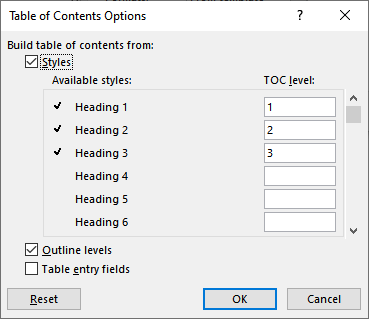
Figure 2. The Table of Contents Options dialog box.
The TOC that is generated will contain both headings (as normal) and the text phrases you marked in your regular text.
Styles are extremely powerful in Word. That being said, perhaps the most esoteric—nay, obscure and hidden—feature of styles is something called "style separators." The only real use for these that I could find has to do with the exact scenario that Roger is facing—putting only some text from the middle of the heading into the TOC.

Figure 3. Style separator.

Figure 4. Style separators surrounding your phrase.
That's it. If you now generate a TOC based on headings (like normal), it will contain just the text bounded by the two pilcrow characters. These characters are known as "style separators," and they allow you to apply multiple paragraph styles within a single paragraph. The problem, of course, is that when you do this, your paragraph looks funky because heading styles normally have a markedly different appearance from regular text. (See Figure 5.)
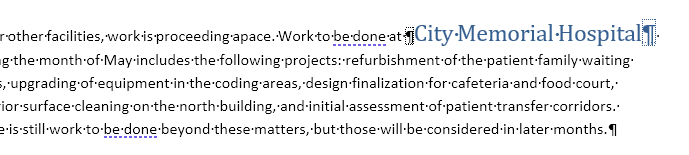
Figure 5. Applying multiple paragraph styles to the same paragraph.
This means you'll need to either manually override the styling (select the heading text and use the controls on the Home tab of the ribbon to make it look like the surrounding text) or create a few new styles to "fake" the headings and then add those fake heading styles to the Table of Contents Options dialog box to ensure they are added to the TOC.
WordTips is your source for cost-effective Microsoft Word training. (Microsoft Word is the most popular word processing software in the world.) This tip (13870) applies to Microsoft Word 2007, 2010, 2013, 2016, 2019, and 2021.

Do More in Less Time! An easy-to-understand guide to the more advanced features available in the Microsoft 365 version of Word. Enhance the quality of your documents and boost productivity in any field with this in-depth resource. Complete your Word-related tasks more efficiently as you unlock lesser-known tools and learn to quickly access the features you need. Check out Microsoft 365 Word For Professionals For Dummies today!
If you need to create a specialized table of contents, you need to know how to add TOC entries to your document. It's ...
Discover MoreWhen you create a TOC for your document, the information in the TOC is based on the headings in your document. If you ...
Discover MoreWord makes it easy to create a Table of Contents. If you want column headings in that table, getting them takes a bit of ...
Discover MoreFREE SERVICE: Get tips like this every week in WordTips, a free productivity newsletter. Enter your address and click "Subscribe."
2021-06-14 15:33:09
Beej
Huh. I contributed to this answer but basically just repeated the ideas in the manual method.
I'd never even heard of style separators until reading the second suggestion. I learned something new today!
2021-06-14 04:04:46
Ken Endacott
A TC field can give text in the TOC that is not necessarily identical to the text in the heading, for example “City Memorial Hospital – May”.
2021-06-13 13:53:00
Paul Stregevsky
Figure captions also benefit from style separators.
Use the "Caption" paragraph style for part 1, which will generate the list of figures ("Figure 3. Our redesigned form is saving money.").
Use a new style--say, Caption Part 2--to put meat on the bones ("The form is so easy to use, most customers are using 30 percent fewer Help Desk agents.")
2021-06-13 13:45:47
Paul Stregevsky
Great tip, Brian Lair--and timely. I'm about to revamp my employer's proposal template. Thanks to your tip, I'm going to make our Heading 3 a run-in heading and see if they'll accept it. If they do, that will free up a 0.3 to 0.5 page in a 30-page-limit proposal.
2021-06-13 10:20:12
Brian Lair
Thanks, Allen (and Malcolm, in comments) for explaining this really interesting feature!
2021-06-12 05:54:17
Malcolm Patterson
Style separators are also a convenient way to "run in" side heads. These differ from other headings in that the paragraph of associated text begins on the same line. Usually the side head itself is separated from the paragraph that follows by a period, colon, or em dash. It's often emphasized with bold or italic font attributes.
Inserting a style separator after the side head makes it easy to maintain consistent formatting of run-in side heads throughout the document, controlling them with paragraph styles. It's cleaner than manual formatting approaches; it won't interfere with the formatting of the text that follows.
Got a version of Word that uses the ribbon interface (Word 2007 or later)? This site is for you! If you use an earlier version of Word, visit our WordTips site focusing on the menu interface.
Visit the WordTips channel on YouTube

FREE SERVICE: Get tips like this every week in WordTips, a free productivity newsletter. Enter your address and click "Subscribe."
Copyright © 2026 Sharon Parq Associates, Inc.
Comments