Alan is a translator who receives most of his work in size A4 pages. He wonders how he can change this to letter size without messing up the pagination.
Let's start with a bit of an explanation. What is commonly known as "letter size" is a piece of paper measured in English (or Imperial) units. It is 8.5 inches by 11 inches. The A4 paper size is measured in metric units. It is 210 millimeters by 297 millimeters. In order to compare the two, it is helpful to convert them to the same units of measure:
When you do the conversion, you can see that A4 paper is slightly narrower and slighter longer than letter-size paper.
Word allows you, when setting up a document, to specify the size of the paper to be used in the document you are creating. Everything in the layout of the document starts with the paper size. Thus, if you have a document that is laid out for A4 paper and you later change that document for letter-size paper, the document "reflows" according to the paper change. This, as Alan has discovered, messes up pagination.
All other things being equal, the easiest way to change from a layout based on A4 paper to one based on letter-size, without messing up the pagination, is to fiddle with your margins. Given the page dimension differences noted above, you would need to make the following adjustments based on a portrait orientation:
In other words, you would need to increase your left/right margins by 0.23 inches in total. So, you could increase the left margin by 0.1 inches and the right by 0.13 inches, though the exact split (left and right) doesn't really matter. The idea is that the total increase for left and right margins would be 0.23 inches. The same process is used for adjusting the top and bottom margins, except you are decreasing those.
Why this fiddling? Because the idea is to make sure that the text block (the area in which text is flowed) remains the same size, independent of the paper on which that text block is being printed. Since letter-size paper is wider than A4 paper, you have to increase the margins on the left and right to make the text block the same relative width. Since letter-size paper is shorter than A4 paper, you need to decrease the margins on the top and bottom to make the text block the same relative height.
There are a couple of things to note about this approach. First, if you print out the A4 document and the letter-size document, the pagination should be the same, but the look of the document, on the paper, will be different. Why? Because the margins will be different. So, if your margins are more important than your text block size, then you may not want to use this approach. The second thing to remember is that it is possible that your pagination may still not be the same after adjusting the margins. Why? Because your document may include non-text items, such as graphics and tables. These affect the flow of your text but adjusting the margins doesn't affect the width of these non-text elements. Thus, adjusting margins may only be a solution if your document consists of straight text, without these extra elements.
This brings us to a different approach which is helpful if your desire is to simply print on a different size paper than used in your layout. With your A4 Word document open, follow these steps:
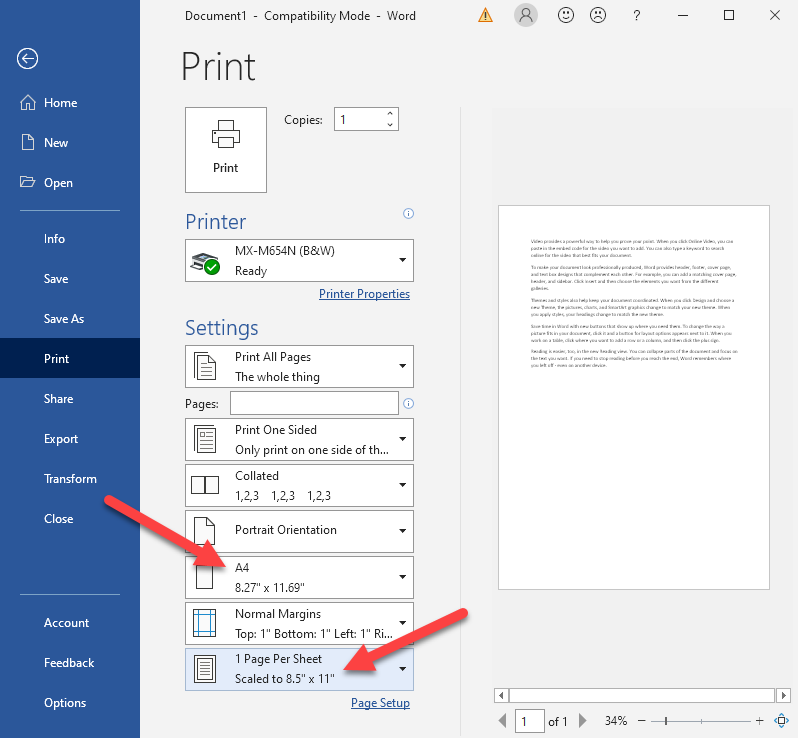
Figure 1. The proper setting in the Print settings.
The result of these steps is that your output, though laid out for A4 paper, should be scaled to fit on the letter-size paper you have in your printer and your original pagination is not affected. (You could follow the same steps if you have a letter-size layout and you want to print on A4 paper.)
The final approach is very similar to this last one, though it involves one more step. You can, if you desire, print your document to a PDF file and then, in whatever PDF reader you use (or in Acrobat), choose to print to letter-size paper. Your reader (or Acrobat) takes care of the scaling for you and your pagination is not messed up.
There is one other thing you may want to check in Word, and it is a setting that has given some users a few fits. Follow these steps:
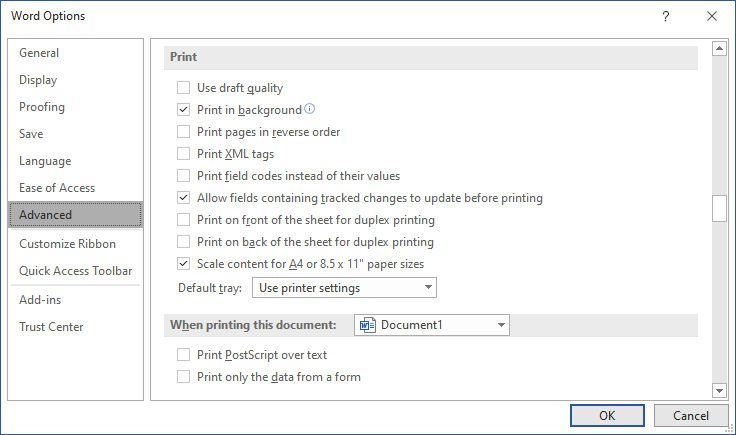
Figure 2. The Print options in the Word Options dialog box.
Note the option, near the bottom of this section, called Scale Content for A4 or 8.5 x 11" Paper Sizes. This option is selected by default in Word. It apparently comes into play with some printers or if you are printing to a PDF file. It can cause your output to unexpectedly be switched between formats, following rules that Microsoft has not made very clear. I find it best to turn off the option and then use the scaling steps already outlined, when I actually need scaling to be done.
WordTips is your source for cost-effective Microsoft Word training. (Microsoft Word is the most popular word processing software in the world.) This tip (13812) applies to Microsoft Word 2007, 2010, 2013, 2016, 2019, and 2021.

Learning Made Easy! Quickly teach yourself how to format, publish, and share your content using Word 2021 or Microsoft 365. With Step by Step, you set the pace, building and practicing the skills you need, just when you need them! Check out Microsoft Word Step by Step today!
Ever want to add page numbers to your document? Word allows you to control many aspects of page numbering. Here's how to ...
Discover MoreWord allows you to insert dynamic page numbers within your document. With some page number formatting, though, it is ...
Discover MoreWant to print your document only on odd-numbered pages in a printout? There are a couple of things you can try, as ...
Discover MoreFREE SERVICE: Get tips like this every week in WordTips, a free productivity newsletter. Enter your address and click "Subscribe."
There are currently no comments for this tip. (Be the first to leave your comment—just use the simple form above!)
Got a version of Word that uses the ribbon interface (Word 2007 or later)? This site is for you! If you use an earlier version of Word, visit our WordTips site focusing on the menu interface.
Visit the WordTips channel on YouTube

FREE SERVICE: Get tips like this every week in WordTips, a free productivity newsletter. Enter your address and click "Subscribe."
Copyright © 2026 Sharon Parq Associates, Inc.
Comments