Please Note: This article is written for users of the following Microsoft Word versions: 2007, 2010, 2013, 2016, 2019, and 2021. If you are using an earlier version (Word 2003 or earlier), this tip may not work for you. For a version of this tip written specifically for earlier versions of Word, click here: Understanding the Gutter Margin.
When you design how your printed document is going to look, you need to consider whether you will be working with a facing-pages layout or a single-sheet layout. A facing-pages layout is used when you intend on printing on both sides of a sheet of paper, whereas a single-sheet layout means you intend on printing on only a single side of the paper.
If you are working with a facing-pages layout, the gutter margin comes into play. The gutter margin is a typographical term used to designate an additional margin added to a facing-pages layout to compensate for the part of the paper made unusable by the binding process. The gutter margin is on the very inside of both pages.
If you are working with a single-sheet layout, the gutter margin isn't that critical, but Word still allows you to set it, if you desire. In this layout scenario, the gutter margin is typically the area where you might three-hole punch your paper. Word allows you to specify a gutter margin at either the left or top edges of the page, provided you are using a single-sheet layout.
To set the gutter margin in Word, you follow these steps:
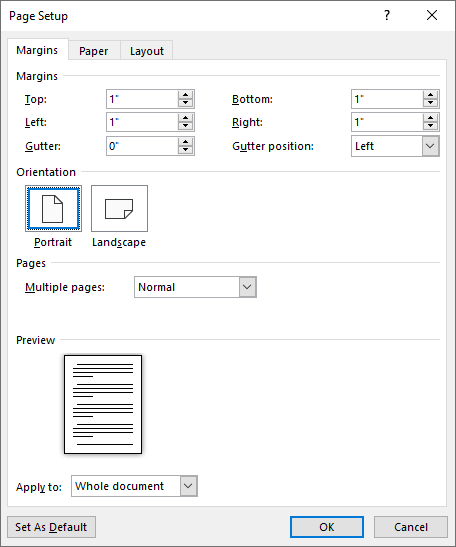
Figure 1. The Margins tab of the Page Setup dialog box.
WordTips is your source for cost-effective Microsoft Word training. (Microsoft Word is the most popular word processing software in the world.) This tip (9037) applies to Microsoft Word 2007, 2010, 2013, 2016, 2019, and 2021. You can find a version of this tip for the older menu interface of Word here: Understanding the Gutter Margin.

Do More in Less Time! An easy-to-understand guide to the more advanced features available in the Microsoft 365 version of Word. Enhance the quality of your documents and boost productivity in any field with this in-depth resource. Complete your Word-related tasks more efficiently as you unlock lesser-known tools and learn to quickly access the features you need. Check out Microsoft 365 Word For Professionals For Dummies today!
Ever want to add page numbers to your document? Word allows you to control many aspects of page numbering. Here's how to ...
Discover MoreDo you need to have your document fit within a certain number of pages? This can be close to impossible to do within ...
Discover MoreWant to print your document only on odd-numbered pages in a printout? There are a couple of things you can try, as ...
Discover MoreFREE SERVICE: Get tips like this every week in WordTips, a free productivity newsletter. Enter your address and click "Subscribe."
2022-01-26 18:23:20
paul jackson
I was working with a document which had a gutter for the publication. Now it seems I have an issue with the margins of anything I try to do, as if everything starts with a gutter. Lines end up off the page to the right. I cannot get the cursor to the left margin. I've tried everything I've found on the internet about changing margins, changing styles, setting defaults, etc. using o.o in the gutter size doesn't change anything.
i work with publisher and Office Pro Plus 2019. I can somehow manipulate the margin and text placement in Publisher, but not in Word. If in Word I move the margin settings at the top--all the text moves also.
figure
Got a version of Word that uses the ribbon interface (Word 2007 or later)? This site is for you! If you use an earlier version of Word, visit our WordTips site focusing on the menu interface.
Visit the WordTips channel on YouTube

FREE SERVICE: Get tips like this every week in WordTips, a free productivity newsletter. Enter your address and click "Subscribe."
Copyright © 2026 Sharon Parq Associates, Inc.
 Please Note:
This article is written for users of the following Microsoft Word versions: 2007, 2010, 2013, 2016, 2019, and 2021. If you are using an earlier version (Word 2003 or earlier), this tip may not work for you. For a version of this tip written specifically for earlier versions of Word, click here:
Please Note:
This article is written for users of the following Microsoft Word versions: 2007, 2010, 2013, 2016, 2019, and 2021. If you are using an earlier version (Word 2003 or earlier), this tip may not work for you. For a version of this tip written specifically for earlier versions of Word, click here:
Comments