Written by Allen Wyatt (last updated February 1, 2025)
This tip applies to Word 2007, 2010, 2013, 2016, 2019, 2021, 2024, and Word in Microsoft 365
Richard is trying to set up a custom paper size in Word. He needs a paper size that is exactly 7" x 10". Whenever he does this, however, Word automatically changes his paper size to JIS B5, which is 7.16" x 10.12". This is frustrating, and Richard wonders how he can get the precise paper size he needs.
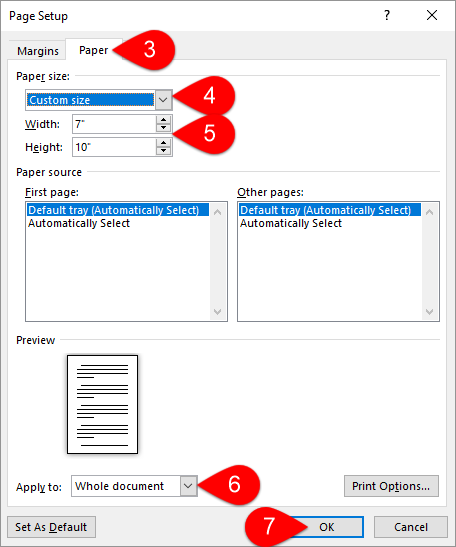
Let's look at theory first. The way that it is supposed to work in Word is that you can specify just about any paper size you want:

Figure 1. The Paper tab of the Page Setup dialog box.
At this point you should be able to save your document, and the next time you work with the document, the margins remain the same as you set them.
Noticed I started out by saying that this is theory. That is because your margins can be affected by other settings in Word. The biggest culprit? Your printer driver. If your printer driver won't handle the size of paper you specify, Word may helpfully adjust your page size to something the printer can handle. If the page size you choose is too far beyond what the printer can handle, you might see an error message or some notification, but if the size difference is small (as in Richard's case), Word just makes the change for you.
If you find yourself in this situation, you might try a macro to "undo" any automatic change made by Word. Here's a simple one:
Sub Create7x10Page()
    With Selection.PageSetup
        .PageWidth = InchesToPoints(7)
        .PageHeight = InchesToPoints(10)
    End With
End Sub
Run this when you first open the document, and things should be back to what you expect.
To me, the better long-term solution is to use a printer driver that matches the output device you will be using, and make sure that the output device will work at the size you want. A good choice is to choose a printer driver that creates PDFs instead of physically printed paper. PDFs are very flexible on margins, and you may notice your problem disappear entirely. If your document is destined for another source (such as a printing firm or third-party), check with them for the proper printer driver that will match their equipment.
WordTips is your source for cost-effective Microsoft Word training. (Microsoft Word is the most popular word processing software in the world.) This tip (13569) applies to Microsoft Word 2007, 2010, 2013, 2016, 2019, 2021, 2024, and Word in Microsoft 365.

The First and Last Word on Word! Bestselling For Dummies author Dan Gookin puts his usual fun and friendly candor back to work to show you how to navigate Word 2019. Spend more time working and less time trying to figure it all out! Check out Word 2019 For Dummies today!
When you allow Word to naturally flow your text through a document, you may find that the text on each page ends at a ...
Discover MoreDo you need to add a line to your document that indicates where a signature should be made? If you don't want that line ...
Discover MoreIf you find that you cannot set the margins in a document, chances are good that it is due to document corruption. Here's ...
Discover MoreFREE SERVICE: Get tips like this every week in WordTips, a free productivity newsletter. Enter your address and click "Subscribe."
There are currently no comments for this tip. (Be the first to leave your comment—just use the simple form above!)
Got a version of Word that uses the ribbon interface (Word 2007 or later)? This site is for you! If you use an earlier version of Word, visit our WordTips site focusing on the menu interface.
Visit the WordTips channel on YouTube
FREE SERVICE: Get tips like this every week in WordTips, a free productivity newsletter. Enter your address and click "Subscribe."
Copyright © 2026 Sharon Parq Associates, Inc.
Comments