Indexing a large technical book went well until Pierre wanted to have a fourth-level entry. Three levels { XE "Abel:Baker:Charlie" } worked perfectly, with Charlie below and inset from Baker, etc. But, on entering another sub-entry level, as in { XE "Abel:Baker:Charlie:Delta" }, the top three appeared nicely in the index, but Delta was in a much larger font. Pierre wonders how to fix this.
How entries appear in an index is controlled by built-in styles in Word. These styles should be applied automatically by Word when you generate the index. The styles have the names Index 1 through Index 9, and to control how the index appears, all you need to do is modify the styles of however many index levels you need.
In Pierre's case—assuming he is only using up to four index levels—he would need to make his style changes to Index 1, Index 2, Index 3, and Index 4. If the first three index levels already appear as you want them, then you only need to modify the Index 4 style.
The problem is, in Word these days you would never know that the index was formatting using the styles Index 1 through Index 9. The reason is because these styles are normally hidden in the Style pane. To see how the styles are used, follow these steps:
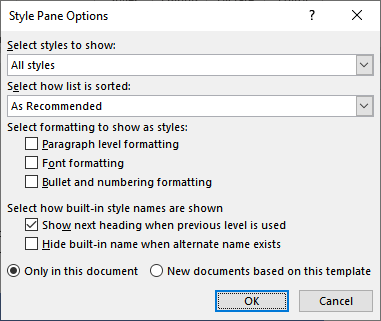
Figure 1. The Style Pane Options dialog box.
That's it; you should now be able to see the Index 1 through Index 9 styles listed in the Styles pane. And, because you performed step 2, you should see that the Index 1 style is selected (This presumes, of course, that the first entry in your index is a first-level entry.)
You should note that step 5 is important; it is the only way I've found to display the styles used in an index. You might think you could choose one of the other options, such as In Use or In Current Document, and it would display the index styles. However, testing shows that these options won't display them, even with the styles actually in use in an index in your document.
Once the styles are displayed, you can use the normal steps to modify a style and get whatever level (such as level 4) looking just the way you want.
WordTips is your source for cost-effective Microsoft Word training. (Microsoft Word is the most popular word processing software in the world.) This tip (13392) applies to Microsoft Word 2007, 2010, 2013, 2016, 2019, and 2021.

Learning Made Easy! Quickly teach yourself how to format, publish, and share your content using Word 2021 or Microsoft 365. With Step by Step, you set the pace, building and practicing the skills you need, just when you need them! Check out Microsoft Word Step by Step today!
Putting together an index for your documents can be challenging, but Word provides some great tools to make the task ...
Discover MoreWord provides many options for creating indexes. One option allows you to specify that the index contain only entries ...
Discover MoreAfter you get your document ready for indexing by inserting index fields throughout it, you may want to index only a ...
Discover MoreFREE SERVICE: Get tips like this every week in WordTips, a free productivity newsletter. Enter your address and click "Subscribe."
There are currently no comments for this tip. (Be the first to leave your comment—just use the simple form above!)
Got a version of Word that uses the ribbon interface (Word 2007 or later)? This site is for you! If you use an earlier version of Word, visit our WordTips site focusing on the menu interface.
Visit the WordTips channel on YouTube

FREE SERVICE: Get tips like this every week in WordTips, a free productivity newsletter. Enter your address and click "Subscribe."
Copyright © 2026 Sharon Parq Associates, Inc.
Comments