Timothy always encourages using Show/Hide to reveal non-printing characters. However, he finds it difficult to distinguish the space glyph from a hyphen. He knows he can use the Word Options dialog box to choose which marks to always show on the screen. That's not as quick a toggle as Ctrl+Shift+8, however. Timothy wonders if there is a way to never show certain non-printing characters such as the space?
The short answer is no, there isn't a way to do this. However, there are workarounds you can try.
First of all, display the Word Options dialog box displaying the File tab of the ribbon and clicking Options. (If you are using Word 2007, click the Office button and then click Word Options.) At the left side of the dialog box, click Display. (See Figure 1.)
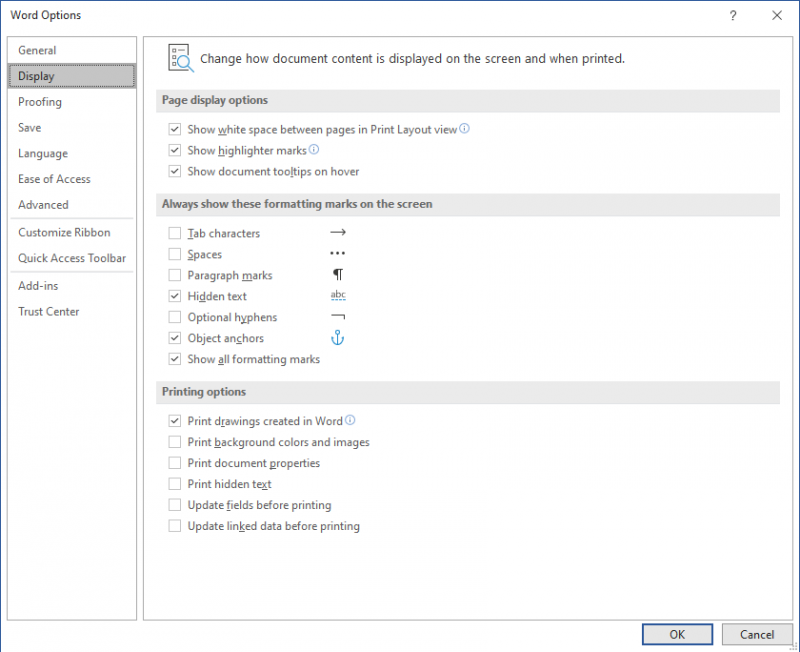
Figure 1. The Display options of the Word Options dialog box.
The part you want to pay attention to is in the middle of the dialog box, under the heading "Always show these formatting marks on the screen." Notice that there are six check boxes under this heading, with the last one being "Show all formatting marks."
It is this last check box that is controlled by the Ctrl+Shift+8 shortcut. Technically, the Ctrl+Shift+8 shortcut is a quick way to toggle the Show/Hide tool on the Home tab of the ribbon, and it is that tool that controls this check box.
The other five check boxes are used to indicate which non-printing characters you want displayed all the time, regardless of the state of the Show/Hide tool. In other words, the settings in the first five check boxes only have meaning if the last check box is turned off.
What does this portend as a workaround for Timothy's case? It is possible to turn on all of the first five check boxes, except the one for Spaces, and he will see what he wants on-screen, as long as the last check box is cleared. The moment, though, that the last check box is selected (or the Show/Hide tool turned on), then Timothy will see spaces be marked on-screen with the glyph he finds confusing. Turn off Show/Hide, and Timothy will again see spaces be unmarked, and all the remaining non-printing characters displayed.
If you want a workaround that essentially replaces what Ctrl+Shift+8 does, you can only accomplish it with a macro. The following will do:
Sub SetDisplayMarks()
    With ActiveWindow.View
        If .ShowTabs Then
            .ShowTabs = False
            .ShowSpaces = False
            .ShowParagraphs = False
            .ShowHyphens = False
            .ShowHiddenText = False
            .ShowObjectAnchors = False
            .ShowAll = False
        Else
            .ShowTabs = True
            .ShowSpaces = False
            .ShowParagraphs = True
            .ShowHyphens = True
            .ShowHiddenText = True
            .ShowObjectAnchors = True
            .ShowAll = False
        End If
    End With
End Sub
The macro uses the setting of the .ShowTabs property to determine if marks are displayed or not. That way the macro can function as a toggle—it will turn on or off Timothy's desired settings each time it is run.
The next step, of course, is to assign the macro to the Ctrl+Shift+8 shortcut key, thereby overriding the normal behavior of the shortcut, which is to toggle the .ShowAll property. Here are the steps to set the shortcut key:
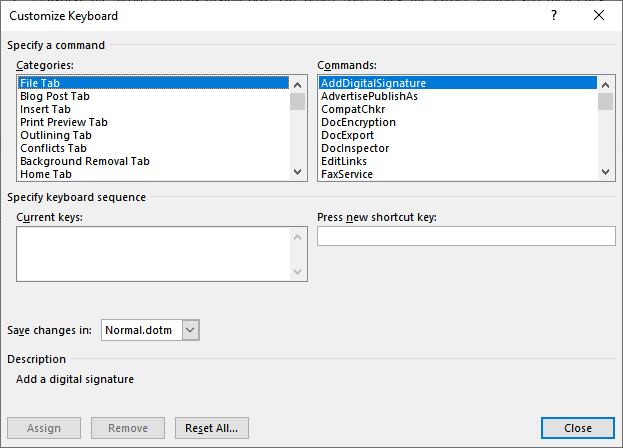
Figure 2. The Customize Keyboard dialog box.
That's it. The Ctrl+Shift+8 shortcut will now run the macro and act as a toggle to satisfy Timothy's needs for displaying non-printing characters.
Note:
WordTips is your source for cost-effective Microsoft Word training. (Microsoft Word is the most popular word processing software in the world.) This tip (13321) applies to Microsoft Word 2007, 2010, 2013, 2016, 2019, 2021, 2024, and Word in Microsoft 365.

Learning Made Easy! Quickly teach yourself how to format, publish, and share your content using Word 2021 or Microsoft 365. With Step by Step, you set the pace, building and practicing the skills you need, just when you need them! Check out Microsoft Word Step by Step today!
Once you are done formatting your document, you may want to make changes to part of that formatting without messing up ...
Discover MoreYou can highlight words and phrases in your document, much the same as you can mark printed words and phrases with a ...
Discover MoreScientific writing often involves the use of special symbols, such as the plus/minus symbol. If you want to align these ...
Discover MoreFREE SERVICE: Get tips like this every week in WordTips, a free productivity newsletter. Enter your address and click "Subscribe."
2025-08-15 10:41:46
Timothy J. McGowan
Excellent! Just what this brain needed. Thanks, Allen!
Got a version of Word that uses the ribbon interface (Word 2007 or later)? This site is for you! If you use an earlier version of Word, visit our WordTips site focusing on the menu interface.
Visit the WordTips channel on YouTube

FREE SERVICE: Get tips like this every week in WordTips, a free productivity newsletter. Enter your address and click "Subscribe."
Copyright © 2026 Sharon Parq Associates, Inc.
Comments