When Judith finishes a part of a report, she justifies the body of the text to signal assistants that she has made all the final corrections in that part. However, in a few places (such as at the end of a section) Word strings out the last line of the last paragraph all across the page. Judith wonders why this is happening.
In all likelihood, Judith is justifying the body of the text by selecting it and clicking the Justify control in the Paragraph group on the Home tab of the ribbon. The same formatting can be applied by simply pressing Ctrl+J. This may lead to the type of effect shown here. (See Figure 1.)
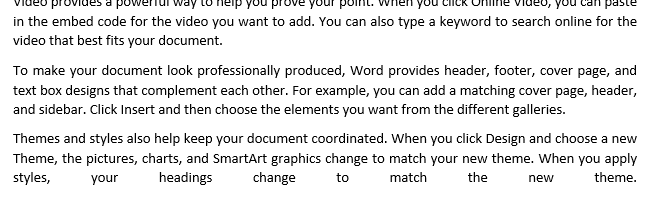
Figure 1. Incorrectly "strung out" text on the last line.
Long-time Word users know that it is problems like this that can best be solved by simply turning on the display of non-printing characters. You do this by displaying the Home tab of the ribbon and, in the Paragraph group, clicking the tool that looks like a pilcrow (a backwards P). (See Figure 2.)
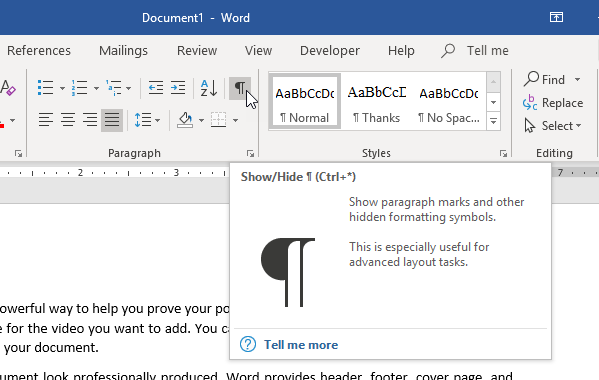
Figure 2. The Show/Hide tool on the Home tab of the ribbon.
When this is done with the document, your text will have additional characters visible. These indicate the non-printing characters, such as spaces, tabs, and various return characters. (See Figure 3.)
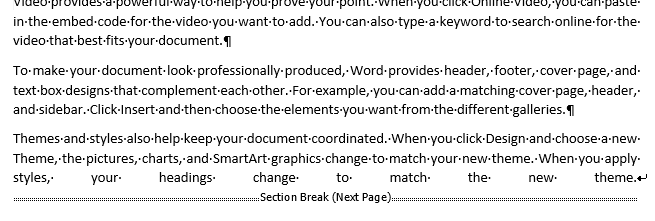
Figure 3. Text with the non-printing characters visible.
Note that at the end of the third paragraph, you can now see that there is a funny arrow just after the word "theme." This arrow indicates that someone at this point pressed Shift+Enter, thinking this would end the paragraph. This does so in some word processors, but not in Word. Instead, it inserts a new-line character, which is what the funny arrow indicates—the presence of the new-line character. When you justify a paragraph, Word justifies every line in that paragraph except the final line. The final line is indicated by the presence of a "hard return," which you can see at the end of the first and second paragraphs, indicated by the pilcrow character. In the case of the third paragraph, the hard return (which, again, signifies the true end of the paragraph) is after the section break—all the way on the next page!
To fix problems like this, there are few things you can try. Some people suggest pressing Tab at the end of the last line. Your text will then look like this. (See Figure 4.)
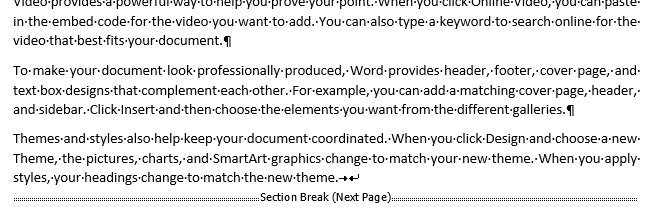
Figure 4. After pressing Tab at the end of the last line.
The line now looks proper but note that the line break is still there (the funny arrow) and is now preceded by a tab character (a right-pointing arrow). I prefer not to use the add-a-tab-character approach as it "muddies" the document even more. In addition, if the paragraph has tab stops set in it, you may not get the desired result—the last line may still stretch further than it should.
A better approach is to put the insertion point at the end of the last line (before the new-line character) and simply press the Delete key. This deletes the new-line and moves the section break up to the last line. Your last line then looks like it should. (See Figure 5.)
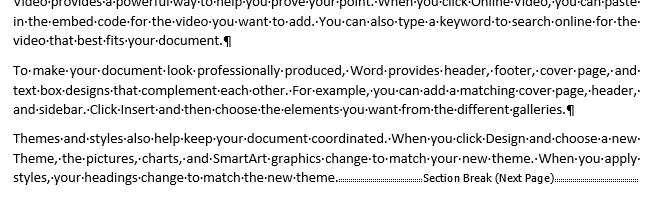
Figure 5. After deleting the new-line character.
Of course, at this point the true end-of-paragraph for this paragraph is still after the section break. It would be best for the break to occur after the end-of-paragraph. This raises an important point in editing—you should almost always insert your breaks at the beginning of a paragraph, not at the end of a paragraph. In this way you can avoid the problem of having the end-of-paragraph marker end up on a page different than the paragraph which it is ending.
To solve the problem in this particular case, just treat the section break as you would any other character:
You can tell that the section break is in the right place because it shows as being after the end-of-paragraph marker. (See Figure 6.)

Figure 6. The section break in the right place, after the end-of-paragraph marker.
If you want to, you can (at this point) turn off the display of the non-printing characters in your document. I suggest leaving them on, however. You'll find that once you learn what they mean and get used to seeing them on the screen, they end up saving you lots of time and headaches in situations like this and many other instances.
The approach I've outlined in this tip works great if you are working in a language that is read from left to right. If, however, you are working in a right-to-left language, then all bets are off and your approach to justification can be much more complex. (That, however, will need to wait for a different tip that I may need to write someday.)
WordTips is your source for cost-effective Microsoft Word training. (Microsoft Word is the most popular word processing software in the world.) This tip (6133) applies to Microsoft Word 2007, 2010, 2013, 2016, 2019, and 2021.

Create Custom Apps with VBA! Discover how to extend the capabilities of Office 365 applications with VBA programming. Written in clear terms and understandable language, the book includes systematic tutorials and contains both intermediate and advanced content for experienced VB developers. Designed to be comprehensive, the book addresses not just one Office application, but the entire Office suite. Check out Mastering VBA for Microsoft Office 365 today!
When adjusting the position of things on the Ruler (like tab stops), you can use the Alt key to get very precise in your ...
Discover MoreIf you turn explicit formatting on and off as you type, you may notice some quirky behavior in Word. This tip examines ...
Discover MoreDo you need to add a line to your document that indicates where a signature should be made? If you don't want that line ...
Discover MoreFREE SERVICE: Get tips like this every week in WordTips, a free productivity newsletter. Enter your address and click "Subscribe."
2025-12-24 07:49:42
Graham Shipley
This is the most impressive of the many comments I've read on this site. Although I am a seasoned copy-editor, I have learned many useful things from it. Congratulations, Allen!
2019-03-26 18:01:40
David Cohen
I'd suggest not using "justification" as a signal that she's done with her edit. Right justification often looks bad in a Word document. Leave that for an actual page layout application. Instead of justification, just change the color of the font to anything other than black. far more visible, and reversible with about 2 key strokes.
2019-03-23 17:45:32
Robert Sellars
To prevent all occurrences in a document of expanded characters at the end of a line that ends with SHIFT-RETURN go to File-Word Options-Advanced then scroll down to Layout options and tick the box "Don't expand character spaces on a line that ends with SHIFT-RETURN"
2019-03-23 11:14:47
Allen
Dave,
That is the way that I created the figures -- I just captured enough of the text to show what I was trying to illustrate. There is nothing cut off by the advertisement.
-Allen
2019-03-23 09:34:13
For some reason, the tops of paragraphs are missing or are overwritten as if a white, empty block of advertisement precedes and sits atop the paragraph. I am unable to uncover the overwritten text. Do you have any idea as to what is happening?
I use Firefox version 66.0 (64-bit).
{fig}
(see Figure 1 below)

Figure 1. wordribbon.tips.net-T006133.png
Got a version of Word that uses the ribbon interface (Word 2007 or later)? This site is for you! If you use an earlier version of Word, visit our WordTips site focusing on the menu interface.
Visit the WordTips channel on YouTube

FREE SERVICE: Get tips like this every week in WordTips, a free productivity newsletter. Enter your address and click "Subscribe."
Copyright © 2026 Sharon Parq Associates, Inc.
Comments